So - it was going to be a painting week, that is happening, but while the watercolours were drying I got distracted again so had another go. This is glue-and-fabric-dress mkII. Do need a better title for them. This time it is based on the late 1700s high-waisted open robe shown in Nancy Bradbury's Costume in Detail. The extant example, from the V&A, gives an idea of the style of dress, The bodice detail is different but the general shapes are similar. The Bradbury one is cut low ( very low!) and pinned edge to edge at the centre front, while the skirt has double inverted pleats and gathers to give the fullness at the back but remains open at the front to show the petticoat.

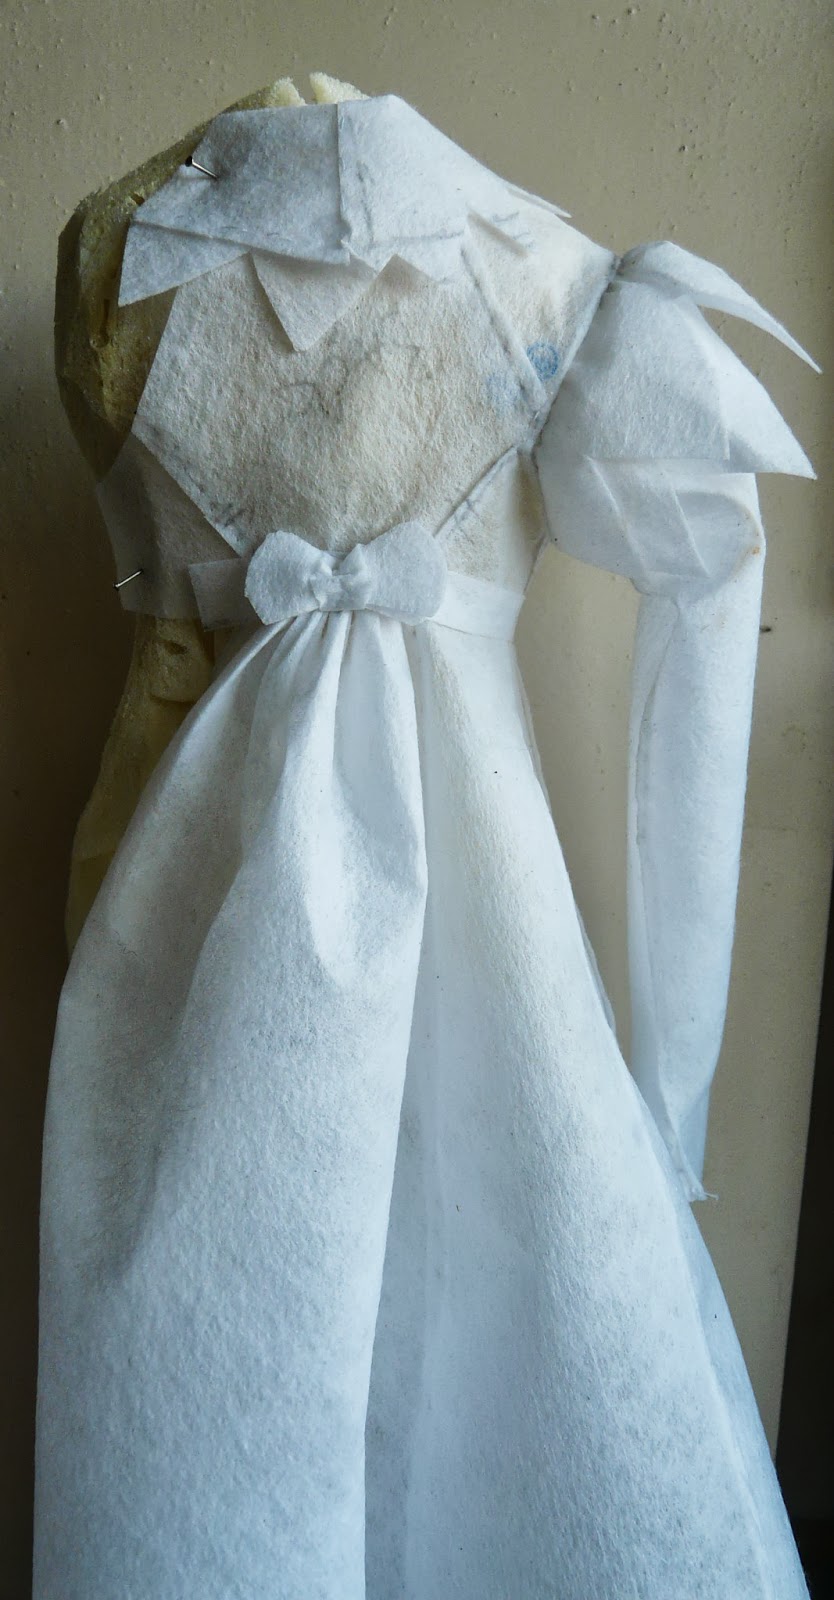
 The start point was the same as for the ghostly dress - a papier mache cast of a little body form perched on a stand. I took a pair of scissors to it and had narrowed the hips out of existence, there is a much cleaner line from shoulder to hem as a result. Frustratingly the first steps were regluing and then creating a simple petticoat- just a rectangle of muslin gathered just under the bust. The skirt was cut and pleats pinned in using the Bradbury measurements to approximate to the proportions (bodice=1 unit skirt length =5ish). Back to the dunk, drape and dry routine, thank goodness for elastic bands to hold it together as it sets! And yes my high tech set up is an upside down bowl for it to stand on, and a plastic biscuit tin to catch the drips.
 This was where I parted company with dress making procedure. Instead of making bodice and skirt separately and then mounting together, the bodice was built panel by panel up from the waist. The edges are still being turned under like seam allowances which did lead to problems, but working like this made fitting the sleeve on much easier. I could smear the glue, slide the sleeve head around without destroying too much this time. Should have put the cuffs on before assembling but.....
 This was close to the finish - the sleeves are on - looking a bit like Victorian insect specimens with the pins everywhere. All that is left are the shoulder pieces- they go from just above the bust over the shoulder and complete that distinctive diamond shape to the back. And then re gluing the inside to strengthen it. And adding another muslin petticoat inside the first - it was indecent (and a bit short) . And re gluing the skirt hem and turnings. and not dropping it. and not sitting on it (genuine accident not vengeful malice, yet)
 And (last one), of course the belt! I did try the tie at the front (dressing gown), did try with just the organza ribbon ( no clarity, looked slightly dirty against the white), the pink ribbon (too narrow). So we have the double layer of organza and satin.
Be grateful - having watched the BBC's Rococo programme this week with Clara the Rhino, I did try a tiny elephant as a brooch on the front. The tiny pink bead is sweet but does make me think of a nose. Ummm.
The muslin at the neck is temporary, preserving modesty again - these high/low dresses must have been seriously draughty. It looks 'right' and certainly stops the unfortunate Headless Horseman associations. I think I will declare it permanent! Hurrah!

As you can see the technique is still evolving. Working out unwanted creases and dents would be a useful skill, as would compressing seams and joins without leaving holes or clip marks. I do want to get artier with it as a process - more Wuthering Heights than Jane Austen as a expressive medium..... but she does look quite good striding purposefully across the window sill.
On a different note - so much for organising my working area. She is upstairs in the bay window making the most of the natural light for photographing her, I'm working in the back room watching Sherlock Holmes wrinkling his brow in deep thought while doing this. At my feet are my painting things ( painted an inch of the nice sofa as a protest against the vile weather) and the experimental hand sewing swag bag and contents are on the squidgy chair opposite. The Front Room is the work space. I begin to think that where ever I want to be becomes a designated work place. Well, the house was never meant to be tidy, was it?
Never underestimate the power of blogging! There is blue sky! If stays good over lunch then I might make it out to see round the windmill!