This week's effort was
meant to be light relief – I think you can guess what happened.
I picked an
iconic garment from the 1780s; the chemise a la Reine. You probably know the dress
even if the name is unfamiliar – think English country house portraits with
white fluffy dresses, frothy at the neck with big coloured sashes and
ribbons. The setting may be countryside, the lighting dramatic. Big
picture hats, and occasional dogs or children.
This had begun life as a 'gaulle' (robe a la gaule), a loosely fitted dress of layers of muslin usually worn with fichu and apron. It was picked up as an informal relaxed style by Marie Antoinette and popularised by her, she even sent examples to the Duchess of Devonshire and Mary Robinson in England. It became known as a chemise a la Reine, an insult - the Queen's underwear. This did not stop the dress becoming popular wear at Petit Trianon and amongst the fashionable classes. The queen was criticised for this - it was not suitable or appropriate for one of her status. Even the fabric was seen as unpatriotic, the expensive cotton muslin had to be imported at a time when the home grown silk industry was in decline.

The basic idea of the dress is very simple- think sundress with sleeves. It is a large tube gathered at waist, neck and sometimes inbetween, to fit. It has shoulder straps and sleeves which are gathered at various places. Some have flouncy necklines, some lace, while others are left plain. Lots of ribbons and large sash complete the look. For 'simple' garments some examples are extravagant and flamboyant expressions of wealth
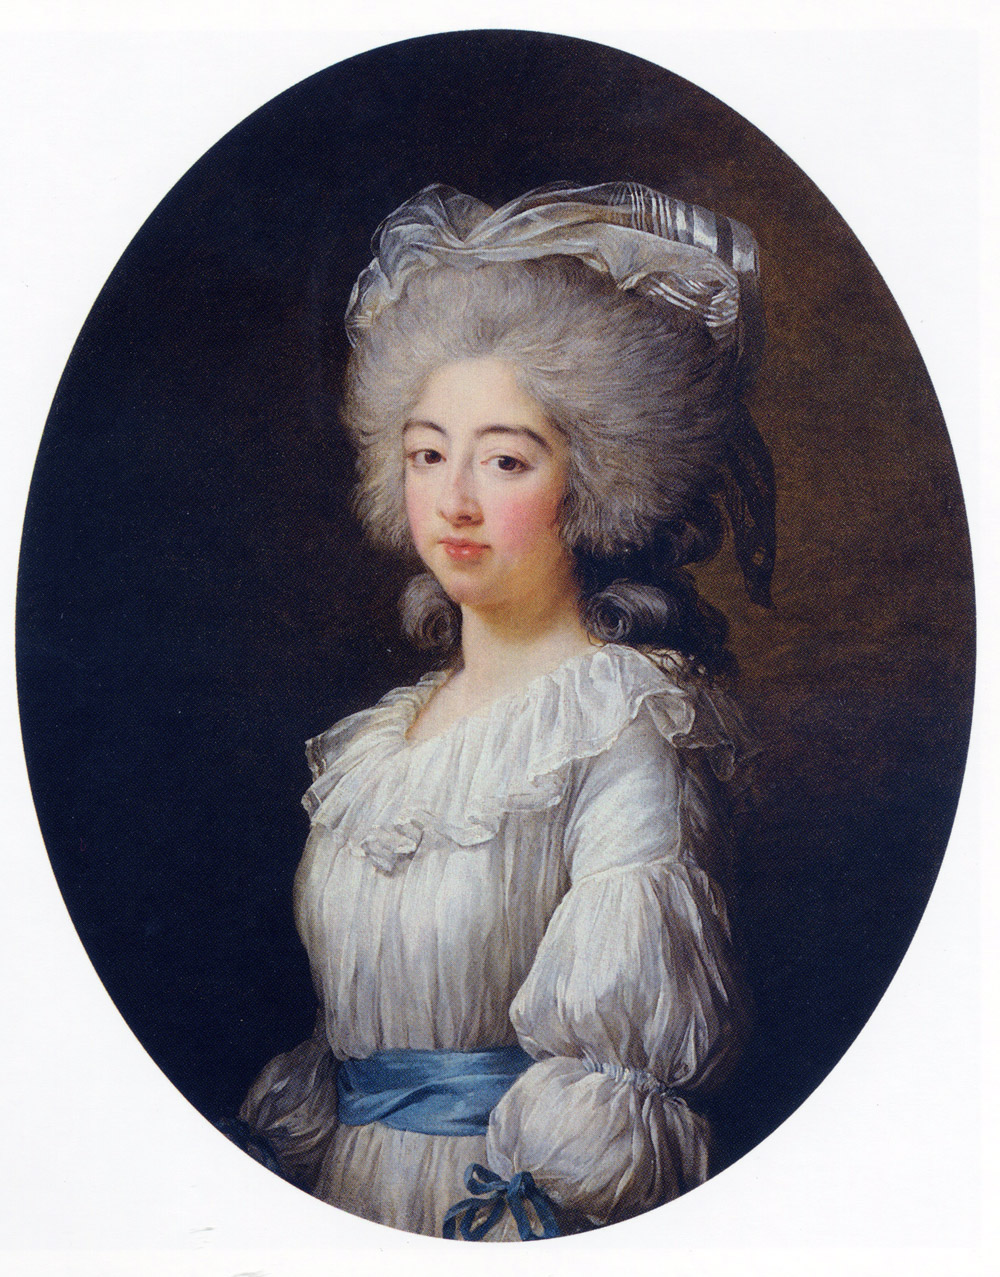
There were many examples to select from, Vigee LeBrun painted many of the grand ladies in the dress, remember the infamous one of Marie Antoinette?, but this is the one that appealed the most. – a rather detached looking French lady and I liked the sleeve details.
This portrait is of the Countess of Provence, Maria Giuseppina of Savoy (known as Marie Joséphine in France) dated 1782. (
Wikipedia is not flattering but in outline - she married Louis Stanislas- younger brother to Louis XVI. They escaped the violence in France and established a court in exile, and following the death of the Dauphin her husband was declared King Louis the XVIII, she died in Buckinghamshire in 1810!).
There are many blog sites describing the making of the chemise but the only pattern guide I have found is a diagram from Norah Waugh. Unable to print it out, I measured off the screen, (umm) and drew up a rough outline of the main parts with 'hopeful' if not aspirational measurements.
Norah Waugh's has 3 rows of gathering, the top neck edge and the 2 channels marked, Marie Josephine only has 2 rows on the body, the top of the sleeve has a tighter band (can not make out how this is done), and a lace collar. Could not see the bottom of the sleeves so prepared to make this up - as if the rest was incredibly accurate!
This an approximation of Waugh's outlines - I was able to cut the whole body out a single piece so the only seam is centre front. The circumference of the tube is 1.26m to fit a bust size of 43cm! The sleeve looks huge - 45cm wide and the top of the sleeve is flat, the cuff is curved, which feels odd. So far it looks easy, and quick. Time to get real - fell seams ( I did French) = 2 rows of stitching, rolled hems on every raw edge, each gather needs a casing = 2 rows of stitching, and it all adds up.
The muslin I had is a gentle yellow tone rather than white, quite nice quality, evenly woven without slubs or snags. Meant it looked nice as it unravelled.
Making up -
The back neck edge is gathered onto a fixed band of cotton
tape to give some stability. The front neck edge is folded to give the dip to the centre front and used as a channel for the first drawstrings- these run from the armhole forward, I made eyelets so that the ribbon 'strings' could come out to the front to be tied. The waist channel (5 mm cotton tape) was marked and stitched to the inside and the front seam closed upto Gwen's waist level. The remainder of the front opening was hemmed and folded under.
This was the body of the dress done. Next was the shoulder pieces, These were adapted to fit Gwen but the rounded 'serifs' top and bottom were kept - these gave a rounded transition from shoulder to front and back neck.


In the first image the sleeve is pinned in situ to get an idea of the space the strap has to fill, In the second the strap is drawn onto fabric and problem one is found - should the front be gathered right to the armhole or just to the edge of the shoulder piece? Opted for the second in the interests of reducing bulk. The bottom photo shows the sleeve coming up from below and attached to the strap lining piece. to the right is the front - seam done and the allowance folded upwards. The top part of the strap is already attached ( along blue line) and waiting to be flipped over to be edge stitched down onto the same seam line as the lining. This encloses all the nasty raw edges. Sounds like a headache? Not really, just takes some planning, fiddling and patience. The result works well, no raw edges inside or out to worry about.
Have you noticed problem 2? Forgot to reduce the top of the sleeve. Lesson - big, BIG stitches preferably in neon colours if ever you want to unpick on muslin. Having done some damage attempting to unpick the sleeve an executive decision was made - live with it, reduce the top sleeve width by other methods.

Sulking gently it was neck line time - and no lace to suit! The modern stuff was toothpaste white or just not long enough so.....

Introducing extant example from Manchester -take a look at this
site for fantastic firsthand details and images, This had a flouncy double frill at the neck, so cut on a curve rather than a straight gathered strip. This gobbles up huge amounts of fabric and is a pig and a half to hem. Nevermind. Bit of grit and a packet of biscuits ( plain and not greasy) and it was done. Done and then some - it is too much. And it is a nightdress. Hum. Not quite so bad with the waist drawn in but still..... problem 3.
Solution time.
Problem one sorted en route - only gathered the front neck edge on strings.

Problem 2 - needing to draw in the fullness at the top of the sleeve - smocking to the rescue. Did 2 rows of simple square smocking at the top of the arm ( mark a square and pull the opposite corners into the centre and secure. You get a four petalled flower on the stitch side and a square puff on the other. Just repeat.) Probably should have done 3 or 4 rows for a denser effect but they can be added at will.
Problem 3 - uber frilliness. The fault lay in fully opening the neck gather and stitching the frill along its length - 25cm worth. Solution was logical, less gathering . So unpicked the front,then gathered half of the neck edge and secured it. Re attached the frill taking 11cm off its length each side, neaten, and rejoice. The reduction in the amount of fabric in the frill has helped a lot.
All it needs is sleeve gathering channels - surface mounted muslin strips this time. I did experiment with more gathering rows but it became too congested - There is also the option of adding lace frills if it feels unfinished.
Washing time to get rid of the blue marker and then photoshoot! Done. (not done - see the following posts!)
Odd thoughts - in the photos it looks Edwardian.But so did the Manchester one. I think the proportions may be out - more hip and less bust required? The frill is too wide -compare to the portrait- volunteering to re-hem all of that on the bias? - next lifetime may be. Meantime out with the bum rolls. Could possibly just roll the hem again? NO.
Time for tea.
But maybe the length of lace I just found could do the neck line better........ These are just details the dress itself has worked well. There maybe an occasion to try the third row of gathering on the bust line in the future - but it is huge - the volume is immense - 3 or 4 lengths of fabric for full size! No wonder they were considered as frivolous expensive things.....

Stray thought -Just trawling through images with no idea of the stories and history behind the people shown, so do tend to see them just as pictures – more likely to assess painting style and dress than anything else. By finding out more about the sitters, these are now dresses worn by people- not sterile museum exhibits. I started feeling uncomfortable about seeing them entirely as artefacts particularly as so many came to violent ends- what they wore only a few years before became less important. It is a little relief that this lady survived the Terror- imagine if I'd picked the next portrait along - Princesse de Lamballe - Marie Josephine's sister.


 Was this wise to make? Ummm. It has tended to reinforce the problem areas and to confuse further. It has also highlighted the 'maternity' quality of the style. Poor Gwen does look as if there are only a few weeks to go! I hate the feeling of dissatisfaction with decisions made, even compromises should be happy ones.