Showing posts with label Museum of London. Show all posts

Thursday, 3 March 2016

Is there anyone in historical costume land who hasn;t  at least heard of Janet Arnold? 
Museum of London has some of the extant garments she worked from for the Patterns of Fashion series and has put a lot of information on line.

http://collections.museumoflondon.org.uk/online/group/21610.html


 I have always found this museum  very approachable and helpful, and they do a pretty thorough  photographic record once they get going.
 I am going to take the time to do more than browse a little - who knows the next inspiration may be lurking there.

Hope you find something of interest too!


Monday, 25 August 2014

bustle dress beginnings.


This about draping, drafting, fabric buying, sore feet and getting it cut out. Oh, and Gwen now has a bustle petticoat.
1885 by Mrs Christie of London.
Task- select and source the style and shapes relevant for the 1880s, drape it on the stand over all the underwear we've been making, draft this into patterns, make a toile. and fit it to ourselves. then Work out yardages, set a budget and go buying. The chosen fabrics are now cut out and mostly flat tacked onto calico, waiting to be made up!
Hermitage Museum
I went for a day dress based on this little petrol blue number in the Museum of London. Not the bodice front but the skirt - asymmetric layers, contrasting fabric textures, so lots of interest without shouting about it. The worrying thing is that it is not relying on embellishment for impact but on the fabrics and cut - nowhere to hide. What is good is that the front and back are balanced - there isn't a distinct front and back separation. The only problem is the front seems  intent on broadening the shoulders and bust to narrow the waist - I do not need added emphasis in this area, so went looking for a different frontage - Maria Fedorovna (Dowager Czarina at the time of the Russian Revolution and original recipient of the Faberge Easter eggs-) to the rescue. This was an evening ensemble = red underdress and beaded over gown. Not at all compatible but I liked the shape of the front!  When mashed together it just about works - something like this.
The whole was to be draped on the stand in medium calico - working directly onto the mannequin without a paper pattern. To break us in gently we began with the foundation skirt to cover the petticoat. It was supposed to be simple - use the petticoat pattern, allow for the extra bulk from all the frills, the idea is to cover the petticoat with minimum fuss and without squashing or losing the general shape.  And construct. And then remodel it when the waist fits but the bottom doesn't.

foundation skirt, draped apron and bustle
Very little of the skirt is going to be  visible - just some pleats at the bottom.  The velvet apron fits smoothly over the skirt so the same pattern shapes will be used.
Then it was onto the radical bit - the draped apron hanging from the right hip.  This was a fairly drastic  60" square  at the beginning- on the cross- with the top corner cut off to make a waist.  It is now shaped like a rough map of Africa. The front edge has to hang in folds and the back is pleated high over the bum. Just to make life fun that front edge appears to be rolled under so the folds come from behind. Happy hours of muttering, pinning, more muttering and it was done. pinned, tacked, and oops - the tacking affected the hang so start again.........
On top of this comes a bustle piece - just a rectangle for this and caught up on tapes ( rather like an Austrian blind). It should have been asymmetric too but looked most odd- not quite big or bold enough to look deliberate without giving me the lean of the drunken sailor.

pinching pulling and pinning, shaping the fabric around the form to match the photos. First pattern.
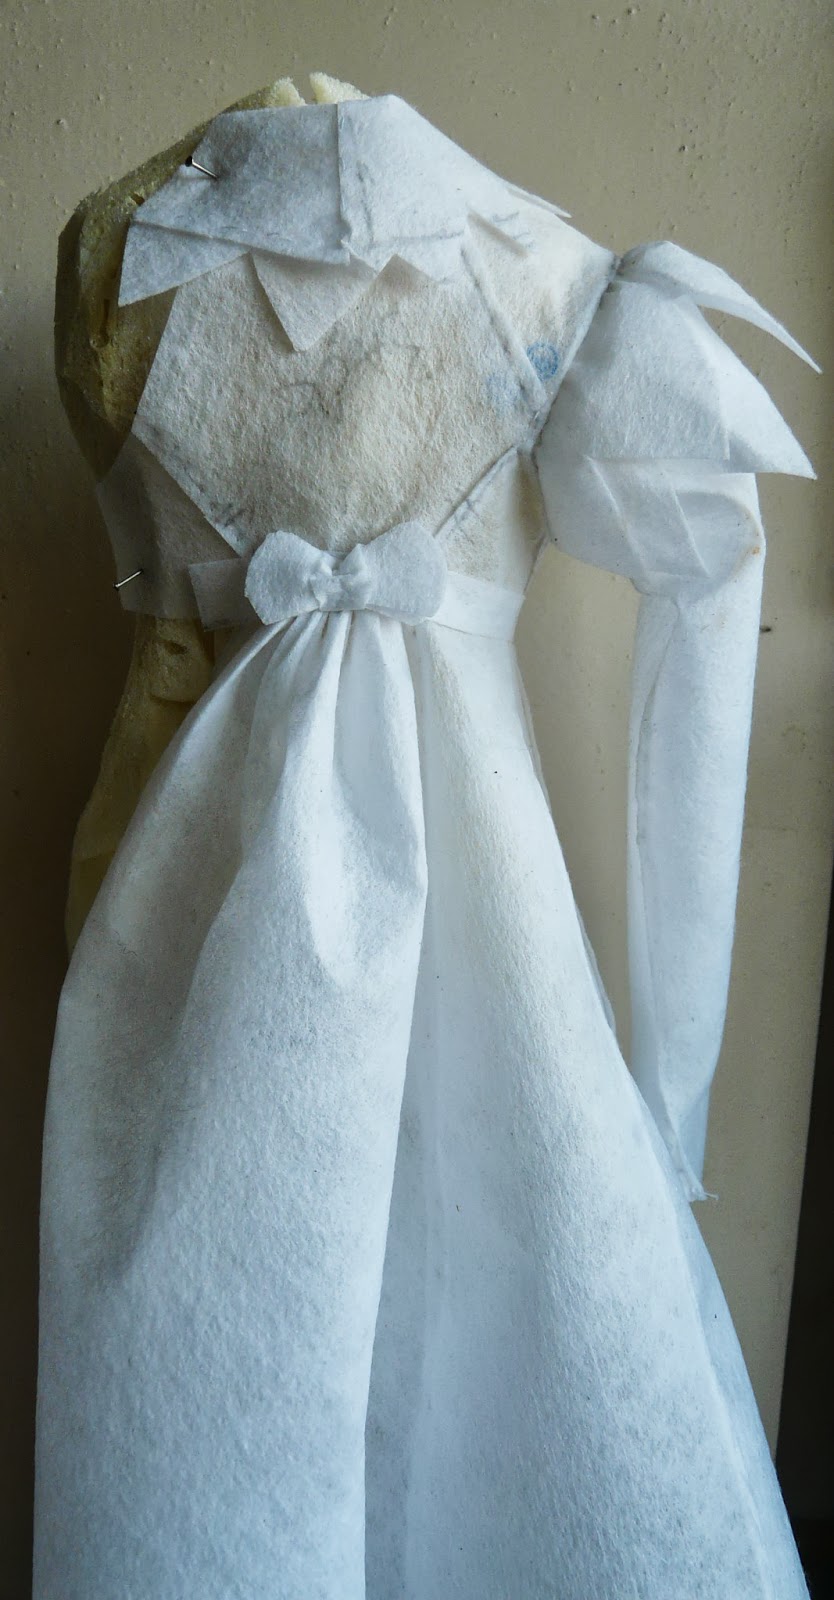
This was meant to be the easier bit because now came the bodice - starting with a vertical centre front, pinning above the bust line and to the side and then pinching the fabric to create front darts to shape it in front.  The back is separate pieces- centre start and carefully mark first seam running up to the armhole and gradually build on the next side back pieces making sure that the grain of each piece is vertical. Sleeves were drawn up  as a basic block pattern and the modified to give upper and under pieces and the bend at the elbow. The front shirty bit is mounted onto separate little panels which will meet edge to edge as a closure, a bit like an  C18th stomacher.

Once happily pinned together on the stand, the edges of each piece were marked, removed. cut down to an inch seam allowance and it was made up and fitted on me - Ah. lots to play with - the two darts  have changed to a seam running up to the shoulder and a dart. The side of the front has been split in two to raise it at the waist, and the shoulder seam moved. Redrawn and remade and refitted.

the early front with frothy bit, final back, sleeve, and the revised pattern
Once the whole was satisfactory, the patterns were drawn up and yardages worked out - about 15-16m in total, in 4 different fabrics! - something plain for the bodice, bustle and foundation skirt (was hoping for something like silk twill) something understatedly fancy for the side apron (a fine damask or brocade?) velvet for the flat apron and cuffs, plus a contrast for the fake shirt front - lawn or fine, slippy satin?

We went down to Goldhawk Road- next to Shepherds Bush in London- on a buying mission -

drawn en route to Hammersmith!
 lots of lovely stuff, especially silks, but trying to find 3 key fabrics each with interest and who work together without arguing  was definitely a mission. It would have been easy to be completely safe - but I could have stayed at home for that, and the Victorians were 'robust' in their ideas of colour and pattern. Bit disappointed not to find a plain brocade like a fine damask for the apron- or even a matching stripe would have done,  and not to be working with delicate tones of brown pink or sage green or muted blue - they proved impossible to match and the mixing was horrible. So came away with a muddy greeny yellow silk, kind of a Prussian blue  velvet, crinkle gauze in yellow and blue and plans for white lawn for the fake front. Umm. Could look like a railcrash or could work really well. The two tone gauze is the jam in the sandwich - it will tie the two strong colours together and hopefully really give the flatness of the velvet some bounce and enhance the sheen and colour shifts of the silk. Umm.


not the true colours - less greeny but sadly shiny


We came back late on Wednesday, cut out on Thursday, spent Friday cutting calico and flat tacking it to the silk to support and stabilise it. Far too organised, so I managed to stab myself and bleed all over a skirt panel, squeaks and drama - don't mind me - save the fabric! Never mind.


As for Gwen - couldn't leave her out - returned to Goldhawk and bought a piece of dodgy second choice fabric to make her a bustle gown and then spent part of Saturday making a petticoat to go underneath it. Need to choose a style now - the rejected House of Worth green thing with train? Umm

Other distractions -
M&S swiss rolls.
Wandering around London at dawn(ish) and dusk - saw the Tower of London poppies, Phyllida  Barlow at Tate Britain, Breakfast in Russell Square,  went to say hello to the Lion Hunt relief carvings in the British Museum, found a great little foody street market behind Westminster, wondered why my feet are sore.
They still have low flying pigeons in the new sanitised and shiny King's Cross.
So many pin pricks now feeling like a tea bag.
Don't leave car and house keys  in unzipped pockets when hill walking - result = blind panic, having to walk the hills twice,  collapsing in heap when found them without any energy left other than for a very feeble whoop and slight waving of limbs. ( they were right on top of hill of course - at least it was down hill from there)

Emsay Crag - now known as carkeys hill. Thank goodness didn't go up Great Whernside as I first planned!


Sunday, 20 April 2014

white pelisse


Of  lovely April days, invasion of cat,  white pelisse, and other many distractions. This is the blog as it was meant to be!


Last week-

The making of the white pelisse-

The sun has shone, the grass and weeds are happy. The bees buzz, there are butterflies, the garden is in its purple Spring phase.  I might have been distracted from costuming but I have been refining copies and interpretations of fashion plates to show the latest additions to Gwendoline's wardrobe as well as constructing 18th Century items for myself, so it has been busy.

I decided to use a clingfilm  base and made Gwendoline a masking tape shell. This was sectioned into pattern parts and then cut and flattened to create templates- and it worked! There is very little gaping, or bowing, or pinching – all without any fiddling, adjusting or cheating in any way. Umm, wow. Don't worry, it won't last.


This of course has lead to unwise decisions, there is no point having patterns that will only fit once, I wanted to find out how flexible this approach would  let me be – 1820s shapes- lower waist, broader shoulders, exaggerated sleeves and decoration. The fabric is curtain offcuts – trying to look like a heavy weave cotton or linen but I'm thinking that the closest this has come to nature was being sat on by an invading cat. ( I yelled, it went from snooze to panic in one move, did a complete circuit of the kitchen tops and windowsills at full pelt before escaping out the backdoor, fled through the hedge and off down the road.... leaving me with hairy fabric and chaos!)

 One idea arising from the gingham frock (last week) was using the smocking as a substitute/sculptural form of gathering, so set out to try a Juliet style sleeve with the repeated gathered bands down the arm. I also wanted to do more with pleating on the bodice. Even my favourite pelisse has gathers above and below the waistline. This fabric is quite stiff, it will bend and flex but goes clumpy and lumpy on curves and bulks up very quickly. The pleats in the back look good but have left the waist heavy, a wider waistband than originally planned might be needed or else the waistline is going to end up the thickest part of the whole garment!
last week's progress


Having faith in the pattern pieces makes such a difference – and saved so much time. No repeat fittings, unpicking and realigning. Getting from 'what shall I do now?' to having a believable bodice took less than an hour. The smocking took about the same. If I had a brain I would have done the smocking before making up and attaching the sleeve. But the sleeve was a bit of a guess, I knew I wanted more fullness at the back rather than the front, and that Pingu arms must be avoided. So I began with a basic gathered sleeve shape and made the curve at the top steeper and off centre . It did take some minor fiddling as the fabric protested about curves but it sits reasonably well, although many sins may be lost in the puffiness. And of course the piece I cut as a pattern is now firmly attached !.
 

This week-
Overall the pelisse has worked quite well- the good times did not last  The collar was a problem, it still tries to stick straight out rather than relaxing on the shoulder. Repeated washing did not help it, the fabric has a great deal of 'boing' - it tries to reset itself to flat each time. The radial  pin tucks have helped  a little and something to experiment with later on. Fears about the waist at the back were well founded, it is thick and seriously needs stiffening. Perhaps come at it from the end - put a bow on the  waistband cb so the bulk becomes deliberate ( see little blue example above).
  I do wish this stuff would make its mind up - it bends when I don't want it to and is too stiff when I want it to bend.

 As a relatively plain pelisse it is fine, the gathers in the sleeves give it more character and style. The gathering on the centre back  should perhaps only be attempted with finer cloth. Poor Gwen does not look terribly happy it. It does nothing for her figure - the extra bulk on the waist is not good , there is nothing voluptuous or even jelly-on-a-plate-ish about her to give definition, she ends up looking like a tree trunk. In the plates above, the waist is so narrow in comparison to the shoulder/ sleeve line, and  Gwen goes in just a little and out not a lot. I do wonder about making her a set of stays /padded bodice-  can't pull her in but might be able to push her out. ( I'm sure I thought this before sometime - a little set of transitions with bust enhancer?)

One moment - repeated washing?  Knowing how much I enjoy domestic chores  you will have realised this had to be an emergency. Well, first the 'sharps' needle I was using was very sharp and I hadn't noticed, second time was due to creating drawings in pastels. The washing has caused problems, now the lining is not happy at the armhole, causing the wrinkling seen above, a bit of unpick and pull  will hopefully sort it but this garment will remain untouched until the pastel phase ends.

Distractions-
1. Pastels- not a medium I usually use but... apart from the dust .....they are quite fun.


2. The fake book. - it started with a charming photo posted on facebook from the Australian Jane Austen Festival in Canberra.  In the general flow of very learned conversation we decided the photo looked like a book cover, couldn't resist it, and....  Last time I caught up it was either Mr D would emerge a la wet shirt, or she had  just shoved him in.  The drawing took  over a morning and then working out the editing  programme took about the same. (Gimp2 - a free download, complex but very good)


3. Gave up putting it off and set up a website- AARGH.
 
  Pastels were easy, Gimp is straightforward. If I had known how to do this it would have been simple! Used Google sites, free, supposed to be an easy site builder, self hosting, and well I'm googled for almost everything else. Looking back, once the mind shift was made, it was straightforward enough.  Over riding the templates was the most frustrating thing - typing in black, size 12 in default font to find it published in blue, boxed in a corner and.......
Hopefully all sorted, hopefully,.... Feeling very exposed at the present.  Be warned - will have to start experimenting with promoting it next....
 
 
And totally recommend
BBCs   "At Home With The Georgians: A Man's Place. 
So much more than important people and oh look at the houses. Well done to Amanda Vickery.


Sunday, 26 May 2013

regency pelisse.

So much needs to be done... including this.....
got as far as making a little half version trying out the ideas.  The general look is quite good but still....AAGH!!


museum of london 1820s.


Not sure about the back skirt yet, the seams feel a little arbitary- the stiffness of the fabric doesn't work for the back gathering- it doesn't have any drape at all. I think there should be more fabric in there  so will have to try again. As you can see the collar was entertaining and I still would like  more height at the back of the neck.

It was fairly straightforward - Janet Arnold was raided again for the basics and shapes of the pieces but historically accurate ?- don't think so. I am still working at the hand stitching - 12 per inch and straight is the current aim( impossible!) .   
I now have a full size pattern for a spencer which I will try out before making this up. With any luck some problems will be sorted - being me, I am sure I can find more!


scissor update - I know where they all are! - not currently sat on any of them.
Why my heavy cutting shears were in the medicine drawer in the kitchen  I have no idea......