Showing posts with label Ron Davis. Show all posts

Sunday, 10 August 2014

frock coat for Gwen and Lotherton Hall.

This has been a 'reading week' at the costume course - officially set aside for research.  I set aside part of the week for a revision of the frock coat, so Gwen now has a mad Rupert check coat - just needing a hem and buttoning. This was a challenge - more of one than I thought just matching the fabric! and certain things are not right.  But it looks okay from a distance. Especially in poor light.

Just like the waistcoat this was a mini redraft of the Ron Davis pattern. It was meant to help iron out problem areas and to practice the parts I had found difficult. Didn't work out that way. Oops.

the black and white is in the interests of general sanity
Problem one - cut the first coat skirts with the fabric on the vertical not horizontal  so had to cut a second pair. - this  had knock on effects - the rest of the pieces no longer fitted onto the remaining fabric. This was an old unfinished project so buying more of the cloth  was out. Look too closely and you realise that one back and one outer sleeve are  wrong, the pattern is back to front. It made matching the rest more painful but hopefully doesn't show too much.

This was a menace to make- though not in the expected places- pockets went in smoothly ( yes, they are workable pockets), facings and pad stitching happened uneventfully but everything else....!  The sequence of making still is a bit of an enigma - every option seemed to lead to more problems than solutions. And then I cut the wrong flappy bit when trimming out the excess seam allowances at the back of the arm hole. Unable to cut a new back piece it was a case of make the sleeve fit - which is why there are fewer pleats on the sleeve head than planned  and about a centimetre less shoulder.
The  other major adjustment was to go from sizing it to fit over the waistcoat to just fitting Gwen's torso - over a centimetre difference. This may not sound a lot but the coat was left  looking like a giant tube - only touching on the shoulder.  The major darts down from the collar were the solution- saw similar on some 1940 tailoring - think they look pretty good - or at least intentional.

in full glory


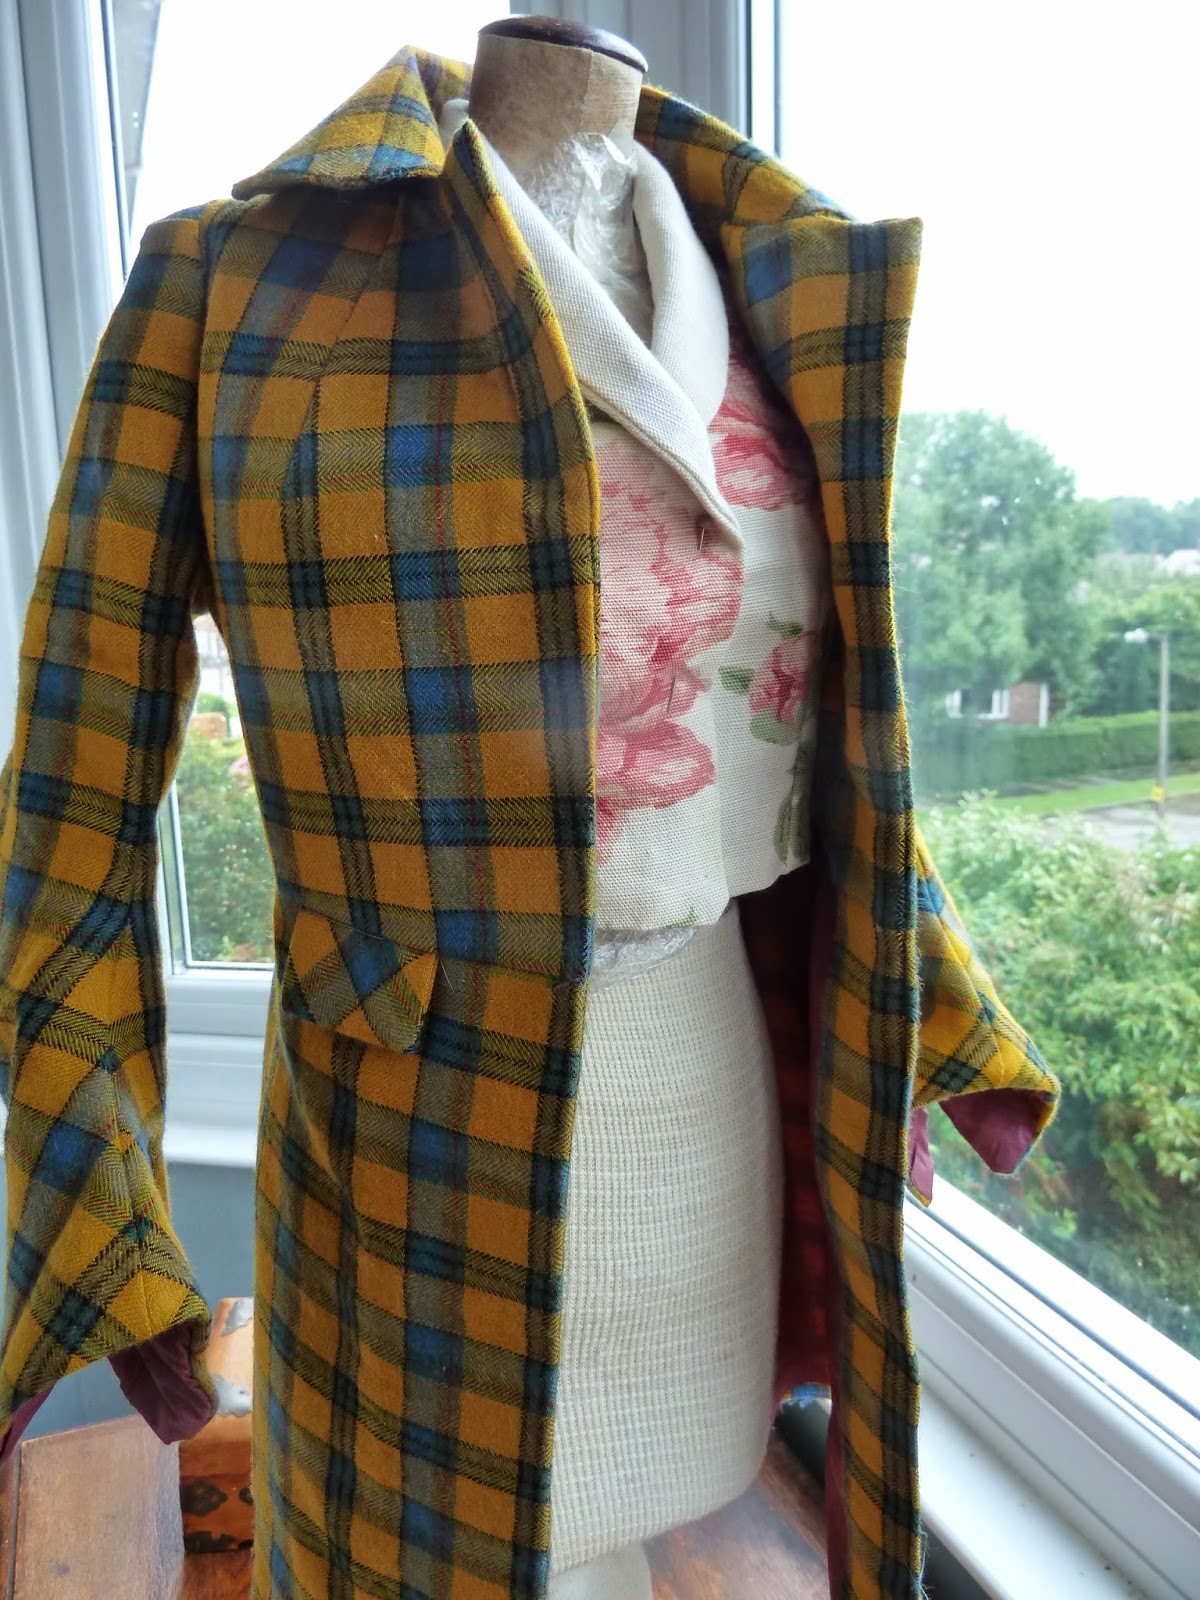
oddly good with the waistcoat?

This has left more queries and questions about construction methods - so probably another Gwen coat will have to be made to sort these out. But not yet.  Definitely not yet.


trouble is - quite like it inside out with the patched lining showing!

As for research......... did extensive practical research into the tides at Sandsend, the availability of icecream, and also tested the extreme steepness of the steps going up on top of the ness. Results were - 1. sea water is wet, 2. prefer Yordale's selection ( rhubarb and ginger or lemon curd), 3. very steep. That was Monday.

Tuesday's research was more relevant - tried out Leeds Museum, the art gallery, the markets, some very posh tailoring shops- don't know how they do it!, and the newish park and ride from Elland Road.  Conclusion -  my feet hurt, and 'interactive museum exhibition' means things to bash or buttons to press aimed at the under 5s, and got  a lot to learn about tailoring.  The trip also involved finding Fabworks fabric emporium in Dewsbury - worth a foraging trip, especially for suitings and  other things than quilter's cotton. Hurrah! Parked in a bramble.
Day 3 - proper job - went to Lotherton Hall just beyond Tadcaster. This is part of the Leeds Museums group- Edwardian house, with a costume gallery (says so on the map).
The house is better inside than out and the costume gallery was hosting 'Dressed for Battle', showing the influence of military styling on fashion.   Not bad at all, Regency dress next to an 1807 Leeds Volunteers tailcoat,  later Victorian and Edwardian  pieces against a Hussar jacket with a sprinkling of Alexander McQueen bits, First World War dresses and of course  1940s things, including a 'New Look' style suit. The blurb made it seem more extensive than it was but it was trying hard and was of interest. As in all museums there seems to be a passion for putting black clothes on display in unlit dark boxes - what is the point? Why display something if it can't be seen? ( worst offender presently is Leeds central) And what about seeing all the way round the objects ?  Finding their blog site could prove a useful reference-  http://www.leeds.gov.uk/museumsandgalleries/secretlivesofobjects/Pages/posts.aspx?BID=117.
 Will admit to spending  a happy half hour with the bird collection -
there were some fantastically  grumpy looking pigeons, a sunbathing condor and a very confused turaco. A diversion? - perhaps not - lots of subtle colour and pattern combinations to ponder on -  The deer were less inspirational - being very deery, and in the deer park not the bird garden. Didn't try the icecream - may have to return.

Were actually meant to be researching bustle dresses and looking for the next inspiration after that. Good job managed to fit it in round the edges.  Still like the grumpy birds best.


Sunday, 13 July 2014

1830s Waistcoat Week!

This was the week for waistcoating... in fact it took far less time than this, minimum button therapy and only 2 icecreams.

Recap - 4th week of the course at the  Northern College of Costume, working from Ron Davis' pattern for an 1830s single breasted, shawl collar waistcoat. Patterns were drafted and toiles fitted. This now is the waistcoat proper....
From the toile the modifications were pretty straightforward, just lengthen at the waist  by 2 1/2" at the front and 1" at the back.

The fabric is a grey blue with a dull metallic broken pattern woven in. It is a kind of twill weave and manages to have very little substance - it's like that annoying friend who only says 'I'll do whatever you want to do' or 'I'll have what ever you are having' and then looks miserable for the rest of the day. The lining is a dull, dark duck egg blue, heavier and more substantial but reverts to floss when it frays. I imagine that any natural fibre content was purely accidental.

The fabric was cut and flat lined with a light calico and interfaced on the front and collar pieces.
front - with pocket!
inside front - facing and lining
After flat tacking to mark the key lines assembly began. Initially it is very clear - pockets (perhaps I should admit to pocket traumas - working out how to set them on the slant and how to minimise bulk, distressingly simple once the penny had dropped),  sew the centre backs to make complete back units, attach collar piece to front, collar facing to front lining, and join fronts to backs at side seams.  From this point on life gets more complicated.


side seams done - looks like bat sign


 I have never yet found the definitive simple way of putting a waistcoat and lining together, it seems I am not alone. This time we  placed rightsides together and sewed  around the armholes, front edge and front hem line. This meant that it could  still be turned rightside out.  The top 1/3 of the front
edge was left open so that we could get in  to sew the front shoulder to the 2 backs on machine ( The front lining would be turned under on the shoulder seam to hide all of the raw edges later on). 
Think the bit in the middle
 is the shoulder seam!
The under collar's centre back  seam was joined  and then it was  sewn to the  neck line. The top parts of the collar were sewn at the centre back and then the
centre back joined and sewn
 in place along neck line
front edge seam completed all the way round.  It did get confusing but was nowhere as fiddly as I thought but..... nothing can ever be that easy - we had misread the pattern a little and the facing  did not match to the shoulder seam - emergency surgery was required and with the help of the new best friend, Fray Check, disaster was averted.  Closing the remaining shoulder
back inside - the horizontal seam is the collar edge
seams and closing the last part of the neck by hand calmed the tattered nerves a little and it was on to the final stages.

The back has two layers so the hem allowance was folded up inside ( thanks to interfacing for helping to create a nice firm edge to sew along)  and hand sewn closed. Then key hole style button holes. By hand. All of them.
 Ok, did cheat a little- zigzagged down each side, punched the round edge and fray checked it before hand stitching. These are something to be practiced, and practiced, and then practiced again.

 Add the buttons, eyelets and attach the tabs ( still need ties) and it is all done - one complete waistcoat.


Distractions- let out to play with power tools - refixing Pauline's eyelet punch to its tabletop - starting to look for work placements for after the course, and creating a monument to Wednesday to keep those malevolent midweek spirits appeased.
Thursday was a part day  so did I sit in the garden reading, rescue pets in the on line games, clean the house? Yes, but also made a  waistcoat for Gwen. Went from  drafting all the way through construction.  How sad. But that emergency surgery on the facing had rankled, I needed to work this through and make it happen. Understanding the mistake did make life easier. Instead of days it was completed that same evening apart from the tabs. The fit is good considering  Gwen is definitely female - the back waist is too large and I had to put in front darts but it has worked! Not bad for a 50p upholstery sample and some left over pink and dotty cotton.  May be a bit too much frill on that shirt?


Coats next.......


Sunday, 29 June 2014

gentleman's toiles

week II  - Northern College of Costume.  1830 Gentleman's outfit - toiles.


 Not a powerful lot to show for a challenging week. This was a preparation week - finishing drafting, drawing up, constructing toiles, a first fitting, and redrafting. In amongst this we also fitted a day of fly fronts and split fall samples. Add into that waistcoat collar and buttonhole  traumas plus a visit to the Quilting Museum to see the costume exhibition, and it seems amazing that it was only 5 days.
In fact it was so engaging that I forgot to take photos of most of it- again. Did get the camera out but not much further....

Main task of the week was finishing drafting and assembling the Cossack trousers, waistcoat and frockcoat for the 1830s gentleman's outfit.  We were working from the patterns set out by R I Davis in  Men's Seventeenth & Eighteenth Century Costume: Cut and Fashion   which are long lists of  dot to dot  coordinates and instructions with line diagrams. Should end up something like this from the V&A.
 Getting started was scary - there was maths involved but thankfully  a logic in the construction  which helped. The drafted patterns were then transferred to calico,  cut out, marked up and assembled into the toile (test garment).
pattern for the frock coat


brave soul!


  The deadline for this was Thursday when my poor victim was coming in for the first fitting. This should have been traumatic as most of the measurements were guess work.( the one we actually had was wrong!) but it went very well. Some parts  - neck lines - have to go out a bit, the shirt collar redone completely, some parts have to get longer - the waist of both trousers and waistcoat plus the coat hem, and  we are creating a side seam in the coat to give the torso more shape.  These adjustments have been made on the pattern pieces and some have been redrawn ready for  next week when we make up the trousers for real.  I'll show the fabric and details of the design and construction in the next post.


The other practical this week was samples for trouser fastenings; button flies and splitfalls.  Guest tutor Julia took us for this - we made calico and woollen cloth samples for the flies and just a calico for the splitfalls.
Flies seem to have an accepted standard layout but the splifalls seem to be more of a moveable feast, the principle remains but the number and placement of buttons, plackets, etc, can changeable. Where the photos  for the wool cloth flies and the splitfalls are I don't know! - just imagine them - like the example from Augusta Auctions, beautiful, precise, immaculate - I wish! The idea is that there are flaps that crossover and fasten with buttons behind the front panel that covers all the draughty bits and buttons up like a bib front. The 2 buttons either side at the waist are for braces.

example from Augusta Auctions

 The first revision is done - replacing the shirt collar was completed yesterday - lounging on the sofa, munching raspberries and cashews, watching a borrowed film- The Company of Strangers- worth a watch if you are after something intriguing and quiet rather than dramatic.