Showing posts with label Nancy Bradbury. Show all posts

Sunday, 30 March 2014

Regency shawl dress, Gwen shall go to the ball!

I claim no responsibility for this. A query was posted about using saris   to make a regency style ball gowns, they are a good source of fabric, richly decorated  and often excellent value. The responses cited the trend for dresses made out of the imported Kashmiri shawls in the early 1800s, something I'd known about but not really considered.
I just happened to be in a charity shop getting my breath back having cycled into town, it just happened to start raining so was reluctant to leave, there just happened to be a silk scarf of a sort of  Indian design, sort of the right size, so I bought it, and this happened......

Context first -  there are many pictorial and extant examples around, the shawls were huge so offered many options from the drapey Greek style chiton approach to using as a standard dress length of fabric.  The fabrics varied as well, from fine cotton and silks to heavier winter weight wool. The first blue dress was the one that began this little episode, from the Snowshill Wade collection dated 1815 and documented by Nancy Bradbury in "Costume in Detail". The second image is merely to show the volume of fabric and the ornate border of a shawl, the third is an 1810 dress from  Museo del Traje and  the blue print ensemble is  Empress Josephine's ( not entirely sure if this was made from shawl lengths or  fabric printed to look like it, one site is sure, another is not! but it has the same feel of using the imported pattern). They all make use of the borders and trims  especially around the hem and neck. The fashion plates show much the same  story but with more accessories, more ornament, layers of detail and pattern.
 
The original shawls were long rectangles with ornate ends but mine was a 30" silk-ish square with a printed border all the way round. A garment for me? No, remarkably draughty. A garment for the faithful Gwen. To the right the scarf is  folded into the centre and pinned at the shoulder to give a very basic drape. The challenge will be to stop it looking like a dressing gown. I like using the border  in the centre of an open dress but Gwen needs much more help and structure to give her shoulders, somewhere between the profiles of the  green and first red fashion plates.
 The dress is fairly simple, the only cutting was to take off the top border, This reduced the length and gave something to make the sleeves out of!
 
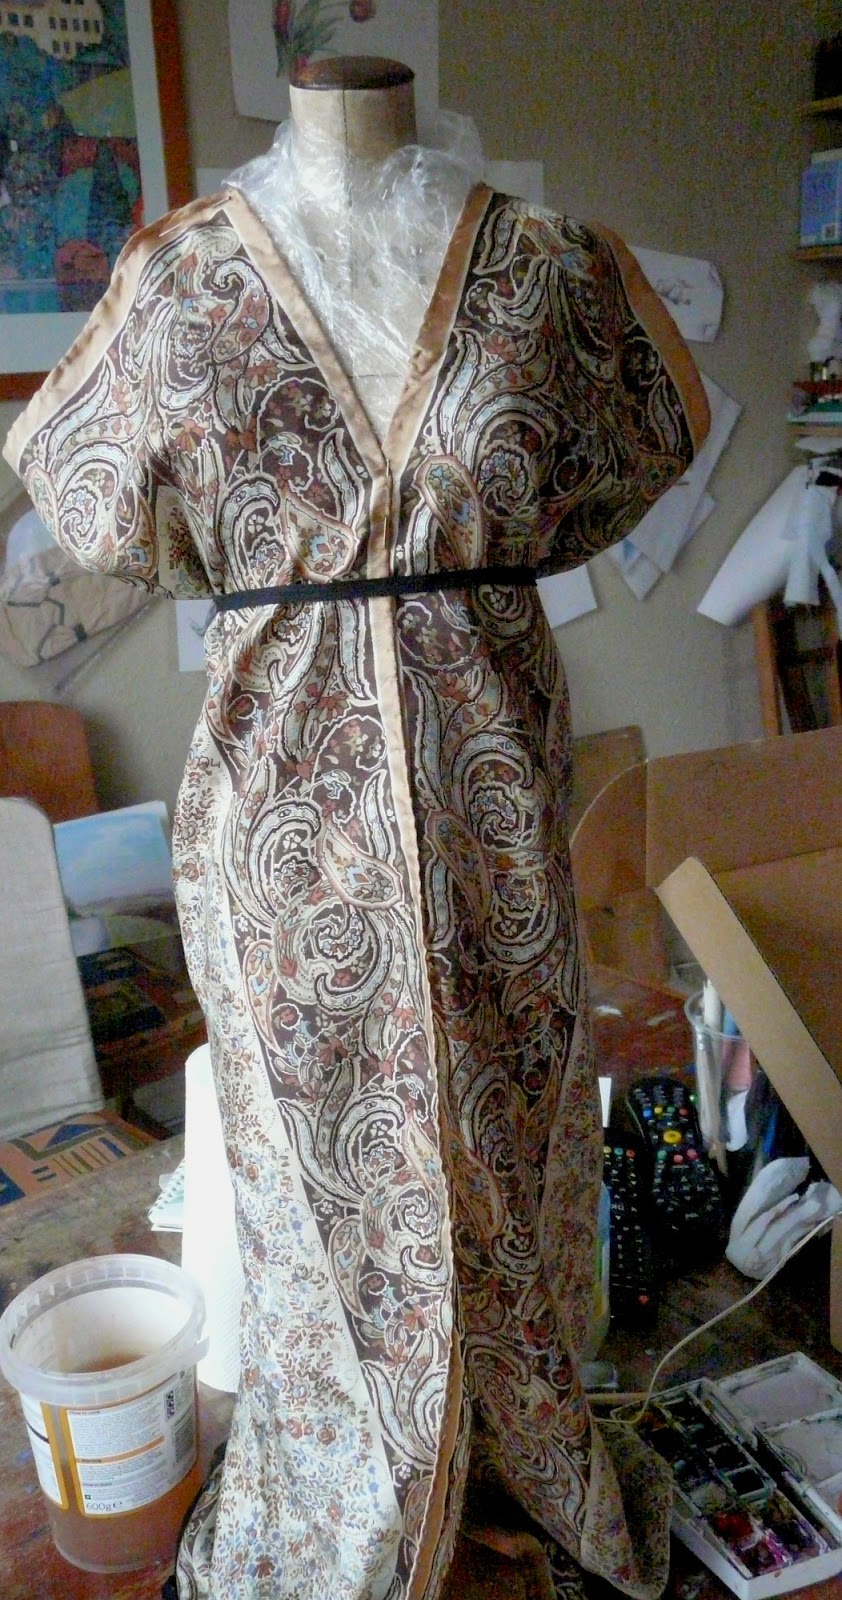
There are 2 rows of gathering to create the bodice, on the high waist line all the way round from border to border and at the centre back along the top edge. The front is joined at a point 3" down and the very top of the front border is pleated back onto itself to give the separation at the bodice.   Each sleeve is half of  the sacrificial top border, sewn into a tube for an inch and opened flat along the top of the dress and  attached. They are gathered at shoulder and cuff trying to give that extra breadth  across the top line. I did reserve some of the yellowy border to do the front trim but it has escaped at the moment, so a length of elderly bias binding is playing understudy for the photos. It gives better definition to the bust but is rather clumsy  tied at the back. If I can't find the renegade trim this is all I have left of the fabric to work with - wish me luck!
 
And the most important question of all - Does this make Gwen look less like Juno, athletic and wholesome, and more of a siren, has she achieved cleavage? 

Certainly like the wider shoulder, even if they had to have stuffing shoved (romantically) up the cover to stop the sleeve slipping off. The back is a bit too much, may be lose some gathering to the sides. For such a straight forward idea this has not ben easy. Getting one side to work was simple, getting the other to match was a pain. The fabric was lovely, to look at, but had no substance. It lost all shape and form unless it was on the model so that was how most of the sewing was done. If I was making this for real the seams would be taped and the bodice mounted onto a lining.  I must take a pattern from this and try with a more meaty fabric, with some adjustment this could become another Gwen wardrobe staple. At least it is her very first grown up ball gown. Not bad for £2.49  ( cheap date).

Some useful sites-  There are loads out there, but will there ever be enough time to read them all?
http://historicalclothinganduniforms.blogspot.co.uk/2012/03/not-only-shawlshawl-dresses-and-dresses.html
http://thedreamstress.com/2013/01/the-kashmiri-shawl-and-the-dress-made-of-kashmir-shawls/

http://www.fashion-era.com/regency_fashion.htm
http://www.marquise.de/en/index.html

Sunday, 2 March 2014

Princess line bustle dress 1

Spent months being quite tasteful, there just had to be a backlash coming. When I turn nasty I like to do it good and hard - luke warm just won't do. So....

stuck to the recurring theme of the neck to hem long lines and pleating into the seams, and even a bit of polonaising and went Victorian!  Instead of en ferreauing I have been princess lining, not  Watteau pleats but a bustle!  Nothing by halves. While nowhere as ornate or complex as this dress

 from the Met, it will be a fitted, bodice front opening  down to below the hips. From there the front  skirt will be fairly straight but the back will increase in volume over a bustle cage and finish in a small train. I hope.

New things to do, new mistakes to make, exciting. Risking taking and problem solving - okay, on a small scale but still fun.

Back to Janet Arnold and Nancy Bradbury for a start point, again they both looked at the same day dress from the Snowshill collection.   Brightest  boldest candy stripes-
there is lack of stripiness in the fabric stash but lurking in the bottom drawer is a nest of Hobbs pillowcases - still in their packaging - desperate to get out. ( Not mad, bought when sold off as old stock, nice dramatic patterns, tight woven cotton. Only survived this long because I'd forgotten them)  Totally inappropriate. GOOD.


The whole of this has been done on the model, no pattern pieces, just a lot of pins, muttering, tacking and then redoing. Pattern pieces might have been easier.  The back - six panels, each full length with the centre and side panels  having extra width  from about bum level downwards to make pleats for the bustle bit. There is extra length on the centre pieces as well, this excess gathers up  in the side seams to make the polonaise. Again I like the idea of the contrast - fitted sleek v volume drama.


The basic ideas worked very well, worryingly so. The skirt bustled quite effectively and even began to train. It could have been an inch or two longer but there are plenty of opportunities to trim and extend. Getting the false front in was a bit of a menace - maybe that should have been done first and the whole front assembled then put to the back. I ended up starting from the centre back seam and building the dress forward from there. As usual focussed on the fun bit - working out how the skirt bustle came together.  I haven't got this too tight at the waist - there should be an internal waist band to hold the bodice in place which will help. As this was done as an experiment there is no lining either which would have helped avoid the stretching and twisting in some parts of the back.
The front of the dress has a false front  with hook and eye fastening on the centre line. Fabric choice was interesting - there was some heavy black satin all lined up, or another pillowcase - same colours tighter designs- or plain green or.... and I chose this Indonesian cloth. It was late at night, but having tried it all the rest looked safe and predictable. Not a wise choice as it had to be interfaced before it would hold the opening. Sometimes I like it other times it is sink into deep despair but unless something drastic happens it will be staying.  The collar is of the same contrast fabric, as will be the cuffs. There should be pleated inserts along the hem  - giving weight and flare I suppose- they may end up green and blue.


The sleeves are more tailored and shaped than the previous ones - in 2 parts and cut with curving seams. The sleeve head seems very shallow.
I did try a mock up of these and we are back to Pingu wings, flapping in the breeze. These current ones are cut with a steeper curve  but are still a bit flappy. The 18thC ones had lead weights but I haven't seen any reference to similar tricks for this. 


This is still very much under construction - final fit, finishing and trimming to do, all the fiddly bits, but it is looking better than I expected. I have enjoyed using the mad fabric choices - it is unexpected and instead of sitting there primly  saying 'aren't I historical', something else is going on. I will  have to do some thing to the front edges - the transition jars- a length of black grosgrain ribbon came off the pillowcase when it was dismantled - could be very useful.
It is starting to remind me of Yinka Shonibare's fabulous work but without any claim to be discussing cross culture references etc.

I had hoped to be finished by today - excuses are rather thin - keep falling asleep but did take a day out to join in with the Woolly Bike project with Cassandra Kilbride.  We were doing a Viking inspired bike as part of the Yorkshire Festival celebration of  the Grand Depart of the Tour de France this summer.  Very silly - I crocheted curly waves and half a snake. Di stole the show with a longship saddle cover and beard for the handlebars. The final exhibition with all 10 creations will be worth seeing!

Sunday, 26 January 2014


So - it was going to be a painting week, that is happening, but while the watercolours were drying I got distracted again so had another go. This is glue-and-fabric-dress mkII. Do need a better title for them. This time it is based on the late 1700s high-waisted open robe shown in Nancy Bradbury's Costume in Detail. The extant example, from the V&A, gives an idea of the style of dress, The bodice detail is different but the general shapes are similar.  The Bradbury one is cut low ( very low!) and pinned edge to edge at the centre front, while the skirt has double inverted pleats and gathers to give the fullness at the back but remains open at the front to show the petticoat.

The start point was the same as for the ghostly dress - a papier mache cast of a little body form perched on a stand. I  took a pair of scissors to it and had narrowed the hips out of existence, there is a much cleaner line from shoulder to hem as a result.  Frustratingly the first steps were regluing and then creating a simple petticoat- just a rectangle of muslin gathered just under the bust. The skirt was cut and pleats pinned in using the Bradbury measurements to approximate to the proportions (bodice=1 unit skirt length =5ish). Back to the dunk, drape and dry routine, thank goodness for elastic bands to hold it together as it sets! And yes my high tech set up is an upside down bowl for it to stand on, and a plastic biscuit tin to catch the drips.
This was where I  parted company with dress making procedure. Instead of making bodice and skirt separately and then mounting together, the bodice was built panel by panel up from the waist.  The edges are still being turned under like seam allowances which did lead to problems, but working like this made fitting the sleeve on much easier. I could smear the glue, slide the sleeve head around without destroying too much this time. Should have put the cuffs on before assembling but.....

This was close  to the finish - the sleeves are on - looking a bit like Victorian insect specimens with the pins everywhere. All that is left are the shoulder pieces- they go from just above the bust over the shoulder and complete that distinctive diamond shape to the back. And then re gluing the inside to strengthen it. And adding another muslin petticoat inside the first - it was indecent (and a bit short) . And re gluing the skirt hem and turnings. and not dropping it. and not sitting on it (genuine accident not vengeful malice, yet)
And (last one), of course the belt! I did try the tie at the front (dressing gown), did try with just the organza ribbon ( no clarity, looked slightly dirty against the white), the pink ribbon (too narrow). So we have the double layer of organza and satin.
 Be grateful - having watched the BBC's Rococo programme this week with Clara the Rhino, I did try a tiny elephant as a brooch on the front. The tiny pink bead  is sweet but does make me think of a nose. Ummm. 
The muslin at the neck is temporary, preserving modesty again - these high/low dresses must have been seriously draughty. It looks 'right' and certainly stops the unfortunate Headless Horseman associations. I think I will declare it permanent! Hurrah!


  As you can see the technique is still evolving. Working out unwanted creases and dents would be a useful skill, as would  compressing seams and joins without leaving holes  or clip marks.  I do want to get artier with it as a process - more Wuthering Heights than Jane Austen as a expressive medium..... but she does look quite good striding purposefully across the window sill.

On a different note - so much for organising my working area. She is upstairs in the bay window  making the most of the natural light for photographing her, I'm working in the back room watching Sherlock Holmes wrinkling his brow in deep thought while doing this. At my feet are my painting things ( painted an inch of the nice sofa as a protest against the vile weather) and the experimental hand sewing swag bag and contents are on the squidgy chair opposite. The Front Room is the work space.   I begin to think that where ever I want to be becomes a designated work place.  Well, the house was never meant to be tidy, was it?
Never underestimate the power of blogging! There is blue sky! If stays good over lunch then I might make it out to see round the windmill!

Tuesday, 31 December 2013

Completed C18th costume - Gwen does Poldark?


Ta da te da te Dum! (larger fanfare than usual)


Not only are the pet and caraco complete (old news) but I have now made the skirt and a neckerchief to complete the costume. There is no point in making stays – the only way to reduce or alter Gwen's waist is with wood working tools, no point in shoes, etc – there are no legs or feet, and a cap or bonnet looks incomplete without a head to go underneath it.


front showing the inside of the open pet
The skirt is simple, blocks of fabric pleated at the waist, raised slightly in front to compensate for the bum rolls. The hem is taped rather than folded, extra work but a smart, clean finish. The construction is straightforward – the knife pleats face to the back leaving a small flat section at centre front. A length of tape runs along the waist edge, neatening and holding the pleat edges as well as extending to become ties to fasten the skirt. The knife pleats sit really well, opening over the roll and folding shut when not needed.
 This extra layer does not benefit the mission in search of Gwen's corset waist, but with the pet's skirts flaring outward over the hips it is contriving to give an illusion of narrowness ( you have to get the angle just right and squinting might help).


The neckerchief is again very basic. Janet Arnold shows a triangle, Nancy Bradbury, a square to be folded. For this one I used a triangle of muslin – need practice with the flimsy fabrics, though now I never wish to see it again! To finish the edge I turned a hem and then caught across it in the first row of a crocheted edging to keep it secure. The originals seem to have been made in a wide range of sizes, fabric and colours – coarse and dark for workers, finer and more ornate for the ladies, so it seemed quite safe to improvise a little. Having the longest side of the triangle on the cross grain of the fabric did make life a little exciting – the muslin is quite loosely woven so pulled and rolled out of shape. The crochet edging seems to have stabilised this and inspite of the excessive moaning was not difficult nor take long. It is a single crochet into the scarf, chain 4, and repeat every half centimetre. Row 2 is merely single into the chain loop of the row below, chain 5,and repeat. I did try all sorts of designs of various complexity but this gave a neat edge with minimum fuss.


Overall - an enjoyable foray into the 18th Century, frustrating, time consuming, deeply annoying. But enjoyable. There are many errors still to address but I would look forward to tackling them rather than sob into my soup and consider emigration. A full sack back gown perhaps?  It will join the growing list Of Things I want To Make... Seeing the ensemble together is strangely satisfying - something to be learnt there I think - but next task......  is already underway.
 
It is experimental, uses builders' grade and a hair drier - at the same time.
 Should have it done for next week's post, if I manage to recapture the scissors by then.
 

Sunday, 10 November 2013

18th Century jacket - pet en l'air.


And this week's challenge – a pet en l'air (pet en l'eir?). I think the direct translation is somewhat rude but to me it is a sack back jacket from the 1700s, a kind of short version of an open robe, or robe a la Francaise.  Think Watteau, think Thos. Gainsborough. This was an informal garment, worn at home, so when finding portraits I've looked for full gowns showing the volume of fabric at the back and the fitting at the front.
Watteau studies - just how much fabric! Shall we play guess the weight?
Gainsborough - Viscountess Tracey


Gainsborough, Miss Theodosia Magill
 The one I am making is based on one from the Snowshill Manor collection dated 1745-55,  described and drawn by both Janet Arnold and Nancy Bradbury. It is made in silk with a linen lining and probably worn with a kerchief to fill in the neckline.

Drawing from Janet Arnold, Patterns of Fashion. The painting above is the one cited by Bradbury - Upton House NT.


  Again it is made to fit Gwendoline, the little model, so every inch on the pattern becomes a centimetre- there will have to be other tweaks and adjustments but the Arnold diagrams will provide the basic shapes.
 I am using a printed cotton - quite fine in texture, too much of a coward for silk or satin at this stage of the learning curve.
 There are several extant examples documented and similar jackets seem to have many different names - on some the front closes, others the stomacher is pinned in as a temporary closure, the back pleats can be sewn in or sewn in part rather than hanging from the neck line. This caraco is from the Met. and although the detail may be different it does give an idea of the garment and the size of padding needed to get Gwen up to speed! I do get everso confused by all these names - I think I understand what a caraco is, a casaquin, a pierrot , and then..... Never mind - the embroidery is exquisite and that row of buttons!


met museum. caraco. 
– Even with 2 sources to glean information from I had no idea how this garment worked. Unpicking happened often. And again Gwen's shape has caused some major headaches- she has a wide flat torso, little hips and a long smooth waist, nothing like the kind of corseted shape shown in the contemporary paintings. I have tried to be as faithful as I can to the original – give and take a bit (quite a big bit in places).  The pattern had to be extended  to fit around

her and the upper front elongated.  The fabric is in two halves – joined at the centre back , with a major amount of pleating on the hip and back and the front bodice extends over the shoulder to meet the back.. What did become obvious as I tried to put this together is the importance of the lining in creating the base for the top fabric to hang from. There is a lot of fabric there - Gwen is 16cm across the shoulders - one half of the top fabric is over 50cm.  Janet Arnold described the parts being made up as one as far as the centre back, so that is what I did, but the lining back has to fit snugly to give shape to the bodice front and shoulder as well as to support the pleats. So undo the flat lining and fit the back bodice together – re-attach top fabric so there was something to hang the pleats onto. Working without a centre front was also difficult - trying the garment on Gwen seemed to give a different fit each time, and with the top and lining together of course they behaved differently again. To stabilise it the false front was made up and fitted as shown. Chickened out of doing the tab fronts from the original jacket and treated it as a solid piece with hooks and eyes to fasten at centre front just to make fitting easier. Considering how the parts were made and all that had to be done was to sew it together neatly the length of time taken seems huge- 2 hours! The side seams were extended an inch to fit Gwen more snugly but then there should be hoops or at least a large bum pad to hold the skirts out from the body which will alter the shape completely - can't win!


Next steps – sleeves, ruffles, hem, decoration.

The arm holes seem to have migrated backward  but I left a lot of spare fabric when cutting out so should not be too difficult to re- establish. I am looking forward to the sleeve - it is such a different shape. The pleats at the head should give a little leeway but....
A the real reason for putting myself through this torture ? Want to make the ruffles, I want to flounce. Already thinking through and planning...... are they lined - self or linen? or hemmed ? Do-able at this scale? Hours of fun to moan about next post.

 
 I've put in some of the useful sources/blogs etc. To be honest there is a lot of very good stuff out there- these are only a tiny tip of the proverbial iceberg.
 http://brocadegoddess.wordpress.com/pet-en-lair/   does a much better job of making than I have!
 http://www.marquise.de/en/index.html
http://americanduchess.blogspot.co.uk/2010/10/costume-analytics-1770-80-chintz-caraco.html

and of course - Janet Arnold -Patterns of Fashion 1 p28-30, Nancy Bradbury - Costume in Detail p19 National Trust - Snowshill collection.
BBC paintings, Met Museum, and Museum of London.