Showing posts with label coat. Show all posts

Sunday, 1 June 2014

LACMA 1790 tailcoat - disaster


A productive and busy week. Completed a commissioned drawing which was pretty concentrated work, made an appalling fabric choice and set out to try the Los Angeles Museum of Art's (LACMA) pattern for a French 1790 tailcoat. This I thought would be a counterpoint to the ladies jacket completed a couple of weeks ago and a way of consolidating some of those new techniques. Oops. In fact, OOPS.

    Click on the picture for the LACMA collections page or on the link for the patterns page. Of course this  is the last one listed-
 
The LACMA download includes gridded outlines to scale up, very brief notes, and one drawing of the centre back detail. It looked enough – having worked from Janet Arnold Fashion and from the NSCT pattern sheets- this was familiar territory and usually what I don't know someone else will tell me about. The usual sites offered general information  - http://www.marquise.de/ has a useful over view and some tips but the example she makes is from earlier in the century.   It was still useful to get me started - the general garment did not seem to alter much over time, just the styling and details. My general research led me in to allsorts of odd corners, how to get curled not flat revers, how to do the rolled collar, welted pockets,  more Garsault- L'Art du Tailleur (1769), but I have survived.
 
 
a close match?- David. Louvre


The fabric was lovely, at least to look at, a purpley maroon with a top layer of fine soft gold and a woven pattern of trailing flowers. What I didn't appreciate was the low ironing temperature, its indestructible belief that creases are bad and the world should not have corners, and as for its ability to fray, to split at seams, to distort – utterly world class. The lining was the vile berry stuff used for the pink and dotty pelisse, so at least it was a known pain to deal with. Enough moan.


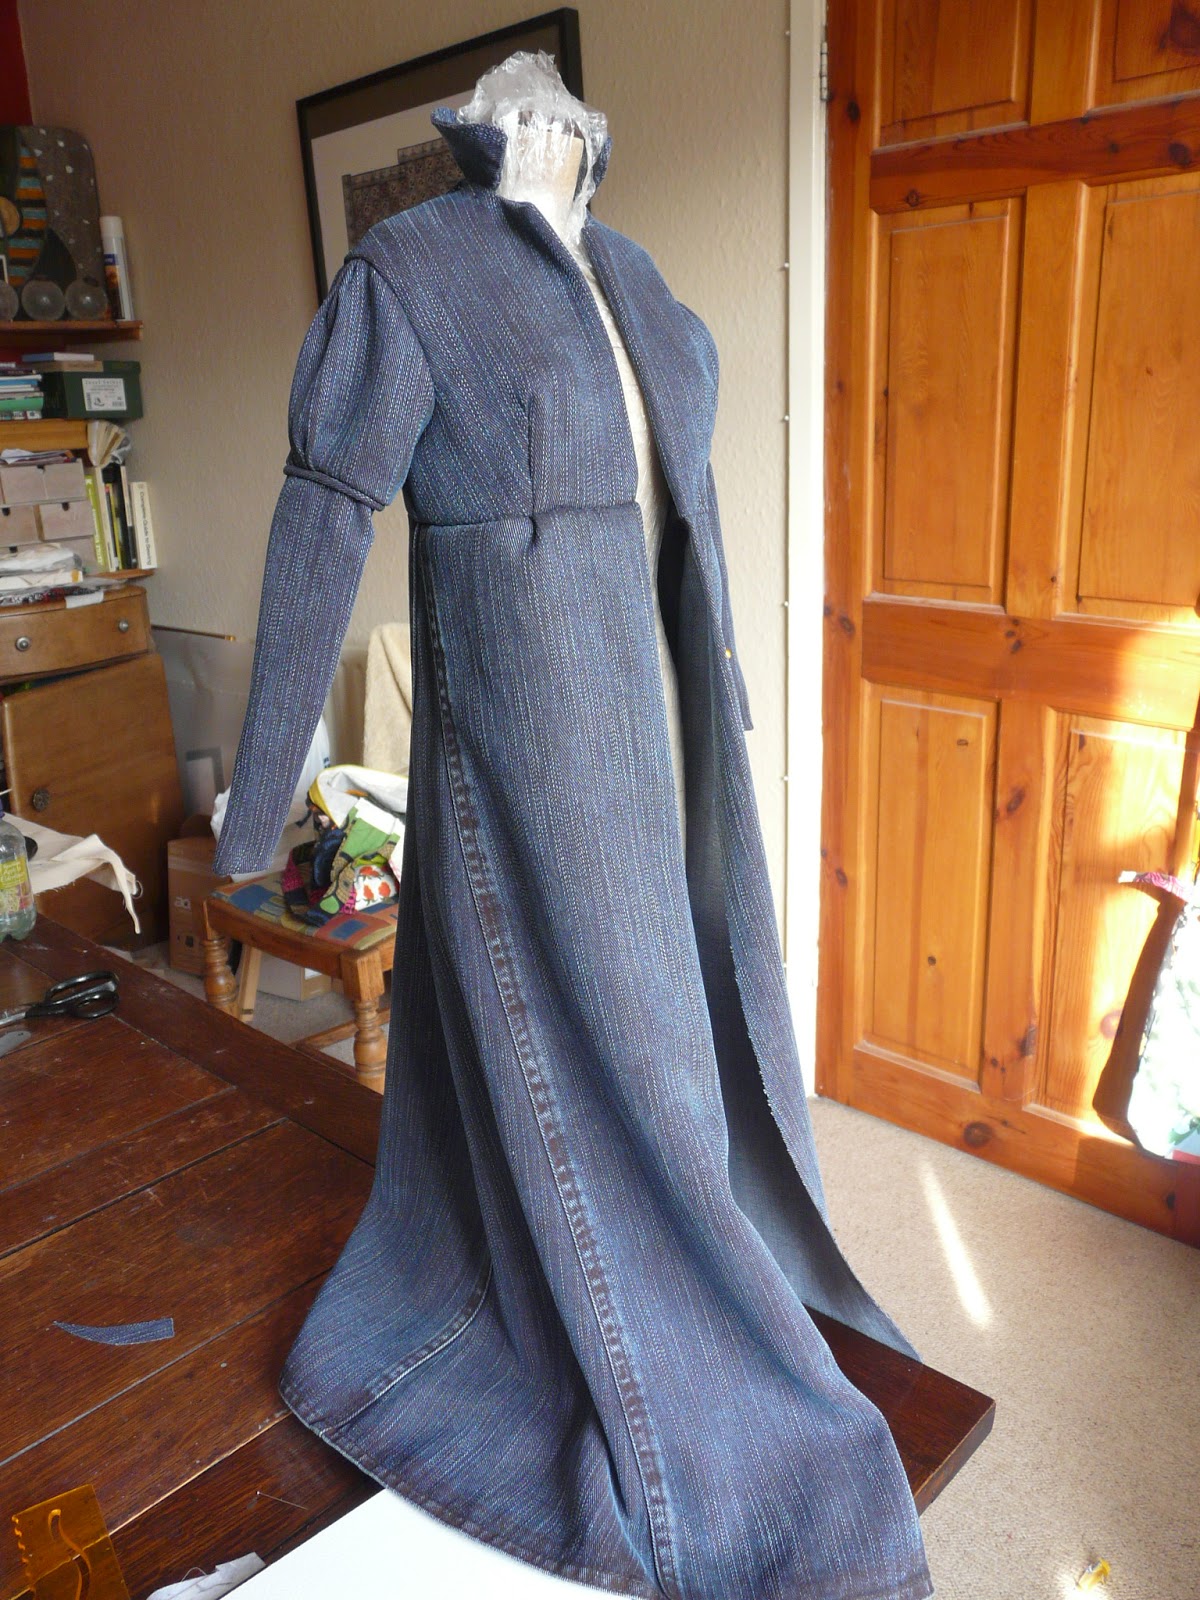
I think the pictures tell the story of its construction quite well - step one was making the pocket - and yes it is a proper opening one! From then on it was flat lined through out the major construction, back first then side and shoulder seams. Padding, interlining etc were tried one mad afternoon on the fronts but discarded - they were impossible to manage at this scale and attempted to bully me - never goes down well. At this point all was rosy. It seems so long ago....

It was collar time. The lapels form part of the front; there is a seam down each side roughly under the buttons and the points are curved back to make the lapel. This where it all goes wrong - the angles are not right, the roll back is too large and in getting that seam to sit in the right place the fit of the back is lost. This became apparent later; it was initially disguised by the Battle of Pad Stitch. This was pointed out as the traditional way of getting layers of fabric to fold or bend - as in a shawl collar or rolled lapel. Good little me tested it  and then applied. On one side the pad stitch is through an interlining and the underneath fashion fabric - not ideal but it seemed to work until the fabric started to separate and break up. On the other there is a pad stitched interlining sandwiched between the fashion fabric. This was fine with the bottom layer but was not strong enough to resist the top layer's desire to bounce back. The back of the collar was done in one rather than 2 pieces, for reasons of sanity, and pad stitched to death or at least until it stopped arguing.  It is not pretty from the inside but the stitching is hidden by the collar fall from the outside.
Sleeves were added - standard 2 parters, but at least I remembered to add the cuffs first. This is another part I am not happy with -  the proportions are wrong and I wasn't really sure of the construction details. They are best guess solutions but I do like the buttons.


 You can see how differently the coat sits now- the whole front has distorted - never mind, it can only get worse. Some of the seams are fraying as the gold thread gives up, and the top fabric is giving more than the lining so there are bumps and rolls forming. Can't win every time. Pah.


The final offering -  Don't look too closely.

 Some of the details still do please. Why I thought the pockets have to be for real I do not know- they are finger sized! and not big enough. They should fill the space from elbow to back button, but the urge to open them  and play is irresistible.
  What has been surprising is the button eating potential of this design. To date it has 12 on it, but there should be nearer 20. And as for the collar and lapels -  after an evening of quiet, calming meditations the collars are curving. It was 10 minutes first thing this morning with death threats and a steam iron that persuaded them.
Ok, I hate the fit - the distortion is so annoying but the gist of the coat is there, even though it is far more Sir Percy Blakeney dandy in it's exaggerations than respectable Frenchman. This is something I will have to come back to, hopefully with a fabric than doesn't think it's Tigger ( The wonderful thing about Tiggers
Is Tiggers are wonderful things.
Their tops are made of rubbers
The bottoms are made of springs.
They're
Bouncy,
Flouncy,
Trouncy,
Pouncy,
Fun, fun, fun, fun, FUN!!!


The wonderful thing about Tiggers
Is I'm the only one
)

As long as the last line is true....and it didn't mention fraying..
 It has been abandoned outside all day - just went to fetch it in and there was a big happy bumble bee sat on one of the back buttons - somebody likes it!    Well, stap me! (is that right?)

Sunday, 20 April 2014

white pelisse


Of  lovely April days, invasion of cat,  white pelisse, and other many distractions. This is the blog as it was meant to be!


Last week-

The making of the white pelisse-

The sun has shone, the grass and weeds are happy. The bees buzz, there are butterflies, the garden is in its purple Spring phase.  I might have been distracted from costuming but I have been refining copies and interpretations of fashion plates to show the latest additions to Gwendoline's wardrobe as well as constructing 18th Century items for myself, so it has been busy.

I decided to use a clingfilm  base and made Gwendoline a masking tape shell. This was sectioned into pattern parts and then cut and flattened to create templates- and it worked! There is very little gaping, or bowing, or pinching – all without any fiddling, adjusting or cheating in any way. Umm, wow. Don't worry, it won't last.


This of course has lead to unwise decisions, there is no point having patterns that will only fit once, I wanted to find out how flexible this approach would  let me be – 1820s shapes- lower waist, broader shoulders, exaggerated sleeves and decoration. The fabric is curtain offcuts – trying to look like a heavy weave cotton or linen but I'm thinking that the closest this has come to nature was being sat on by an invading cat. ( I yelled, it went from snooze to panic in one move, did a complete circuit of the kitchen tops and windowsills at full pelt before escaping out the backdoor, fled through the hedge and off down the road.... leaving me with hairy fabric and chaos!)

 One idea arising from the gingham frock (last week) was using the smocking as a substitute/sculptural form of gathering, so set out to try a Juliet style sleeve with the repeated gathered bands down the arm. I also wanted to do more with pleating on the bodice. Even my favourite pelisse has gathers above and below the waistline. This fabric is quite stiff, it will bend and flex but goes clumpy and lumpy on curves and bulks up very quickly. The pleats in the back look good but have left the waist heavy, a wider waistband than originally planned might be needed or else the waistline is going to end up the thickest part of the whole garment!
last week's progress


Having faith in the pattern pieces makes such a difference – and saved so much time. No repeat fittings, unpicking and realigning. Getting from 'what shall I do now?' to having a believable bodice took less than an hour. The smocking took about the same. If I had a brain I would have done the smocking before making up and attaching the sleeve. But the sleeve was a bit of a guess, I knew I wanted more fullness at the back rather than the front, and that Pingu arms must be avoided. So I began with a basic gathered sleeve shape and made the curve at the top steeper and off centre . It did take some minor fiddling as the fabric protested about curves but it sits reasonably well, although many sins may be lost in the puffiness. And of course the piece I cut as a pattern is now firmly attached !.
 

This week-
Overall the pelisse has worked quite well- the good times did not last  The collar was a problem, it still tries to stick straight out rather than relaxing on the shoulder. Repeated washing did not help it, the fabric has a great deal of 'boing' - it tries to reset itself to flat each time. The radial  pin tucks have helped  a little and something to experiment with later on. Fears about the waist at the back were well founded, it is thick and seriously needs stiffening. Perhaps come at it from the end - put a bow on the  waistband cb so the bulk becomes deliberate ( see little blue example above).
  I do wish this stuff would make its mind up - it bends when I don't want it to and is too stiff when I want it to bend.

 As a relatively plain pelisse it is fine, the gathers in the sleeves give it more character and style. The gathering on the centre back  should perhaps only be attempted with finer cloth. Poor Gwen does not look terribly happy it. It does nothing for her figure - the extra bulk on the waist is not good , there is nothing voluptuous or even jelly-on-a-plate-ish about her to give definition, she ends up looking like a tree trunk. In the plates above, the waist is so narrow in comparison to the shoulder/ sleeve line, and  Gwen goes in just a little and out not a lot. I do wonder about making her a set of stays /padded bodice-  can't pull her in but might be able to push her out. ( I'm sure I thought this before sometime - a little set of transitions with bust enhancer?)

One moment - repeated washing?  Knowing how much I enjoy domestic chores  you will have realised this had to be an emergency. Well, first the 'sharps' needle I was using was very sharp and I hadn't noticed, second time was due to creating drawings in pastels. The washing has caused problems, now the lining is not happy at the armhole, causing the wrinkling seen above, a bit of unpick and pull  will hopefully sort it but this garment will remain untouched until the pastel phase ends.

Distractions-
1. Pastels- not a medium I usually use but... apart from the dust .....they are quite fun.


2. The fake book. - it started with a charming photo posted on facebook from the Australian Jane Austen Festival in Canberra.  In the general flow of very learned conversation we decided the photo looked like a book cover, couldn't resist it, and....  Last time I caught up it was either Mr D would emerge a la wet shirt, or she had  just shoved him in.  The drawing took  over a morning and then working out the editing  programme took about the same. (Gimp2 - a free download, complex but very good)


3. Gave up putting it off and set up a website- AARGH.
 
  Pastels were easy, Gimp is straightforward. If I had known how to do this it would have been simple! Used Google sites, free, supposed to be an easy site builder, self hosting, and well I'm googled for almost everything else. Looking back, once the mind shift was made, it was straightforward enough.  Over riding the templates was the most frustrating thing - typing in black, size 12 in default font to find it published in blue, boxed in a corner and.......
Hopefully all sorted, hopefully,.... Feeling very exposed at the present.  Be warned - will have to start experimenting with promoting it next....
 
 
And totally recommend
BBCs   "At Home With The Georgians: A Man's Place. 
So much more than important people and oh look at the houses. Well done to Amanda Vickery.


Sunday, 16 March 2014

Pelisse- recycling and speed challenge

Spot of light relief this week. I'm putting the time into completing large scale pieces so set a quick challenge.
Task: buy a charity shop garment and create a  regency garment for Gwen in a day. Complete it for under £5, all in.

First find the garment. I was expecting soft cotton summery frocks, flowing skirts, delicate prints. Nope. Still in deepest darkest Winter mode, scratchy wool, jersey knits, heavy colours. There were some nice pieces but not enough fabric  for the price. Ended up with a fake denim look skirt for £2.99.
Issue one - denim? Time correct or not? Serge de Nimes was certainly around  but used for work clothes. Issue 2 - this is fake denim - it's tencel and the distressed and faded bits are manufactured. However there was quite a lot of it, it is quite soft and flexible. I will lie through my teeth and call it 'cotton twill'.


Second - decide on the garment - a pelisse, long ladies coat- think spencer with a skirt. Still like shapes  they make. It is also a flexible thing, the complexity, cut and fullness can be altered to suit the available fabric. The basic shape was meant to be like these examples, high stand collar, short revers and falling quite straight.

Third - sort out a pattern, fitting a quick draft for the bodice to see how much  fabric would be left for the skirt.  The pieces are quite standard but the number of large pieces is a problem, fitting them onto  the largest area of material  means a reduction in the skirt width.
It is unlined (couldn't find a lined skirt I wanted to make from!) so the front is extended to make facings which are turned inside  to make the revers. The sleeves were the most complex part- it had to be in 2 parts to fit on the fabric-, the top is cut wider and  pleated on the centre line, the bottom is tapering to the wrist. I'm not using a pattern for these- it will be maximising what is there after cutting the front  and centre back out. The side pieces and collar are small enough to fit on the scraps.


Assembling - fairly straight forward - the most time consuming area was the sleeves, fixing the pleats and finishing with piping along the joining seam took about 2 hours!. The seams are top stitched to flatten them but otherwise un finished to get the whole thing completed in the  time limit.    Sewing through layers of this fabric was difficult and then painful so short cuts for the skirt were most welcome.


The photos are a gallop through the  process, making the bodice, working the collar, making and attaching the sleeves and then adding the skirt. The skirt is nearly as found - about a 1/3 of the original garment was used to make the bodice so not much room for manoeuvre.  There were 2 triangular inserts  which I  placed on the  side seams to flare over the hips Gwen should have,  and then gathered the excess fabric at the centre back. It is really too long for Gwen, but  in keeping with the "up-cycling" theme it seemed silly to cut off one hem just to make another an inch away! I tried working out the proportions from the fashion plate  and this isn't too far away.

The front is just slightly crossed over and is held with a loop over the bottom right of the 4 buttons. The collar stands without any problem and would frame the face nicely. The frothy lace is just some scrap placed in for the photo, but it does seem to finish the look, the power of accessorising.


Summary -  I don't know what is happening with the photos - the originals are great but the upload seems to be having a bit of a migraine attack with them.
One simple pelisse done in the time allowed using all but scraps of the original garment. It looks like a warm, winter weight garment, quite plain and functional rather than grand and fancy. The only purchase was the victim skirt, all threads and buttons are from the leftovers of other projects. The problem areas are the bulk on the underarm seam affecting the hang even with the seam allowances clipped, and I set the collar about 5mm too far back.  The last is annoying as I fitted the collar and then shortened it !
 It is crying out for more embellishment. The buttons have given a focus to the front but there is plenty of space for frogging or decoration - and on  the back . I did toy with putting a belt across the centre back piece but I like seeing the tops of the gathers, that contrast between the smooth and then the volume is a beautiful detail.  I do wish that I had deconstructed the run and fell seams on the skirt - the machined lines and artificial colouring is distracting. If I decide to make more of this coat then a bit of unpicking will have to happen.

At the moment I am suffering from sewing finger -
the needle used was a 'sharp', slim and very pointy, unfortunately it was sharp at both ends, one finger has lots of little perforations from the point and the other is sore and shredded from pushing the needle though! Solution - toughen up the skin - no more washing up and cleaning windows, perhaps even weeding will have to go- all that washing of hands......

Sunday, 12 January 2014

costume/sculpture II

This has been fun. Messy. Hysterical. More messy. But fun.  It is only possible to do a little and then wait for it to dry and stiffen, so even little things take a lot of time,  not making and doing time but standing-back-and-not-fiddling time - the very worst kind.

 The back story-
 Aim - to make a free standing C18th costume, inspired by Boucher and Gainsborough - using calico and PVA glue. This is a trial piece to assess the creative and practical potential of this method of working.
it's more like this from LACMA

It was meant to be elegant  like this, but....

Process so far -Bundled up a mini papier mache  body on a stick to be the armature.
Added a skirt. Dunked it  in glue, dried then redunked and dried again to make rigid.  Then added a stomacher and  the body of a sack backed jacket based on the pet en l'air made before Christmas. This was without sleeves or collar, to be added later. Dunked, draped and dried.

This was all in the last post - just didn't have the heart to update,  adding that the weight and wetness of the jacket caused a skirt crisis and it started to collapse over night.
 After expressing myself quite fluently, the skirt was resoaked and reset and redried.  The jacket was in decent state so only needed a gentle re-wetting and then resetting onto what is left of the now mutant body form and re-rigid skirt.
 For some reason the glue is struggling to hold the jacket closed onto the stomacher, it keeps gaping, I may have to resort to pins or tacks to close it while trying again. This sounds simple  but the fabric is now rising nobly to the challenge of going rigid - the last stay stitch had to be done using pliers to pull the needle through and the cotton thread wasn't as strong as the cloth!

Patience is not a virtue I possess, there are teeth marks on the furniture. The waiting has led to several ideas/ associations. At present the height of the back neck and the general headless quality remind me 'Sleepy Hollow' - could this be Mrs Headless Horseman, or perhaps he was a cross dresser before Tim Burton came along to do the film?


 Sleeve making has now happened, although not quite as originally planned.  The raw sleeve units were made up with flounces and elbow tucks but not then set.  To lessen the weight and the awkwardness of joining rigid to rigid,  just the top section of the sleeve was glued and then attached to the body, pinned (pliers again), and dried. They have moved as they dried but the glue is determined not to let go so it will have to stay. The rest of the sleeve is being painted with glue  and allowed to dry in sections. I'm just about at the flounces now, without major mishaps so far!

The neck edge has yet to be sorted out- the back lowered and then cased. I am thinking of cutting out  as much of the original body as possible leaving the costume to support itself.  I doubt if this will be easy or neat so extra finishing - maybe a lace edging will have to be done.    Another week of happy glueyness!
She(he?) is in the hall drying - I keep sneaking a peek round the door to check but she is being well mannered at the moment. I hope to have it finished by next week, I'm sure I said that last time.....
Also should have an en ferreau polonaise gown done by then -  I'm part way through fitting it - but key question - can  I be said to ferreauing?


Tuesday, 31 December 2013

Completed C18th costume - Gwen does Poldark?


Ta da te da te Dum! (larger fanfare than usual)


Not only are the pet and caraco complete (old news) but I have now made the skirt and a neckerchief to complete the costume. There is no point in making stays – the only way to reduce or alter Gwen's waist is with wood working tools, no point in shoes, etc – there are no legs or feet, and a cap or bonnet looks incomplete without a head to go underneath it.


front showing the inside of the open pet
The skirt is simple, blocks of fabric pleated at the waist, raised slightly in front to compensate for the bum rolls. The hem is taped rather than folded, extra work but a smart, clean finish. The construction is straightforward – the knife pleats face to the back leaving a small flat section at centre front. A length of tape runs along the waist edge, neatening and holding the pleat edges as well as extending to become ties to fasten the skirt. The knife pleats sit really well, opening over the roll and folding shut when not needed.
 This extra layer does not benefit the mission in search of Gwen's corset waist, but with the pet's skirts flaring outward over the hips it is contriving to give an illusion of narrowness ( you have to get the angle just right and squinting might help).


The neckerchief is again very basic. Janet Arnold shows a triangle, Nancy Bradbury, a square to be folded. For this one I used a triangle of muslin – need practice with the flimsy fabrics, though now I never wish to see it again! To finish the edge I turned a hem and then caught across it in the first row of a crocheted edging to keep it secure. The originals seem to have been made in a wide range of sizes, fabric and colours – coarse and dark for workers, finer and more ornate for the ladies, so it seemed quite safe to improvise a little. Having the longest side of the triangle on the cross grain of the fabric did make life a little exciting – the muslin is quite loosely woven so pulled and rolled out of shape. The crochet edging seems to have stabilised this and inspite of the excessive moaning was not difficult nor take long. It is a single crochet into the scarf, chain 4, and repeat every half centimetre. Row 2 is merely single into the chain loop of the row below, chain 5,and repeat. I did try all sorts of designs of various complexity but this gave a neat edge with minimum fuss.


Overall - an enjoyable foray into the 18th Century, frustrating, time consuming, deeply annoying. But enjoyable. There are many errors still to address but I would look forward to tackling them rather than sob into my soup and consider emigration. A full sack back gown perhaps?  It will join the growing list Of Things I want To Make... Seeing the ensemble together is strangely satisfying - something to be learnt there I think - but next task......  is already underway.
 
It is experimental, uses builders' grade and a hair drier - at the same time.
 Should have it done for next week's post, if I manage to recapture the scissors by then.