Northern College of Costume, York. Summer Course-

Actually started! This is a costume course - not a 'lets make a historically accurate garment down to the very last detail' course. Modern machines and techniques are used so don't expect a purist's outcome. In other words - overlocked and machine sewn.
 |
| From V&A, earlier but similar |
project one - gentleman's ensemble c 1830s
 |
| Waugh, Norah. The Cut of Men's Clothes, 1600-1900 |
First the shirt - this was based on the Norah Waugh pattern for the 1700s/early 18th C. The cuffs are changed to fitted ones and a stock at the neck rather than cravat. It is fitted at the neck and cuff, quite tight at the armhole - but most of the rest is just gathered in almost all directions- and with gusset mania . There is a huge amount of fabric in the body and sleeve- it is hard to imagine it 'fitting' anyone except the Michelin man.
Also, being a forward thinking and highly organised person I did take a camera everyday to record the process - then forgot to use it. The construction images are from a mini version done yesterday as a 'revision' exercise.
Task one -
First scaling up and drafting. This was simple enough - it is all right angled blocks - although my fabric pieces tended to change shape somewhat after their experience of the industrial overlocker. Must remember not to giggle.
The construction should have been straight forward enough as well but there were one or two tricks and ideas (and gussets) to play with-
 |
| frill and placket on my small version |
 New idea 2 was to put in a gusset into the shoulder seam at the neck. This gusset is folded into a triangle and opens out the seam to give some shaping at the base of the collar to allow for the slope of the shoulder line. On the photo, to the left of the frill, the folded gusset is quite clear, sticking up above the flat line of the shoulder seam.
 |
| underarm gussets, raw edged and partly felled |
Another folded gusset (number 3s) opens the bottom of the side seam.
The rest was familiar territory, which means it was more frustrating to make errors.
I had a proper Wednesday which was frustrating - it was collar day. The process is simple enough but there was plenty of fight left in the shirt. There is gathering all round the neck, with tucks at the shoulder on the gussets. Problem one gathering evenly, problem 2 stopping the fine fabric of the collar from rucking and pleating as I was machining, and problem 3, of course remembering to fold the top placket back underneath the shirt front before attaching the collar. Once all of this was sorted out ( unpicking skills to the fore) the iron decided to strike and mark the fabric as it was pressed. It will come out in the wash, it will.....
 |
| full sized version- buttoned up |

Now that the shirt is done the rest of the ensemble was begun - Cossack trousers (pleat fronts) waist coat and frock coat, had to be drawn out and pattern pieces made. Ron Davis' patterns were the guiding light for these, they are not hard but do require some maths, precision and care - all of which were in short supply on a Friday. A minor concern is the elusive nature of my male model - only 3 confirmed measurements ( or is that sightings?) - I am beginning to visualise him as somewhere between the Cheshire Cat, fading in and out of existence leaving only traces, and the Scarlet Pimpernel, - we seek him here, we seek him there.... We have done best guess patterns based on a similar guy and will run up the toiles next week for a fitting. It is going to be an interesting time!
Photos and reports on these next week.......

Week 2 Toiles - trousers, waistcoat, coat.

This was a preparation week - finishing drafting, drawing up, constructing toiles, a first fitting, and redrafting. In amongst this we also fitted a day of fly fronts and split fall samples. Add into that waistcoat collar and buttonhole traumas plus a visit to the Quilting Museum to see the costume exhibition, and it seems amazing that it was only 5 days.
In fact it was so engaging that I forgot to take photos of most of it- again. Did get the camera out but not much further....
 Main task of the week was finishing drafting and assembling the Cossack trousers, waistcoat and frockcoat for the 1830s gentleman's outfit. We were working from the patterns set out by R I Davis in Men's Seventeenth & Eighteenth Century Costume: Cut and Fashion which are long lists of dot to dot coordinates and instructions with line diagrams. Should end up something like this from the V&A.
Getting started was scary - there was maths involved but thankfully a logic in the construction which helped. The drafted patterns were then transferred to calico, cut out, marked up and assembled into the toile (test garment).
 |
| pattern for the frock coat |
 |
| brave soul! |
The deadline for this was Thursday when my poor victim was coming in for the first fitting. This should have been traumatic as most of the measurements were guess work.( the one we actually had was wrong!) but it went very well. Some parts - neck lines - have to go out a bit, the shirt collar redone completely, some parts have to get longer - the waist of both trousers and waistcoat plus the coat hem, and we are creating a side seam in the coat to give the torso more shape. These adjustments have been made on the pattern pieces and some have been redrawn ready for next week when we make up the trousers for real. I'll show the fabric and details of the design and construction in the next post.


The other practical this week was samples for trouser fastenings; button flies and splitfalls. Guest tutor Julia took us for this - we made calico and woollen cloth samples for the flies and just a calico for the splitfalls.
 Flies seem to have an accepted standard layout but the splifalls seem to be more of a moveable feast, the principle remains but the number and placement of buttons, plackets, etc, can changeable. Where the photos for the wool cloth flies and the splitfalls are I don't know! - just imagine them - like the example from Augusta Auctions, beautiful, precise, immaculate - I wish! The idea is that there are flaps that crossover and fasten with buttons behind the front panel that covers all the draughty bits and buttons up like a bib front. The 2 buttons either side at the waist are for braces.
 |
| example from Augusta Auctions |
Week 3 Trousers
 Never heard of these Cossack trousers before starting this course. It seems to have been a popular style - pleated front and tapering legs- rather more forgiving than the straight cut. These from the V&A are more gathered than mine and look to be a split fall front, but the idea is the same. They have a curiously feminine silhouette - narrow flat waist, curving hips and narrowing legs- and are pulled straight by the stirrup loop under the instep.
  Step one was revising and redrafting the pattern pieces following the fittings, - raising the waist at the front by an inch and then compensating for this at the back. The hems were left over long as we want to put in an arch over the foot which shapes down into the stirrup straps like these.
Step 3 - Prep - The calicos were separated and flat tacked to the back of the top fabric pieces and each long edge was overlocked.( go too fast and the industrial overlocker sounds like a freight train in a tunnel, nearly fast and the poise lamp bounces, less fast and anything on the table dances around before throwing themselves over the edge, or slowly and it purrs ( still have to work on my relationship with this machine)) - The extra layer should help to extend the life of the trousers as well as helping to stabilise the top fabric. All pleats and darts were sewn in and then.....
 |
| one inside out leg |
 |
| inside the body, the brown band is the back facing, button holes for the fly at the bottom , the unfinished pleats for the waist show up clearly in the calico. |
In fact the easy bits were over.
Step 5 - buttoned flies - The fabric was thin enough to be used for all the layers, so an interfacing and overlocking fest later, the buttonhole piece, facing and buttonstand were complete and in place. This was Wednesday so nothing is ever straight forward - now on sewing machine 3, it seems even Berninas are not Wednesday proof. We consoled ourselves by rootling through old button tins - some fantastic Deco geometrics and outrageously ornate glittery ones. This should be recognised as an official therapy in any sewing workroom.
 Step 6 - The fronts have a waistband but the back does not, so this was the day to regret deciding to have the stripes horizontal on the band because everything had to be exactly level and matched. Had to resort to basting! The back facing was friendly and helpful, went on simply and directly. The facing and the waistband were joined at the side seam, so all that was left was hand sewing the inside of the waistband and turning the raw edges of the facing.
Step 7 - waist fastening - lovely mother of pearl button - inside out, of course, and a mini festival of pressing later, the beasties are complete!
They will need pressing again and fitting to sort out the exact positioning of the hem shapings. They are definitely too long at present, they come up to my shoulders, but pattern outlines for the foot arch, and what I can only think of as bunny ears, are drawn up and prototyped, so it shouldn't be a battle once we have the model's legs to measure against. And pressing again. May be some more clipping to release the curves, and pressing, and then removing more tacking - each time I look I find more to be taken out! But they are complete - honest......except for more pressing.
Hopefully next time you see them they should have someone in them- and be an amazing fit!
Week 4
This was the week for waistcoating...
Recap - 4th week of the course at the Northern College of Costume, working from Ron Davis' pattern for an 1830s single breasted, shawl collar waistcoat. Patterns were drafted and toiles fitted.
This now is the waistcoat proper....

The fabric is a grey blue with a dull metallic broken pattern woven in. It is a kind of twill weave and manages to have very little substance - it's like that annoying friend who only says 'I'll do whatever you want to do' or 'I'll have what ever you are having' and then looks miserable for the rest of the day. The lining is a dull, dark duck egg blue, heavier and more substantial but reverts to floss when it frays. I imagine that any natural fibre content was purely accidental.
The fabric was cut and flat lined with a light calico and interfaced on the front and collar pieces.
 |
| front - with pocket! |
 |
| inside front - facing and lining |
 |
| side seams done - looks like bat sign |
We placed rightsides together and sewed around the armholes, front edge and front hem line. This meant that it could still be turned rightside out. The top 1/3 of the front
edge was left open so that we could get in to sew the front shoulder to the 2 backs on machine ( The front lining would be turned under on the shoulder seam to hide all of the raw edges later on).
 |
| Think the bit in the middle is the shoulder seam! |
 |
| centre back joined and sewn in place along neck line |
 |
| back inside - the horizontal seam is the collar edge |

The back has two layers so the hem allowance was folded up inside ( thanks to interfacing for helping to create a nice firm edge to sew along) and hand sewn closed. Then key hole style button holes. By hand. All of them.
Ok, did cheat a little- zigzagged down each side, punched the round edge and fray checked it before hand stitching. These are something to be practiced, and practiced, and then practiced again.
Add the buttons, eyelets and attach the tabs ( still need ties) and it is all done - one complete waistcoat.


Distractions- let out to play with power tools - refixing Pauline's eyelet punch to its tabletop - starting to look for work placements for after the course, and creating a monument to Wednesday to keep those malevolent midweek spirits appeased.


 Thursday was a part day so did I sit in the garden reading, rescue pets in the on line games, clean the house? Yes, but also made a waistcoat for Gwen. Went from drafting all the way through construction. How sad. But that emergency surgery on the facing had rankled, I needed to work this through and make it happen. Understanding the mistake did make life easier. . The fit is good considering Gwen is definitely female - the back waist is too large and I had to put in front darts but it has worked! Not bad for a 50p upholstery sample and some left over pink and dotty cotton. May be a bit too much frill on that shirt?
Coats next.......
Week 5
 |
| revised pattern pieces |
 |
| inside front - canvas ironed on and dart made. |
 |
| pad stitching |
 |
| front - effect of pad stitching - shame we pressed it flat again! |
 |
| pocket made into waist seam on skirt |
 |
| making up the skirt, facing and lining |
 |
| off setting edges - pulling the seam slightly to the inside |
 |
| finished skirts - |
Assemble back pieces in the same way, make shoulder and side seams. Attach body to skirt- outer fabric only. Trim out seams and hand sew lining closed over the waist seam. Most of the time the coat resembled a manic octopus at this stage.

 |
| attaching collar - zigzag onto outside and hand sew inside edge |
 |
| under collar- stiff canvas and machine pad stitched. |


final stages - sleeves, fastenings, removing all the tacking.
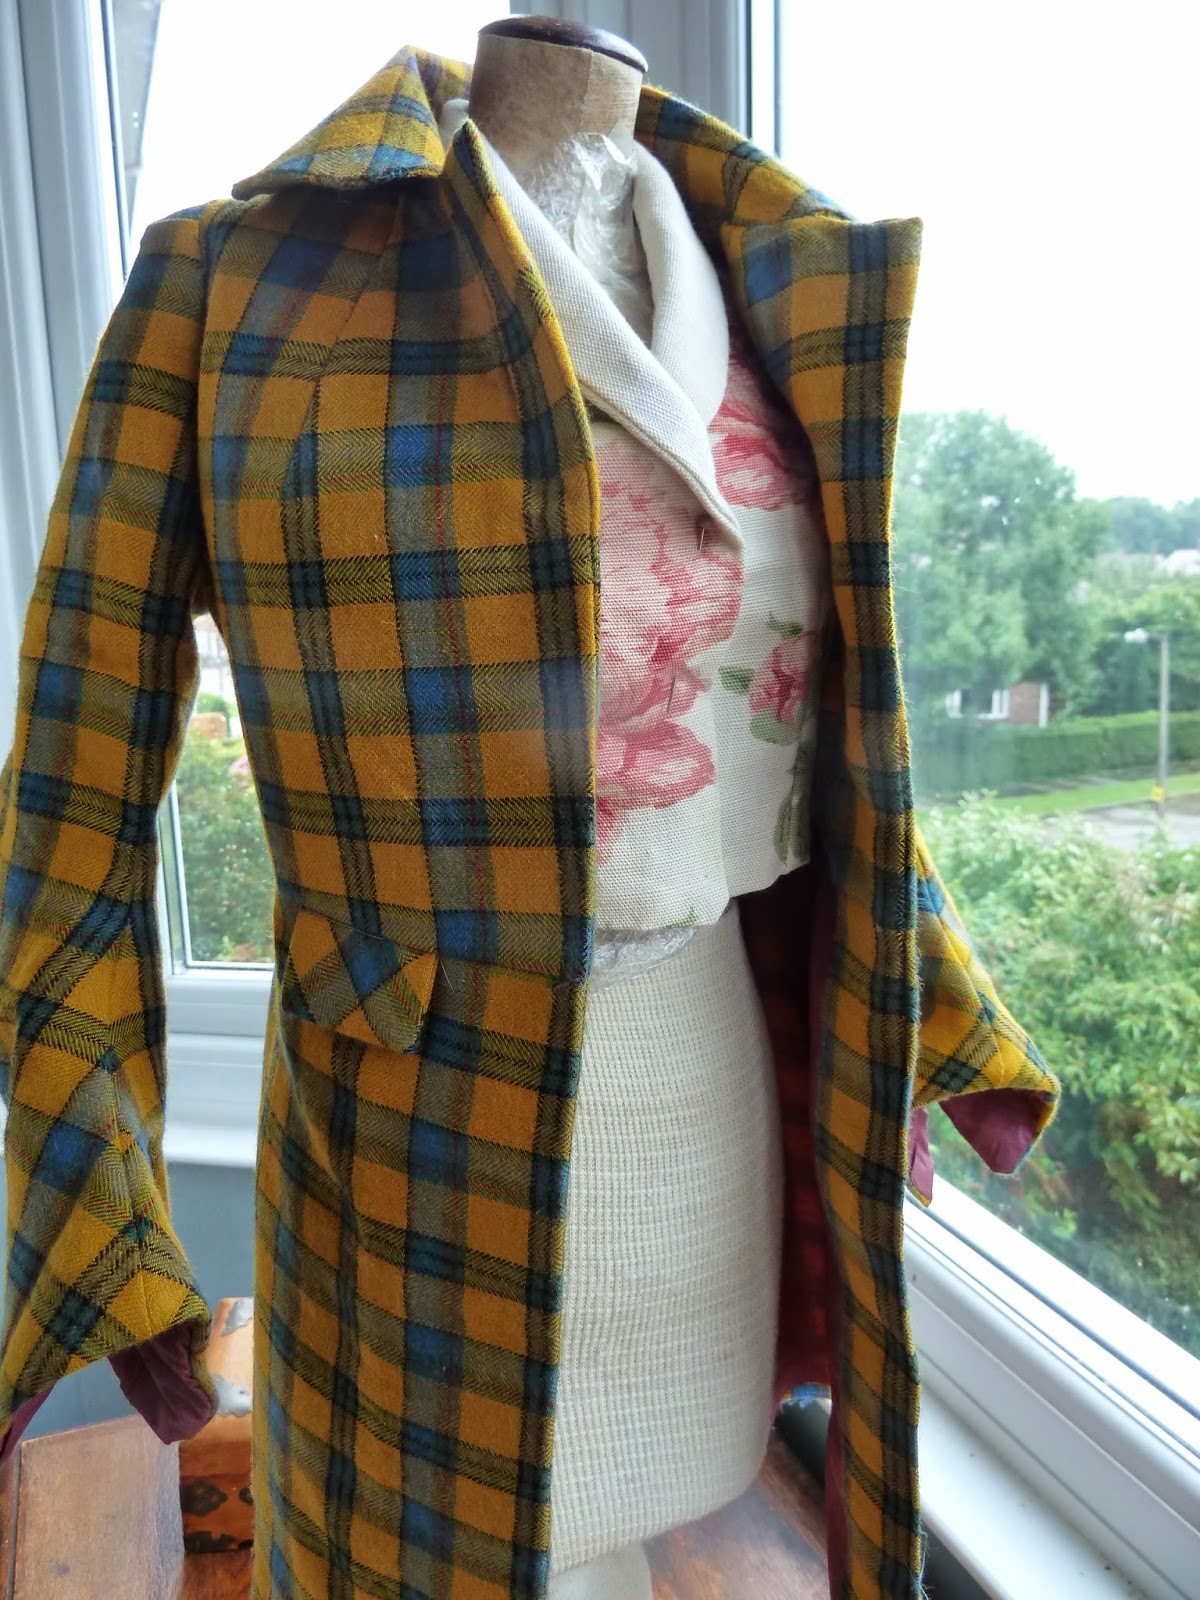
Photo shoot day - the complete costume in all its glory.


Week 6. Gwen's version.

Just like the waistcoat this was a mini redraft of the Ron Davis pattern. It was meant to help iron out problem areas and to practice the parts I had found difficult. Didn't work out that way. Oops.
 |
| the black and white is in the interests of general sanity |

 This was a menace to make- though not in the expected places- pockets went in smoothly ( yes, they are workable pockets), facings and pad stitching happened uneventfully but everything else....! The sequence of making still is a bit of an enigma - every option seemed to lead to more problems than solutions. And then I cut the wrong flappy bit when trimming out the excess seam allowances at the back of the arm hole. Unable to cut a new back piece it was a case of make the sleeve fit - which is why there are fewer pleats on the sleeve head than planned and about a centimetre less shoulder. Happily to seems to fit better!
 |
| in full glory |

 |
| oddly good with the waistcoat? |
This has left more queries and questions about construction methods - so probably another Gwen coat will have to be made to sort these out. But not yet. Definitely not yet.
Loved your post on sewing and costume-making! If anyone’s also looking to expand into men’s fashion, Vintage Wholesale Store offers carefully sourced wholesale clothing in the UK – from casual streetwear to retro designer labels.
ReplyDeleteFashion Men Wholesale offers trendy styles in bulk at competitive prices, perfect for retailers looking to stock up on the latest menswear collections.
ReplyDeleteFind trusted wholesale clothing suppliers uk with J5 Holland Ltd, offering trend-led apparel for men, women and kids. Our wholesale collections combine quality, affordability and fast delivery, making it easy for retailers to stock high-demand clothing that performs well both online and in-store.
ReplyDelete