Sunday, 30 March 2014

Regency shawl dress, Gwen shall go to the ball!

I claim no responsibility for this. A query was posted about using saris   to make a regency style ball gowns, they are a good source of fabric, richly decorated  and often excellent value. The responses cited the trend for dresses made out of the imported Kashmiri shawls in the early 1800s, something I'd known about but not really considered.
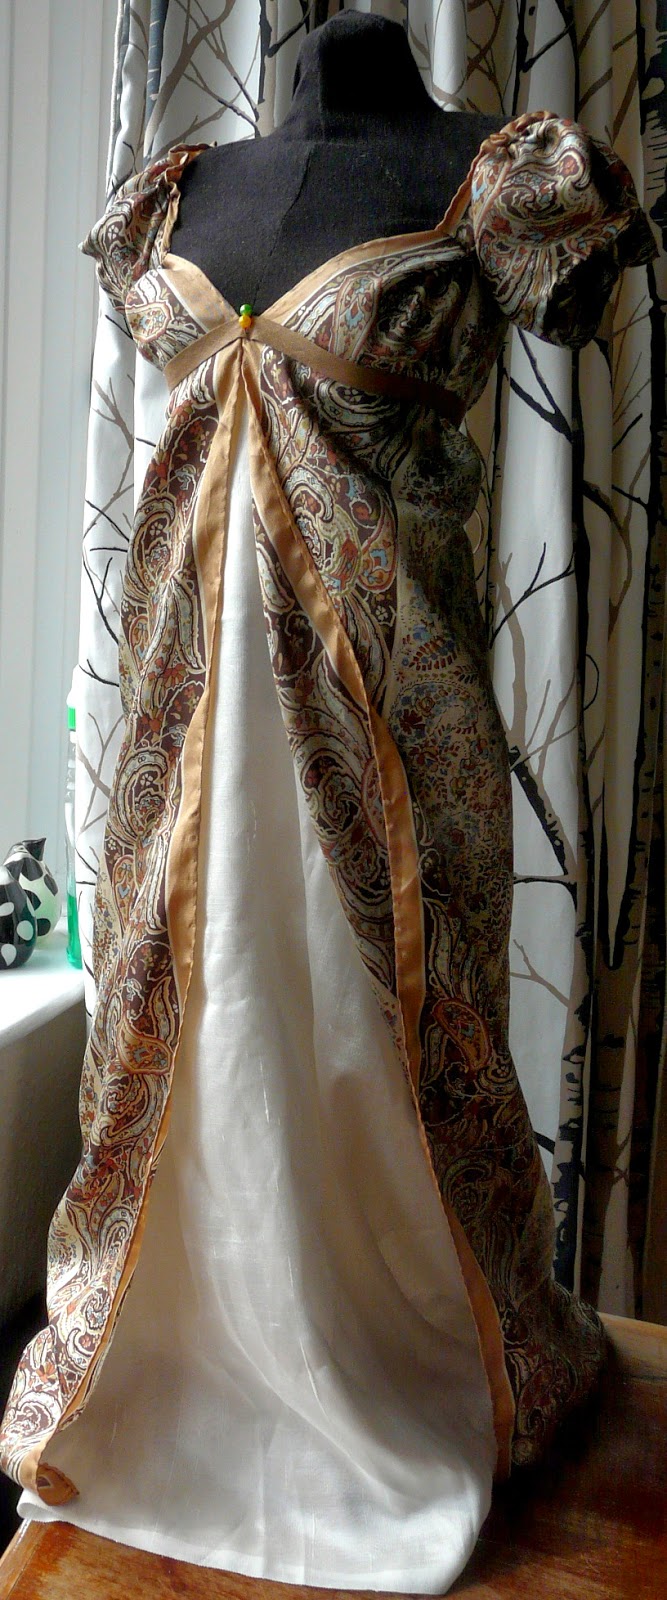
I just happened to be in a charity shop getting my breath back having cycled into town, it just happened to start raining so was reluctant to leave, there just happened to be a silk scarf of a sort of  Indian design, sort of the right size, so I bought it, and this happened......

Context first -  there are many pictorial and extant examples around, the shawls were huge so offered many options from the drapey Greek style chiton approach to using as a standard dress length of fabric.  The fabrics varied as well, from fine cotton and silks to heavier winter weight wool. The first blue dress was the one that began this little episode, from the Snowshill Wade collection dated 1815 and documented by Nancy Bradbury in "Costume in Detail". The second image is merely to show the volume of fabric and the ornate border of a shawl, the third is an 1810 dress from  Museo del Traje and  the blue print ensemble is  Empress Josephine's ( not entirely sure if this was made from shawl lengths or  fabric printed to look like it, one site is sure, another is not! but it has the same feel of using the imported pattern). They all make use of the borders and trims  especially around the hem and neck. The fashion plates show much the same  story but with more accessories, more ornament, layers of detail and pattern.
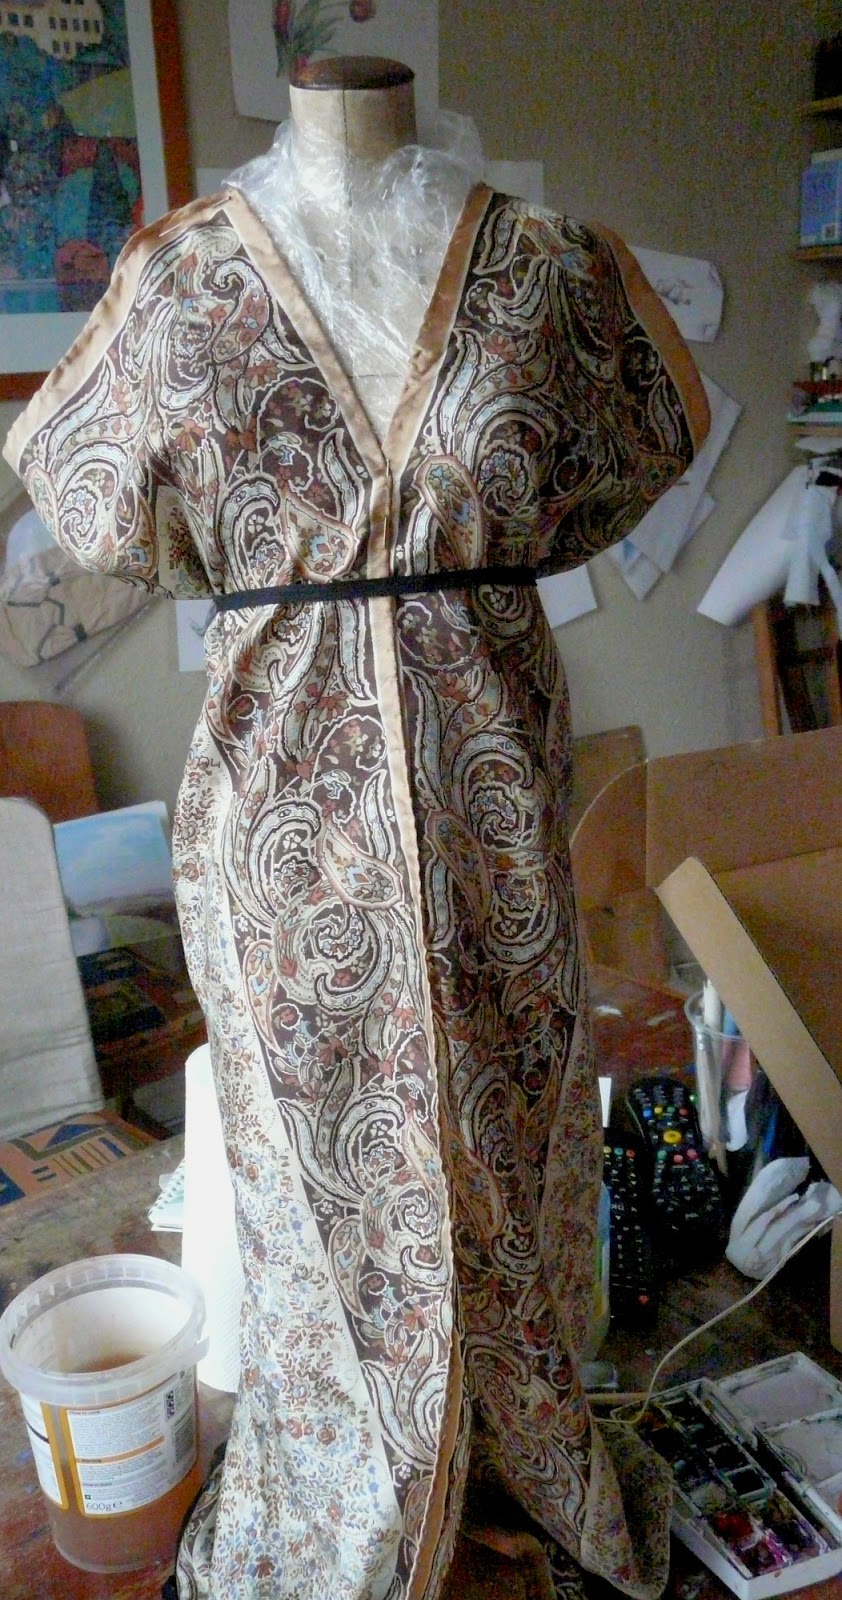
 
The original shawls were long rectangles with ornate ends but mine was a 30" silk-ish square with a printed border all the way round. A garment for me? No, remarkably draughty. A garment for the faithful Gwen. To the right the scarf is  folded into the centre and pinned at the shoulder to give a very basic drape. The challenge will be to stop it looking like a dressing gown. I like using the border  in the centre of an open dress but Gwen needs much more help and structure to give her shoulders, somewhere between the profiles of the  green and first red fashion plates.
 The dress is fairly simple, the only cutting was to take off the top border, This reduced the length and gave something to make the sleeves out of!
 
There are 2 rows of gathering to create the bodice, on the high waist line all the way round from border to border and at the centre back along the top edge. The front is joined at a point 3" down and the very top of the front border is pleated back onto itself to give the separation at the bodice.   Each sleeve is half of  the sacrificial top border, sewn into a tube for an inch and opened flat along the top of the dress and  attached. They are gathered at shoulder and cuff trying to give that extra breadth  across the top line. I did reserve some of the yellowy border to do the front trim but it has escaped at the moment, so a length of elderly bias binding is playing understudy for the photos. It gives better definition to the bust but is rather clumsy  tied at the back. If I can't find the renegade trim this is all I have left of the fabric to work with - wish me luck!
 
And the most important question of all - Does this make Gwen look less like Juno, athletic and wholesome, and more of a siren, has she achieved cleavage? 

Certainly like the wider shoulder, even if they had to have stuffing shoved (romantically) up the cover to stop the sleeve slipping off. The back is a bit too much, may be lose some gathering to the sides. For such a straight forward idea this has not ben easy. Getting one side to work was simple, getting the other to match was a pain. The fabric was lovely, to look at, but had no substance. It lost all shape and form unless it was on the model so that was how most of the sewing was done. If I was making this for real the seams would be taped and the bodice mounted onto a lining.  I must take a pattern from this and try with a more meaty fabric, with some adjustment this could become another Gwen wardrobe staple. At least it is her very first grown up ball gown. Not bad for £2.49  ( cheap date).

Some useful sites-  There are loads out there, but will there ever be enough time to read them all?
http://historicalclothinganduniforms.blogspot.co.uk/2012/03/not-only-shawlshawl-dresses-and-dresses.html
http://thedreamstress.com/2013/01/the-kashmiri-shawl-and-the-dress-made-of-kashmir-shawls/

http://www.fashion-era.com/regency_fashion.htm
http://www.marquise.de/en/index.html
Monday, 24 March 2014

making the mob cap

Georgian/Regency cap

Apologies for the tardiness this week - just trying to get the world to behave a little!  Failed. Gave up and am just getting  on with things regardless. And moan. And moan. Comfort eat. And made this as a by-product.

This week has been a very 'shut up and get on with it' one. I've had a chemise pattern for a while and was determined to make it. This is bread and butter sewing not cake, lots of straight, precise fell seams on a garment that was never intended to fit. As one who does not convey ideals of elegance and svelte willowy form, for me this garment had all the charm of a potato sack.
Being a good little beastie I even measured carefully and followed the instructions. Hah. Should have an ease of 12" over the hip not 20".  "This is a good time to finish your seams, if you have not already done so. The original has been entirely finished with small flat felled seams." And that is that covered. I have never tried felling intricate  'Y' junctions before, don't really fancy doing them again, not without more advice or medication. The great white whale is done, it will do until I've got my mental breath back and can face redoing the  dodgy bits. You may guess that I am not truly happy with it.
This left me with an aftermath of a floor, Furniture all over to maximise the floor space for cutting out, bits and remnants taking up residence, notions escaping, and sniggering in the corner is the machine and iron. So what to do? Bright idea, I'll make a cap out of the left over fabric, that will really help to clear things away!
So....
I've made the panto version (dustbin lid, elastic and ribbon- 10 minute task once started!) but this was to be a more refined form and the whole purpose was to make an exploratory piece to sort out shapes, sizes, design and construction  for future reference. As an adventure into The World of Caps this was a sewing machine job for speed with hand finishing if it came out right


The basic model - a version of a mob cap, frill as a peak, band and then the cap. Very simple, lots of variations. Standard indoor wear for wealthy widows down to the servant help, fashionable as well as utility. (The very funny ones are those perched high on top of the towering wigs, still with a pretty bow) So many examples are on pinterest  that I spent far too many an hour longing,  looking and worrying.
liotard -
Begin with identity crisis, what is my social status? To decorate, to froth with lace and ribbon or to be sober and plainer, cheaper. Seeing as the chemise fabric was the cheapest cotton I could find I think the cap certainly won't be of the posh variety.

Scale - I am not good with hats so something to hide/lurk in or that could be welded in place is a must. Of course at some periods caps were worn under a bonnet or hat, so this could be phase one of head wear.
 

Up to this point I was fine. Some fabric had left the floor, so had most of the pins, one pair of scissors and a tape measure.  Rough pieces were cut - long 3" strip for the ruffle, a band tapering at each end to over the head and a tall semicircle for the back. Simple and straight forward.

 Then..... Couldn't decide between narrow knife pleats or broader box pleats, so made one of each. Liked them together- why not use both?  The frills were sewn to the front edge of the band and tried on.  The moment photographed is the one of Hope Triumphing  Over Experience. The  pleats are full width 4" and seem to give an exaggerated ruffle, too much like a cake paper.  That I also looked like Mrs Tiggy-Winkle  crossed with Toad escaping as a washerwoman rather than a simpering Regency Miss, did cause concern. The pleats were reduced and layered as shown but I did  it the wrong way round! Redid with the box pleats wider than the other. These are forgiving and fairly open so with any luck the tighter knifed layer should stop it from flopping too much.. There are many paintings and extant garments to show that this double frill was acceptable but usually with the narrower band uppermost. By the time I'd finished these strips had lost that lovely crisp whiteness of fresh cotton, they are scarred, mangled, abused but still trying.


The  cap back was a horse shoe/ tall half circle, the bottom section folds up to make a drawstring channel. Not sure of the size needed I started off with 17" diameter and prepared to reduce. It was gather-stitched and pinned onto the back edge of the band and adjusted. When I thought it was fine I sewed the seam really,  really carefully but....
the back cap was still too full- positively bouffant, probably fine for the 1790s, but not a look I am comfortable with, so this was removed and made narrower. (By 'removed and' I mean unpicking seams, unpicking gathers, pressing, measuring and marking, 2 lines of gather stitch. pinning at the quarter and eighth marks, gathering to fit, sewing a new seam, removing pins and then pressing the seam open. Again.)

Major construction is done. I went with a band sandwich, duplicate band pieces top and bottom, holding all the seam allowances safe and out of sight. This was hand sewn - it felt so good just slipstitching along, and now the creation is created!


It isn't shaming but there are things I would change - the back is too long and could be gathered up more. Perhaps the outer frill is too wide still?  The knife pleats are  vicious, too rigid against the outer layer so they don't complement each other as I hoped. A run through the wash could work wonders as the fabric isn't pre-shrunk! 
As a cap it will do. I have a better idea of the process and adjustments. Worrying thing - still some fabric on the floor, would still be enough to make a cap........ and I do like the sans-frill carcase picture above. (Millicent could sell anything).  Remembering   "The Mirror of the Graces" advise I should be careful not to over embellish as a lady in the advanced seasons of life!

And, no, at this time I am not going to publish photos of me wearing it, content your little souls  with Millicent the Milliner's Dummy posing serenely for you. If you don't think I suffer enough do take into consideration that I have to tidy and resurrect the room for the art class tomorrow!
  I hate housework. Might find the other pair of scissors.

Sunday, 16 March 2014

Pelisse- recycling and speed challenge

Spot of light relief this week. I'm putting the time into completing large scale pieces so set a quick challenge.
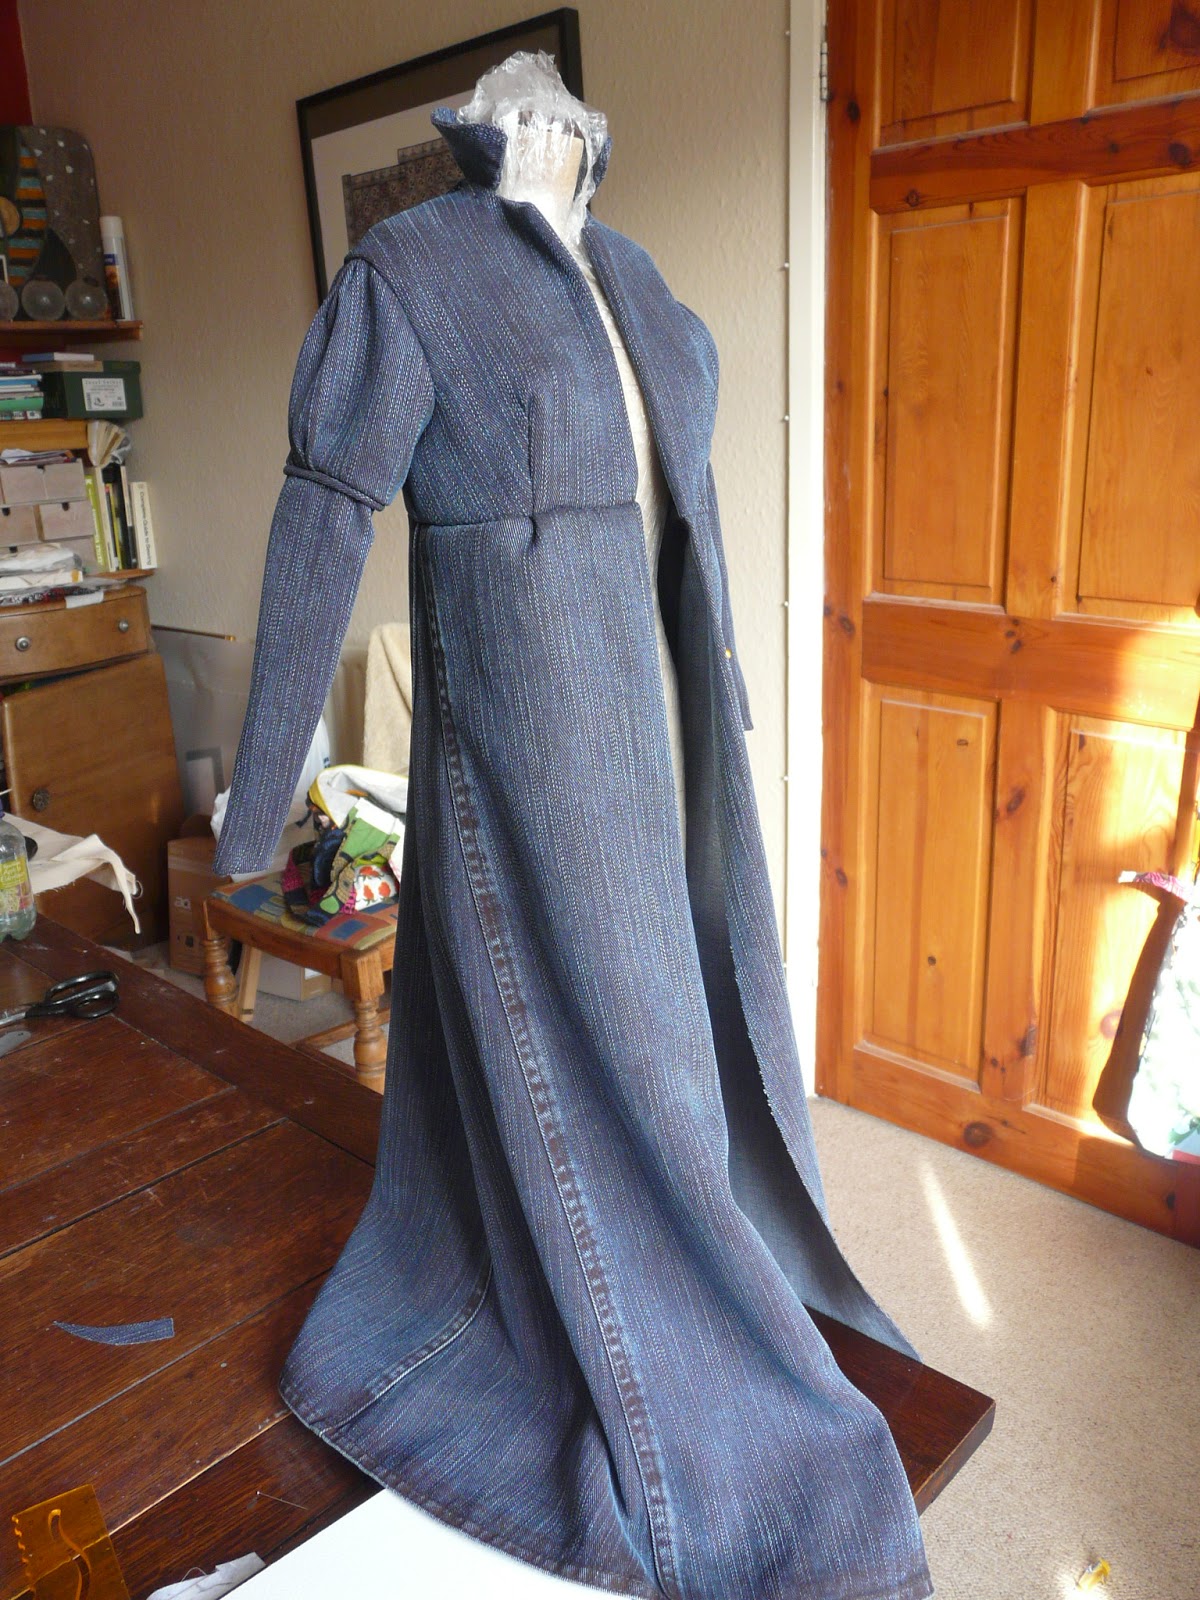
Task: buy a charity shop garment and create a  regency garment for Gwen in a day. Complete it for under £5, all in.

First find the garment. I was expecting soft cotton summery frocks, flowing skirts, delicate prints. Nope. Still in deepest darkest Winter mode, scratchy wool, jersey knits, heavy colours. There were some nice pieces but not enough fabric  for the price. Ended up with a fake denim look skirt for £2.99.
Issue one - denim? Time correct or not? Serge de Nimes was certainly around  but used for work clothes. Issue 2 - this is fake denim - it's tencel and the distressed and faded bits are manufactured. However there was quite a lot of it, it is quite soft and flexible. I will lie through my teeth and call it 'cotton twill'.


Second - decide on the garment - a pelisse, long ladies coat- think spencer with a skirt. Still like shapes  they make. It is also a flexible thing, the complexity, cut and fullness can be altered to suit the available fabric. The basic shape was meant to be like these examples, high stand collar, short revers and falling quite straight.

Third - sort out a pattern, fitting a quick draft for the bodice to see how much  fabric would be left for the skirt.  The pieces are quite standard but the number of large pieces is a problem, fitting them onto  the largest area of material  means a reduction in the skirt width.
It is unlined (couldn't find a lined skirt I wanted to make from!) so the front is extended to make facings which are turned inside  to make the revers. The sleeves were the most complex part- it had to be in 2 parts to fit on the fabric-, the top is cut wider and  pleated on the centre line, the bottom is tapering to the wrist. I'm not using a pattern for these- it will be maximising what is there after cutting the front  and centre back out. The side pieces and collar are small enough to fit on the scraps.


Assembling - fairly straight forward - the most time consuming area was the sleeves, fixing the pleats and finishing with piping along the joining seam took about 2 hours!. The seams are top stitched to flatten them but otherwise un finished to get the whole thing completed in the  time limit.    Sewing through layers of this fabric was difficult and then painful so short cuts for the skirt were most welcome.


The photos are a gallop through the  process, making the bodice, working the collar, making and attaching the sleeves and then adding the skirt. The skirt is nearly as found - about a 1/3 of the original garment was used to make the bodice so not much room for manoeuvre.  There were 2 triangular inserts  which I  placed on the  side seams to flare over the hips Gwen should have,  and then gathered the excess fabric at the centre back. It is really too long for Gwen, but  in keeping with the "up-cycling" theme it seemed silly to cut off one hem just to make another an inch away! I tried working out the proportions from the fashion plate  and this isn't too far away.

The front is just slightly crossed over and is held with a loop over the bottom right of the 4 buttons. The collar stands without any problem and would frame the face nicely. The frothy lace is just some scrap placed in for the photo, but it does seem to finish the look, the power of accessorising.


Summary -  I don't know what is happening with the photos - the originals are great but the upload seems to be having a bit of a migraine attack with them.
One simple pelisse done in the time allowed using all but scraps of the original garment. It looks like a warm, winter weight garment, quite plain and functional rather than grand and fancy. The only purchase was the victim skirt, all threads and buttons are from the leftovers of other projects. The problem areas are the bulk on the underarm seam affecting the hang even with the seam allowances clipped, and I set the collar about 5mm too far back.  The last is annoying as I fitted the collar and then shortened it !
 It is crying out for more embellishment. The buttons have given a focus to the front but there is plenty of space for frogging or decoration - and on  the back . I did toy with putting a belt across the centre back piece but I like seeing the tops of the gathers, that contrast between the smooth and then the volume is a beautiful detail.  I do wish that I had deconstructed the run and fell seams on the skirt - the machined lines and artificial colouring is distracting. If I decide to make more of this coat then a bit of unpicking will have to happen.

At the moment I am suffering from sewing finger -
the needle used was a 'sharp', slim and very pointy, unfortunately it was sharp at both ends, one finger has lots of little perforations from the point and the other is sore and shredded from pushing the needle though! Solution - toughen up the skin - no more washing up and cleaning windows, perhaps even weeding will have to go- all that washing of hands......

Sunday, 9 March 2014

It is in the wash - honest!


Spot of imagination required - finished facing the collar and trimming off the whiskery bits and chucked it in the wash to get rid of the soluble marker and old machining holes. " Fortunately" it has taken me so long to get this together that it has finished, been pressed and dried in the sun!  Imagination may still be used to ignore the creases.
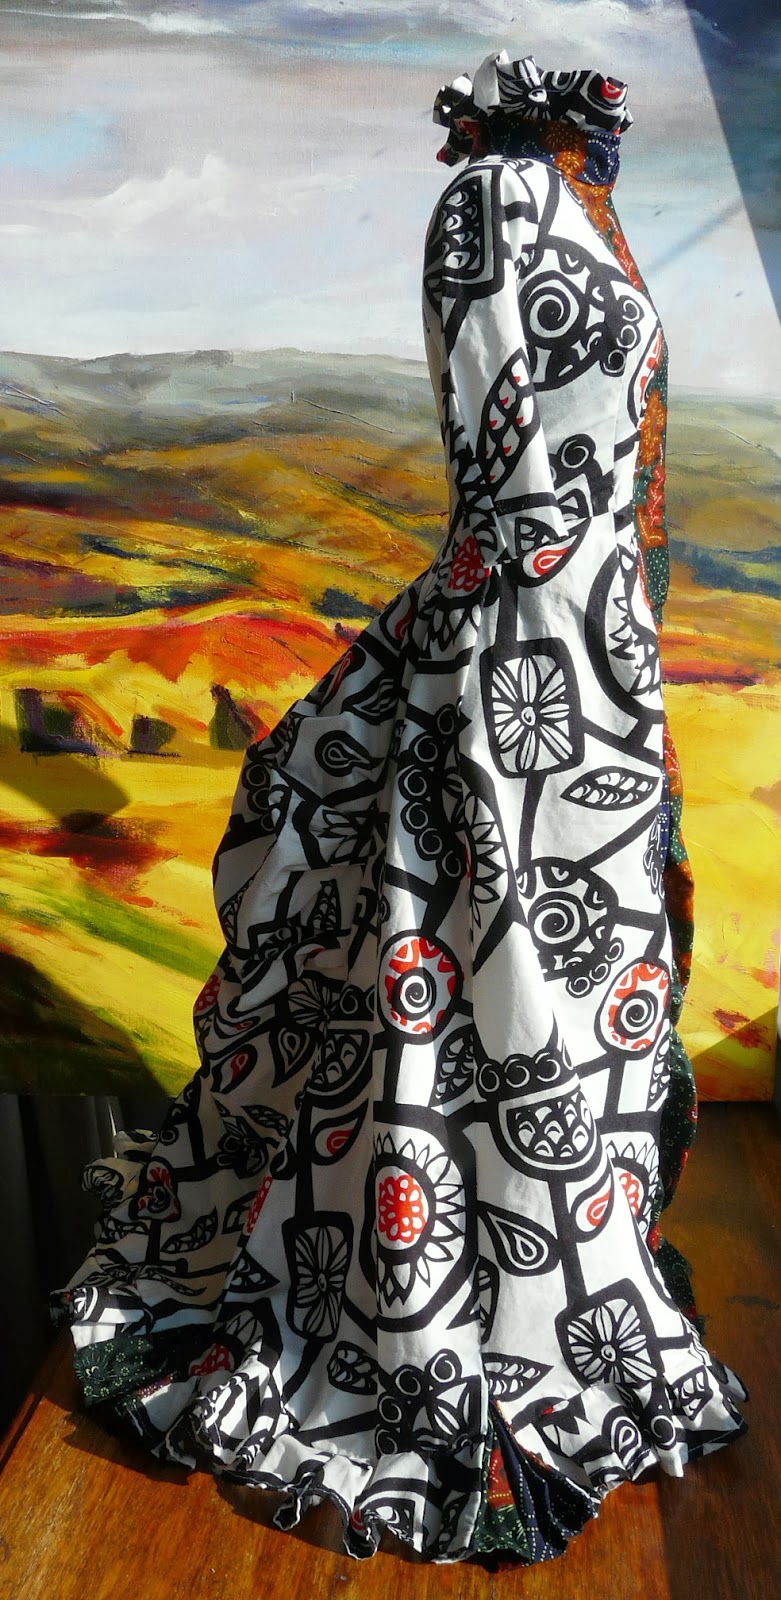
 This is a Victorian bustle dress based on one in the Snowshill Wade collection  dated 1878. Both Janet Arnold and Nancy Bradbury recorded it and this has been made working from their measurements and patterns to fit my  model, Gwendoline.,


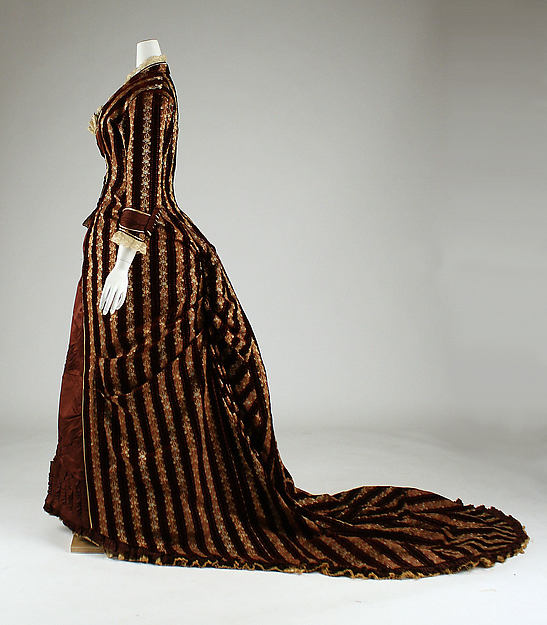
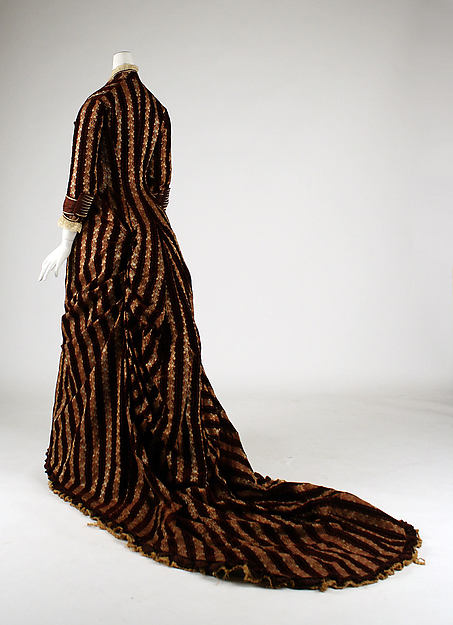
Afternoon dressAfternoon dressThis  afternoon dress  from the Met Museum's collection is the look and shape I was aiming for, showing the sloping rather than shelf like shape of the bustle and the gathering of the polonaise to give the fullness at the back of the skirt. The bustle's  weight   is supported by  petticoats flounced at the back while inside the skirt tapes held the  volume of the polonaise in place. The dress is cut in one length from neck to hem, no separate bodice and skirt, and with the open front is very reminiscent of the gowns  from the late 1700s.

 
The bulk of the dress is complete, a few odds and ends of finishing remain - such as taping the arm hole seams and the internal waistband, but nothing structural.  The amount of fabric needed for this has been a surprise - only a few scraps of each is left. It was the trims that gobbled up great swathes of material and these are the bare minimum. I would have liked a double layer flounce at the hem and something down the bodice to compensate for the lack of buttons.( Perhaps  Hobbs who retailed the original pillowcase could help to source more of the fabric). This was done as a direct draping experiment so isn't lined, which would have made it even heavier, but would  have made fitting the bodice easier and covered a multitude of sins on the inside. Stupidly I didn't think to take any pattern pieces so this is definitely a one-off!  I may try the stained glass trick and try a rubbing  to record the seam lines but it is complicated in 3 dimensions. As for the fabric - it  is a crisp, dense cotton, nice to handle, but showed every pin hole. These seem to have closed in the wash (phew!) but the main reason for choosing it was the bold, almost freehand quality of the pattern. The tailored shape and the uncompromising design should be at odds with each other but seem to work well together  resulting in something theatrical, certainly not for a shrinking violet. My favourite part - the bottom of course!

 
A lot of the week has been spent painting - trying out different styles of work to suit this dress.  The bold pattern is  an anachronism but reminded me of Audrey Beardsley's black and whites from the 1890s. These tend to be stark and hard edged, graphic illustrations rather than formal portraits.

Rejane.  He often worked  quite sparsely, choosing when to omit or include detail, sometimes working in silhouette and outline, sometimes focussing on patterning. In the painting above I tried working without outline, not trying to give a full 3 dimensional idea of the dress with careful tone, but letting the distortion of the pattern do the work.  I quite like the outcome but am still considering adding a background. In the smaller study the cloth pattern fills the page with the figure merging in to it or being outlined by it. I was also trying to work more loosely ( attempt at sanity) working  wet onto wet paper and letting the paint spread as it wished. Not very successful - the paint was far too civilised.

 I am not sure which gives a better idea of the gown. Stylistically I prefer the top one, but rather like the second - need a better face approach so she looks less gormless, but enjoyed doing the last- playing with the medium. Umm


The major problem is what to do next - there are painting tasks, full sized garments to resolve or raid the stash of pillowcases and try another combination of shape and pattern.
Pillow cases win. The others will plod onward but  what to make? I like decisions. Should I try panniers? Putting 2 of the designs together?.... could  be a real car crash of a outfit! Would I mind? Nope, it isn't me going to be wearing it!

And must be getting closer to being a real costumer - alien cat is trying to join in!

Sunday, 2 March 2014

Princess line bustle dress 1

Spent months being quite tasteful, there just had to be a backlash coming. When I turn nasty I like to do it good and hard - luke warm just won't do. So....

stuck to the recurring theme of the neck to hem long lines and pleating into the seams, and even a bit of polonaising and went Victorian!  Instead of en ferreauing I have been princess lining, not  Watteau pleats but a bustle!  Nothing by halves. While nowhere as ornate or complex as this dress

 from the Met, it will be a fitted, bodice front opening  down to below the hips. From there the front  skirt will be fairly straight but the back will increase in volume over a bustle cage and finish in a small train. I hope.

New things to do, new mistakes to make, exciting. Risking taking and problem solving - okay, on a small scale but still fun.

Back to Janet Arnold and Nancy Bradbury for a start point, again they both looked at the same day dress from the Snowshill collection.   Brightest  boldest candy stripes-
there is lack of stripiness in the fabric stash but lurking in the bottom drawer is a nest of Hobbs pillowcases - still in their packaging - desperate to get out. ( Not mad, bought when sold off as old stock, nice dramatic patterns, tight woven cotton. Only survived this long because I'd forgotten them)  Totally inappropriate. GOOD.


The whole of this has been done on the model, no pattern pieces, just a lot of pins, muttering, tacking and then redoing. Pattern pieces might have been easier.  The back - six panels, each full length with the centre and side panels  having extra width  from about bum level downwards to make pleats for the bustle bit. There is extra length on the centre pieces as well, this excess gathers up  in the side seams to make the polonaise. Again I like the idea of the contrast - fitted sleek v volume drama.


The basic ideas worked very well, worryingly so. The skirt bustled quite effectively and even began to train. It could have been an inch or two longer but there are plenty of opportunities to trim and extend. Getting the false front in was a bit of a menace - maybe that should have been done first and the whole front assembled then put to the back. I ended up starting from the centre back seam and building the dress forward from there. As usual focussed on the fun bit - working out how the skirt bustle came together.  I haven't got this too tight at the waist - there should be an internal waist band to hold the bodice in place which will help. As this was done as an experiment there is no lining either which would have helped avoid the stretching and twisting in some parts of the back.
The front of the dress has a false front  with hook and eye fastening on the centre line. Fabric choice was interesting - there was some heavy black satin all lined up, or another pillowcase - same colours tighter designs- or plain green or.... and I chose this Indonesian cloth. It was late at night, but having tried it all the rest looked safe and predictable. Not a wise choice as it had to be interfaced before it would hold the opening. Sometimes I like it other times it is sink into deep despair but unless something drastic happens it will be staying.  The collar is of the same contrast fabric, as will be the cuffs. There should be pleated inserts along the hem  - giving weight and flare I suppose- they may end up green and blue.


The sleeves are more tailored and shaped than the previous ones - in 2 parts and cut with curving seams. The sleeve head seems very shallow.
I did try a mock up of these and we are back to Pingu wings, flapping in the breeze. These current ones are cut with a steeper curve  but are still a bit flappy. The 18thC ones had lead weights but I haven't seen any reference to similar tricks for this. 


This is still very much under construction - final fit, finishing and trimming to do, all the fiddly bits, but it is looking better than I expected. I have enjoyed using the mad fabric choices - it is unexpected and instead of sitting there primly  saying 'aren't I historical', something else is going on. I will  have to do some thing to the front edges - the transition jars- a length of black grosgrain ribbon came off the pillowcase when it was dismantled - could be very useful.
It is starting to remind me of Yinka Shonibare's fabulous work but without any claim to be discussing cross culture references etc.

I had hoped to be finished by today - excuses are rather thin - keep falling asleep but did take a day out to join in with the Woolly Bike project with Cassandra Kilbride.  We were doing a Viking inspired bike as part of the Yorkshire Festival celebration of  the Grand Depart of the Tour de France this summer.  Very silly - I crocheted curly waves and half a snake. Di stole the show with a longship saddle cover and beard for the handlebars. The final exhibition with all 10 creations will be worth seeing!