Sunday, 27 April 2014

Georgian Jacket, caraco, pet en l'air, bodice......

Georgian Jacket - the French Revolution  Dress crossed with the Chocolate Girl.

Somewhere along the way I  acquired a pack from the Northern Society of Costume and Textiles about a dress  displayed at Castle Howard in the 90s.  The linen dress had been worn ( as a disguise!) by the widow of the Comte Guillaume de Panthou, wife of Henry Seymour, to escape from Paris at the time of the Revolution. By that time it was second/third hand, owned by the wife of a Seine boatman, adapted and altered from earlier incarnations. Although fine linen, it was no longer an expensive or luxurious garment, the fabric dates probably from the 1720s and this was at least its third makeover.

It was the bodice that interested me, the short body, fitted back, and the sleeve. The pack contained a gridded pattern to enlarge and detail drawings with notes. This was to be a quick slap it together at Gwen scale to see if this was something I would want to make for myself.  An hour later it was done in the rough and I was making a smarter version for Gwen  as part of her anachronistic pillowcase-wardrobe-in-the-making ( see the Victorian bustle dress). Never can keep things simple.....

As this was a reworked dress for a working woman how fashionable would it have been? Would it have been up to the minute? Was the style exactly what was desired or, like me,  would compromises have been made?  The photo above was the only one I could find for the dress so went looking for other sources for ideas of the front and closer detail on the peplum.  Many do seem to have similar bodies but  vary in skirt, sleeves and neckline. These source images and others are on my pet en l'air pinterest board.
 In the Liotard pastel study, the Chocolate Girl, 1744/5,  the jacket is different in detail, winged cuffs, the longer peplum reads almost as coat tails, and it looks as if the front maybe gathered under the apron bib. What it does have is a flat front with the shoulders  set well back, all  of the in and out curves on the torso happen at the back.
 I decided to take elements from both with a little bit of help from others such as the yellow c1750s example from Christies. This was never meant to be a precise recreation or totally historically accurate so a bit of mix and match wouldn't hurt.


The idea really was to make a short jacket/bodice  with a flirty peplum. The  fabric of choice was another Hobbs pillowcase- nice crisp cotton with a bold blobbish design.  The plan was to unpick and use the short side for the bodice and the larger part for the skirt. The base pattern shapes are from the Revolution dress but unfortunately the peplum was a greedy thing so I ran out of fabric to do the 2 part long sleeves - the compromise was to 'borrow'  a shorter single shape from Janet Arnold.

This is now complete, flat lined and with a contrast binding to finish the cuff and hem ( only because of fabric shortage- couldn't make my own bias).  It behaved quite well, apart from the fraying fine calico as the lining, but it did take forever. The back and peplum are in 4 pieces, the front and shoulder in 2 as well, so lots of  seams and finishing. In trying to speed this up I tried a stitching the top and lining fabric at the same time - http://stay-ingalive.blogspot.co.uk/2011/03/how-to-do-weird-running-whip-stitch.html . This seems to be a form of ladder stitch now I look at it but I ended up producing a version  of this. I whipped the return stitch over the top instead of coming back through the fabrics but it does work effectively enough.  I, of course, didn't remember about this until most of it was done.  The compromise sleeves look quite at home, the tuck at the cuff to create the elbow bend was a nice touch. The peplum is a bit exuberant, flirty I wanted but this is very outgoing, very 'pet en l'air'.


This is the first part of the outfit. Of course it needs the skirt. I borrowed my pet en l'air's skirt for the photos but it will need to be  slightly longer at the back to compensate for a bigger bum roll. The Christie's side view has a very exaggerated  bum, the peplum sticks out  above the horizontal. I think a  little less would suit Gwen, but will have to balance the peplum.  I'm hoping this style will suit Gwen's body shape more than the white pelisse - already she looks to be  more slender, the change in angle at the waist flatters.

 By next week this should be done, and hopefully the illustrations to go with it.  (It is going to have to be a Liotard-ish - but what on the tray? Chocolate.... cake? Coffee and walnut? TV dinner?.....)  or maybe match the starker style of the Victorian bustle dress?


pattern source - NSCT pack 2.- A Dress of the Revolution- worn for escape- 1793.  http://www.nsct.org.uk/
Janet Arnold,  Patterns of Fashion 1, p 42 (sleeve)
Met Museum and V&A


Sunday, 20 April 2014

white pelisse


Of  lovely April days, invasion of cat,  white pelisse, and other many distractions. This is the blog as it was meant to be!


Last week-

The making of the white pelisse-

The sun has shone, the grass and weeds are happy. The bees buzz, there are butterflies, the garden is in its purple Spring phase.  I might have been distracted from costuming but I have been refining copies and interpretations of fashion plates to show the latest additions to Gwendoline's wardrobe as well as constructing 18th Century items for myself, so it has been busy.

I decided to use a clingfilm  base and made Gwendoline a masking tape shell. This was sectioned into pattern parts and then cut and flattened to create templates- and it worked! There is very little gaping, or bowing, or pinching – all without any fiddling, adjusting or cheating in any way. Umm, wow. Don't worry, it won't last.


This of course has lead to unwise decisions, there is no point having patterns that will only fit once, I wanted to find out how flexible this approach would  let me be – 1820s shapes- lower waist, broader shoulders, exaggerated sleeves and decoration. The fabric is curtain offcuts – trying to look like a heavy weave cotton or linen but I'm thinking that the closest this has come to nature was being sat on by an invading cat. ( I yelled, it went from snooze to panic in one move, did a complete circuit of the kitchen tops and windowsills at full pelt before escaping out the backdoor, fled through the hedge and off down the road.... leaving me with hairy fabric and chaos!)

 One idea arising from the gingham frock (last week) was using the smocking as a substitute/sculptural form of gathering, so set out to try a Juliet style sleeve with the repeated gathered bands down the arm. I also wanted to do more with pleating on the bodice. Even my favourite pelisse has gathers above and below the waistline. This fabric is quite stiff, it will bend and flex but goes clumpy and lumpy on curves and bulks up very quickly. The pleats in the back look good but have left the waist heavy, a wider waistband than originally planned might be needed or else the waistline is going to end up the thickest part of the whole garment!
last week's progress


Having faith in the pattern pieces makes such a difference – and saved so much time. No repeat fittings, unpicking and realigning. Getting from 'what shall I do now?' to having a believable bodice took less than an hour. The smocking took about the same. If I had a brain I would have done the smocking before making up and attaching the sleeve. But the sleeve was a bit of a guess, I knew I wanted more fullness at the back rather than the front, and that Pingu arms must be avoided. So I began with a basic gathered sleeve shape and made the curve at the top steeper and off centre . It did take some minor fiddling as the fabric protested about curves but it sits reasonably well, although many sins may be lost in the puffiness. And of course the piece I cut as a pattern is now firmly attached !.
 

This week-
Overall the pelisse has worked quite well- the good times did not last  The collar was a problem, it still tries to stick straight out rather than relaxing on the shoulder. Repeated washing did not help it, the fabric has a great deal of 'boing' - it tries to reset itself to flat each time. The radial  pin tucks have helped  a little and something to experiment with later on. Fears about the waist at the back were well founded, it is thick and seriously needs stiffening. Perhaps come at it from the end - put a bow on the  waistband cb so the bulk becomes deliberate ( see little blue example above).
  I do wish this stuff would make its mind up - it bends when I don't want it to and is too stiff when I want it to bend.

 As a relatively plain pelisse it is fine, the gathers in the sleeves give it more character and style. The gathering on the centre back  should perhaps only be attempted with finer cloth. Poor Gwen does not look terribly happy it. It does nothing for her figure - the extra bulk on the waist is not good , there is nothing voluptuous or even jelly-on-a-plate-ish about her to give definition, she ends up looking like a tree trunk. In the plates above, the waist is so narrow in comparison to the shoulder/ sleeve line, and  Gwen goes in just a little and out not a lot. I do wonder about making her a set of stays /padded bodice-  can't pull her in but might be able to push her out. ( I'm sure I thought this before sometime - a little set of transitions with bust enhancer?)

One moment - repeated washing?  Knowing how much I enjoy domestic chores  you will have realised this had to be an emergency. Well, first the 'sharps' needle I was using was very sharp and I hadn't noticed, second time was due to creating drawings in pastels. The washing has caused problems, now the lining is not happy at the armhole, causing the wrinkling seen above, a bit of unpick and pull  will hopefully sort it but this garment will remain untouched until the pastel phase ends.

Distractions-
1. Pastels- not a medium I usually use but... apart from the dust .....they are quite fun.


2. The fake book. - it started with a charming photo posted on facebook from the Australian Jane Austen Festival in Canberra.  In the general flow of very learned conversation we decided the photo looked like a book cover, couldn't resist it, and....  Last time I caught up it was either Mr D would emerge a la wet shirt, or she had  just shoved him in.  The drawing took  over a morning and then working out the editing  programme took about the same. (Gimp2 - a free download, complex but very good)


3. Gave up putting it off and set up a website- AARGH.
 
  Pastels were easy, Gimp is straightforward. If I had known how to do this it would have been simple! Used Google sites, free, supposed to be an easy site builder, self hosting, and well I'm googled for almost everything else. Looking back, once the mind shift was made, it was straightforward enough.  Over riding the templates was the most frustrating thing - typing in black, size 12 in default font to find it published in blue, boxed in a corner and.......
Hopefully all sorted, hopefully,.... Feeling very exposed at the present.  Be warned - will have to start experimenting with promoting it next....
 
 
And totally recommend
BBCs   "At Home With The Georgians: A Man's Place. 
So much more than important people and oh look at the houses. Well done to Amanda Vickery.


Sunday, 13 April 2014

A little sewing, alot of pastels.

So this is not the post I was hoping for - that was even drafted and photos done.... and then.... distraction struck with a vengeance. Here are some tasters/teases for the real blog, construction, more smocking, fashion plate......
 but this is the one you are getting.
Let me explain - Started the new idea on Friday, tried a new way of drafting the pattern - worked well. Using up some fabric stash- brilliant. Went together sweetly, even embellished according to plan. Suspicious? So was I. Only things left to do are finishing the lining, applying the fake waistband (cut, pressed and ready) and fastenings ( set out and waiting). This was obviously too much to cope with. It felt like being a real costumer - even had a cat invade and sleep on the spare fabric. So of course got distracted, by a nose.
 It was too long, like a beak,  it was looking at me, and had been looking at me for most of the week. While the kettle boiled it could be sorted - that was breakfast - it is now lunch. Sorted that nose, done another and sorted that too.
So I'm always doing painting and drawing along side the sewing but this was a pastel work. For anyone who hasn't used chalk/soft pastels they are a rare species of demonic life form. Never get the exact colour, or marks in the right place, and  they conspire and giggle in the box just waiting their chance. Not too bad, until you realise the amount of coloured dust they spread happily over everything, the cutting/work table, the floor, me. It isn't just any old dust, this is friendly dust, wanting to get really close and stay with you for life.  Not the place for a plain white anything. I am actually going to have to WASH UP to get it  off my fingers. This is traumatic.
The new garment is on hold until the table is wiped down and dried, everywhere hoovered  and clean.

What I will share with you is the cause of all the trouble-  a study by Adolph van Menzel.
von Menzel

Watteau
 It has the same informal charm as the Watteau studies and is an unusual, beautifully lit  pose. I can't decide if she is being coy or looking for goldfish.
After a couple of pencil tries out came the evil pastels and battle commenced. They are actually quite fun to work with  and working on a coloured ground was a change - the colours are bolder, the paler tones are more vibrant, but they mix in unexpected ways, sometimes clear layers, sometimes muddy, chalky and opaque.
initial working
Having got this to a reasonable place it was pinned to wall (gently shedding dust) for a few days so that I could evaluate it and plan the next stages. It really was the nose, and elbow, and claw hand, and skirt detail.
It was going to be a quick amendment, no fuss, no mess, no trauma. It was. And then the 'should I do a background to balance the composition?' decision. And then came the 'while the pastels are out....' moment.
The Yellow Dress.
  The dress is the yellow gingham made and posted about last week. I haven't tried to  be pedantic about the gingham pattern, focussing more on the shapes and fall of the skirt. This is a very different outcome to the 1824 fashion plate pose done to previously. I  like the idea of presenting my Regency creations in as Regency a way as I can but I do like the  substance of this- is does make the fashion plate look over precious (but in an entirely charming way. Of course).


The second image is  based on the Scarf/shawl dress from the week before and is the development from the "Regency Wedgie" pose as discussed on facebook and pinterest. It was too good a thing to pass up so I had added a quick sketch to the mix and this grew out of that.. After so many still poses this was meant to be dancing ( just about turned into the 1960s/70s flamenco pose) and she is holding her  over dress rather than adjusting the underwear!


shawl dress with initial illustrations


They have turned out better than I expected, the shawl dress needs more attention, but pastels allow for a combination of approaches - the directness of pencil mark making and line, and then the more painterly handling of surface and colour. They have made me work larger, more quickly and to be bold in the use of  the limited choice of colours that I had, forcing me to be more experimental with  mixing and contrasts. The coloured paper puts more emphasis on working with light,  which I have probably enjoyed just a little too much. The water colours are still the choice medium, there is so much still to develop there. ( They look better in the flesh - more subtle, and softer) but these have been fun! And messy! And now to clean up....... or should I have a go at the dancer first...to save cleaning up twice...... how about the far shoulder of the yellow dress- should be puffier.....
It will be tea time soon.

Sunday, 6 April 2014

Regency summer dress with smocking details.

This week's task
- not so much working on a basic shape but looking at how to modify and extend this to create detail. Instead of straight gathering  I decided to make the gather decorative and an integral part of the overall garment design. This is the start of Gwendoline's summer wardrobe. Rather Georgette Heyer, fresh, bright, innocent.
Met Museum Spencer
Pelisse, 1815-20
Smocking has a long history, it is a way of using pleating to alter shape,  of drawing areas in and allowing fullness in others without fancy cutting. It has become decorative, patterns sewn onto the pleats, or  creating patterns by how the pleats are formed. When looking for ideas I  went for the latter technique, the former is something I associate with either Farmer Giles or small children.


 The associations with the second technique are no more promising - silk fancy cushions -  but  it did look more like some of the details of some regency clothing. The technique is simple. Mark a grid on the fabric and sew points together to make pleats. Most things sound simple in such basic terms! It did require precision, neatness and patience, not my natural skill base.                                   .
 
To keep life simple - gingham! The smocking grid comes ready made with  this fabric. Gingham was around and used in the period but sometimes as a stripe rather than a check. 

"My mother told me that my childhood had passed away; I was now seventeen, and must for the future be dressed suitably to the class of lady into which I had passed. ...
Two or three gingham dresses of different colours very neatly made with frills, tucks, flounces etc. Two or three cambrick muslins in the same style with embroidery upon them, and one pale lilac silk, pattern a very small check, to be worn on very grand occasions......”. (1814)   
from ‘Memoirs of a Highland Lady’ by Elizabeth Grant of Rothiemurchus.
 
So to begin...
It was going to be a bib front dress with a trained skirt but the fabric just wouldn't drape, the skirt was clumsy and gaped, so it was converted into a basic open robe with diamond back, high waist, straight skirt gathered at the back and overlapping front. But I also needed to know how much extra to include for the smocking, so experiment time....
the pieces

The purple sample is an interlocking leaf kind of pattern, made of 3 double rows of diagonal gathers. It seemed quite straightforward. The little squares pattern  is formed by pulling in 4 corners to a centre, this seemed more complex, first impressions are definitely misleading.
Areas to smock - sleeves, centre back, possibly the top of the skirt gathers at the back.  The back  gathers are large and left  a real question about how to deal with the fullness in such a small  area. The cuff edges are held by bias binding and the fullness above is pleated into the top of the sleeve  seam. This worked so well that I got carried away. Must remember that good ideas should be handled with care. The gingham is not really that nice, it looked so flat that a bit of detail on the skirt seemed the way to go. Could the technique be used to create interest and texture rather than gathering? Probably, but not by me! It began with the same pattern as on the sleeve but in miniature down the skirt front edges. This is a simple pattern but all of a sudden I couldn't understand it, which way should the diagonals go? How do they line up with each other? It also gathered up quite alarmingly, but looked great when rolled to make the edge. Phase 2 was the little squares,  2 side by side with a space above and below to make a column. So easy! This has  pulled up the hem but this could be pressed out  to a great extent. 
The dress was done, only the usual problems about buttons, I tried some covered discs but the fabric frayed too much at this scale so emergency beads are in place until I find something.  So of course I made an underdress out of the scraps, as you do.  The things I find to do when there is housework waiting and the lawn to mow..... I had intended a white slip, but the gingham fabric needed using up....


The positive - the sleeves. They have a sense of self importance and are more than prepared to stand up for themselves. It was surprisingly easy to work and they went in first time. I would imagine they would not be easy to wear, acting like shoulder pads, rising up to attack whenever the arm is raised too high. The gathering does work well visually, but caution is needed. For some areas a separate panel  might be answer. If I had sectioned the back into 3 it might have sat flat. against the torso. 
Negative - distortion. The front will need to be blocked to flatten it out a bit more. This will happen after the wash it needs and re buttoning. The self covered button idea looked charming  but was impossible, they needed recovering every time they were used. I must find  a decent solution to this as the beads are too small, the dress looks cross-eyed.
 
Would I make this full scale? Yes, but with modifications, and not in yellow gingham!
 
 And then the fun bit - creating a fashion plate-  The pose is from an 1824 Ackermann's Repository ball dress. The lady was eating an ice but  this has changed into sewing.
oh, and of course....
The Hider of Scissors. My own personal sewing demon, mischievous not really evil. 


Sunday, 30 March 2014

Regency shawl dress, Gwen shall go to the ball!

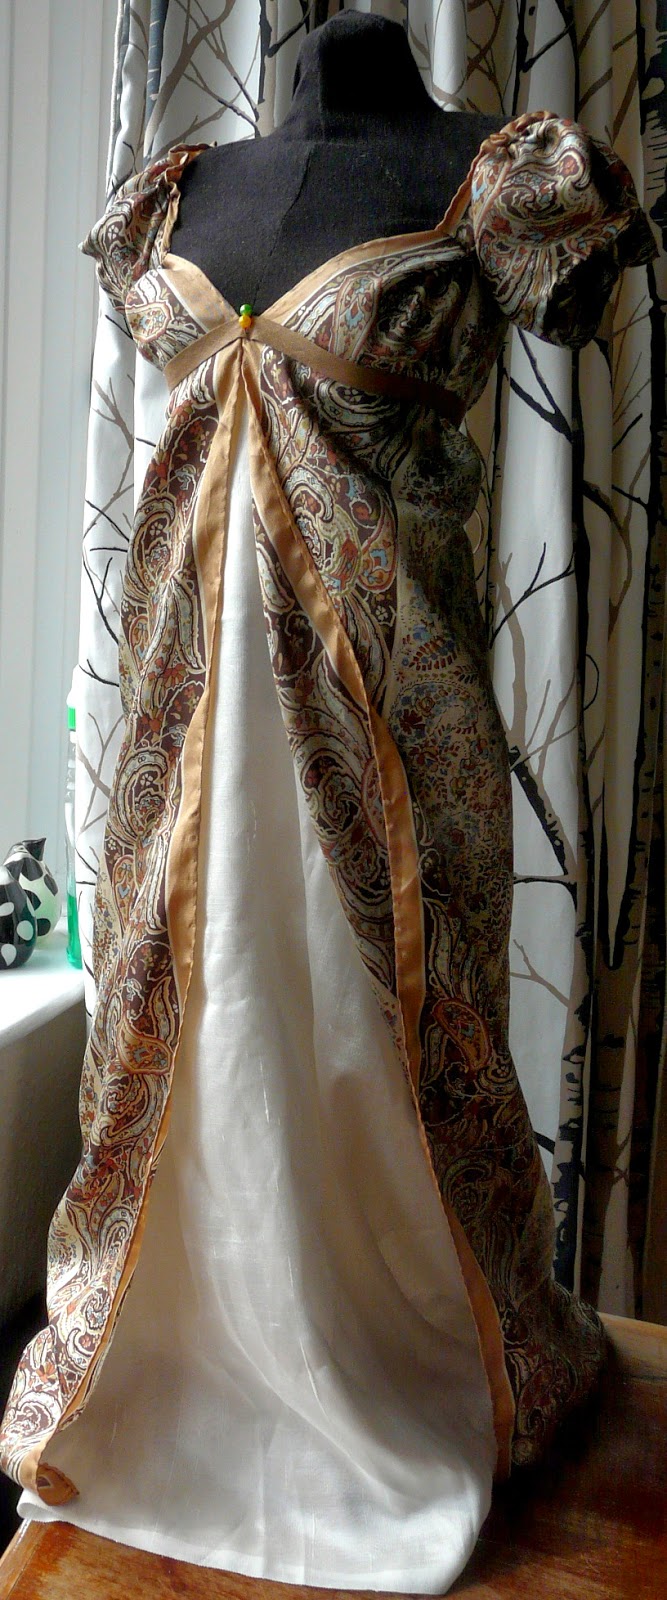
I claim no responsibility for this. A query was posted about using saris   to make a regency style ball gowns, they are a good source of fabric, richly decorated  and often excellent value. The responses cited the trend for dresses made out of the imported Kashmiri shawls in the early 1800s, something I'd known about but not really considered.
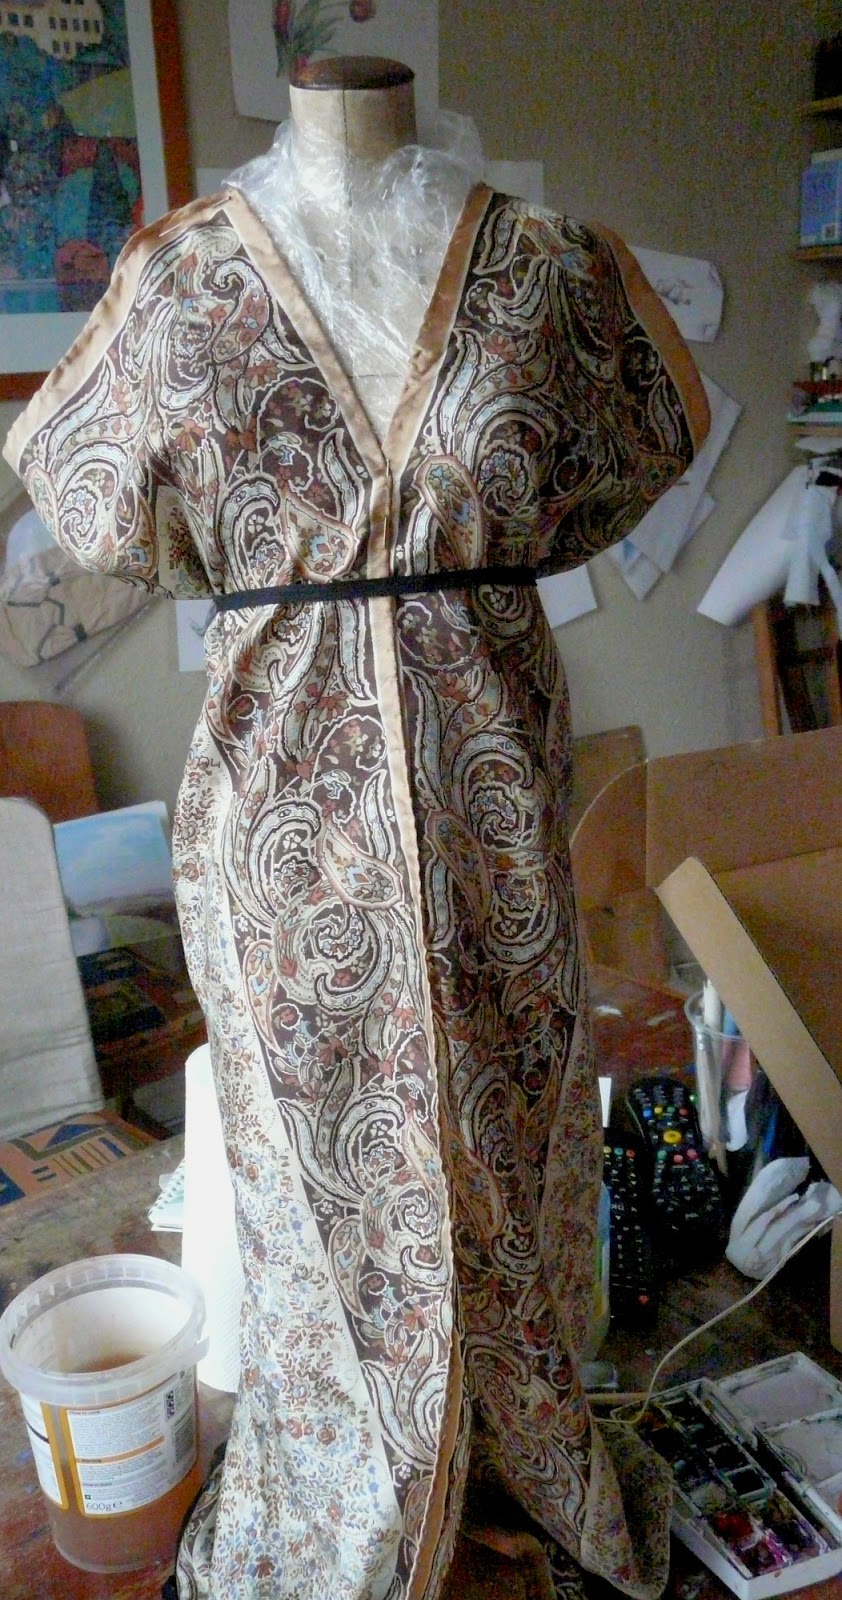
I just happened to be in a charity shop getting my breath back having cycled into town, it just happened to start raining so was reluctant to leave, there just happened to be a silk scarf of a sort of  Indian design, sort of the right size, so I bought it, and this happened......

Context first -  there are many pictorial and extant examples around, the shawls were huge so offered many options from the drapey Greek style chiton approach to using as a standard dress length of fabric.  The fabrics varied as well, from fine cotton and silks to heavier winter weight wool. The first blue dress was the one that began this little episode, from the Snowshill Wade collection dated 1815 and documented by Nancy Bradbury in "Costume in Detail". The second image is merely to show the volume of fabric and the ornate border of a shawl, the third is an 1810 dress from  Museo del Traje and  the blue print ensemble is  Empress Josephine's ( not entirely sure if this was made from shawl lengths or  fabric printed to look like it, one site is sure, another is not! but it has the same feel of using the imported pattern). They all make use of the borders and trims  especially around the hem and neck. The fashion plates show much the same  story but with more accessories, more ornament, layers of detail and pattern.
 
The original shawls were long rectangles with ornate ends but mine was a 30" silk-ish square with a printed border all the way round. A garment for me? No, remarkably draughty. A garment for the faithful Gwen. To the right the scarf is  folded into the centre and pinned at the shoulder to give a very basic drape. The challenge will be to stop it looking like a dressing gown. I like using the border  in the centre of an open dress but Gwen needs much more help and structure to give her shoulders, somewhere between the profiles of the  green and first red fashion plates.
 The dress is fairly simple, the only cutting was to take off the top border, This reduced the length and gave something to make the sleeves out of!
 
There are 2 rows of gathering to create the bodice, on the high waist line all the way round from border to border and at the centre back along the top edge. The front is joined at a point 3" down and the very top of the front border is pleated back onto itself to give the separation at the bodice.   Each sleeve is half of  the sacrificial top border, sewn into a tube for an inch and opened flat along the top of the dress and  attached. They are gathered at shoulder and cuff trying to give that extra breadth  across the top line. I did reserve some of the yellowy border to do the front trim but it has escaped at the moment, so a length of elderly bias binding is playing understudy for the photos. It gives better definition to the bust but is rather clumsy  tied at the back. If I can't find the renegade trim this is all I have left of the fabric to work with - wish me luck!
 
And the most important question of all - Does this make Gwen look less like Juno, athletic and wholesome, and more of a siren, has she achieved cleavage? 

Certainly like the wider shoulder, even if they had to have stuffing shoved (romantically) up the cover to stop the sleeve slipping off. The back is a bit too much, may be lose some gathering to the sides. For such a straight forward idea this has not ben easy. Getting one side to work was simple, getting the other to match was a pain. The fabric was lovely, to look at, but had no substance. It lost all shape and form unless it was on the model so that was how most of the sewing was done. If I was making this for real the seams would be taped and the bodice mounted onto a lining.  I must take a pattern from this and try with a more meaty fabric, with some adjustment this could become another Gwen wardrobe staple. At least it is her very first grown up ball gown. Not bad for £2.49  ( cheap date).

Some useful sites-  There are loads out there, but will there ever be enough time to read them all?
http://historicalclothinganduniforms.blogspot.co.uk/2012/03/not-only-shawlshawl-dresses-and-dresses.html
http://thedreamstress.com/2013/01/the-kashmiri-shawl-and-the-dress-made-of-kashmir-shawls/

http://www.fashion-era.com/regency_fashion.htm
http://www.marquise.de/en/index.html

Monday, 24 March 2014

making the mob cap

Georgian/Regency cap

Apologies for the tardiness this week - just trying to get the world to behave a little!  Failed. Gave up and am just getting  on with things regardless. And moan. And moan. Comfort eat. And made this as a by-product.

This week has been a very 'shut up and get on with it' one. I've had a chemise pattern for a while and was determined to make it. This is bread and butter sewing not cake, lots of straight, precise fell seams on a garment that was never intended to fit. As one who does not convey ideals of elegance and svelte willowy form, for me this garment had all the charm of a potato sack.
Being a good little beastie I even measured carefully and followed the instructions. Hah. Should have an ease of 12" over the hip not 20".  "This is a good time to finish your seams, if you have not already done so. The original has been entirely finished with small flat felled seams." And that is that covered. I have never tried felling intricate  'Y' junctions before, don't really fancy doing them again, not without more advice or medication. The great white whale is done, it will do until I've got my mental breath back and can face redoing the  dodgy bits. You may guess that I am not truly happy with it.
This left me with an aftermath of a floor, Furniture all over to maximise the floor space for cutting out, bits and remnants taking up residence, notions escaping, and sniggering in the corner is the machine and iron. So what to do? Bright idea, I'll make a cap out of the left over fabric, that will really help to clear things away!
So....
I've made the panto version (dustbin lid, elastic and ribbon- 10 minute task once started!) but this was to be a more refined form and the whole purpose was to make an exploratory piece to sort out shapes, sizes, design and construction  for future reference. As an adventure into The World of Caps this was a sewing machine job for speed with hand finishing if it came out right


The basic model - a version of a mob cap, frill as a peak, band and then the cap. Very simple, lots of variations. Standard indoor wear for wealthy widows down to the servant help, fashionable as well as utility. (The very funny ones are those perched high on top of the towering wigs, still with a pretty bow) So many examples are on pinterest  that I spent far too many an hour longing,  looking and worrying.
liotard -
Begin with identity crisis, what is my social status? To decorate, to froth with lace and ribbon or to be sober and plainer, cheaper. Seeing as the chemise fabric was the cheapest cotton I could find I think the cap certainly won't be of the posh variety.

Scale - I am not good with hats so something to hide/lurk in or that could be welded in place is a must. Of course at some periods caps were worn under a bonnet or hat, so this could be phase one of head wear.
 

Up to this point I was fine. Some fabric had left the floor, so had most of the pins, one pair of scissors and a tape measure.  Rough pieces were cut - long 3" strip for the ruffle, a band tapering at each end to over the head and a tall semicircle for the back. Simple and straight forward.

 Then..... Couldn't decide between narrow knife pleats or broader box pleats, so made one of each. Liked them together- why not use both?  The frills were sewn to the front edge of the band and tried on.  The moment photographed is the one of Hope Triumphing  Over Experience. The  pleats are full width 4" and seem to give an exaggerated ruffle, too much like a cake paper.  That I also looked like Mrs Tiggy-Winkle  crossed with Toad escaping as a washerwoman rather than a simpering Regency Miss, did cause concern. The pleats were reduced and layered as shown but I did  it the wrong way round! Redid with the box pleats wider than the other. These are forgiving and fairly open so with any luck the tighter knifed layer should stop it from flopping too much.. There are many paintings and extant garments to show that this double frill was acceptable but usually with the narrower band uppermost. By the time I'd finished these strips had lost that lovely crisp whiteness of fresh cotton, they are scarred, mangled, abused but still trying.


The  cap back was a horse shoe/ tall half circle, the bottom section folds up to make a drawstring channel. Not sure of the size needed I started off with 17" diameter and prepared to reduce. It was gather-stitched and pinned onto the back edge of the band and adjusted. When I thought it was fine I sewed the seam really,  really carefully but....
the back cap was still too full- positively bouffant, probably fine for the 1790s, but not a look I am comfortable with, so this was removed and made narrower. (By 'removed and' I mean unpicking seams, unpicking gathers, pressing, measuring and marking, 2 lines of gather stitch. pinning at the quarter and eighth marks, gathering to fit, sewing a new seam, removing pins and then pressing the seam open. Again.)

Major construction is done. I went with a band sandwich, duplicate band pieces top and bottom, holding all the seam allowances safe and out of sight. This was hand sewn - it felt so good just slipstitching along, and now the creation is created!


It isn't shaming but there are things I would change - the back is too long and could be gathered up more. Perhaps the outer frill is too wide still?  The knife pleats are  vicious, too rigid against the outer layer so they don't complement each other as I hoped. A run through the wash could work wonders as the fabric isn't pre-shrunk! 
As a cap it will do. I have a better idea of the process and adjustments. Worrying thing - still some fabric on the floor, would still be enough to make a cap........ and I do like the sans-frill carcase picture above. (Millicent could sell anything).  Remembering   "The Mirror of the Graces" advise I should be careful not to over embellish as a lady in the advanced seasons of life!

And, no, at this time I am not going to publish photos of me wearing it, content your little souls  with Millicent the Milliner's Dummy posing serenely for you. If you don't think I suffer enough do take into consideration that I have to tidy and resurrect the room for the art class tomorrow!
  I hate housework. Might find the other pair of scissors.