Sunday, 19 January 2014

ghostly dress


Headless wonder !

Currently haunting my hall radiator is the finished calico and PVA dress. It does look strange without a body in it  and is not at all what I expected at the start –  perhaps it was rather ambitious to do a sack back but a good experiment overall. It is fairly rigid, quite cardboard-like, but how this will last I do not know.

Process Problems – supporting the weight of wet fabric as it dries.
Keeping shape as drying – strange things can happen.
Preventing set areas becoming wet and pliable again.
Drying times.
Unblocking pipes having spilt large bowl of glue solution down the sink( hot water and unresolved anger issues worked wonders)


Benefits - do not have holes in fingers from sewing,
very direct way of working – see it, do it, dunk it,
small periods of working then put to one side to dry,
errors can be undone – frustrating but satisfying in the end.

  Would I do it again? Yes.


Would want to use different fabrics – cotton-based for absorbency- patterned/ striped?
Want to be able to fix more permanently – acrylic varnish?
Like the idea of having the 'seams' raw on the surface – really looking at the construction and fitting.
Might keep a body form inside or a wire armature .

Will try just with cutting out and sticking, no sewing.
In the background is the dress I've been making  while the glue dress dried. This is a fairly straight forward 1780s polonaise pattern, loosely based on the extant example from LACMA.  I've gone for

LACMA en ferreau back and front fastening with hooks and eyes. A pain - quite literally- to do - an awful lot of sewing before construction and and then a lot of finishing. I didn't help myself by adding a stiff interfacing and lining late in the process - to give that corseted look.  It just needs a wash to get the blue marker pen out and a press over to be officially finished! I do like the fabric, it is summery and fresh, and yes it is Laura Ashley curtaining. One extra tip - do not stab yourself with the needle and then bleed onto the nice crisply white fabric. It is an avoidable trauma - washing it out, not the stabbing.


Next task is going to be doing illustrations for this - patterns, drafting and construction notes and then the fun bit - painting. Romney I think for this - making the most of the creases without getting precious.

Sunday, 12 January 2014

costume/sculpture II

This has been fun. Messy. Hysterical. More messy. But fun.  It is only possible to do a little and then wait for it to dry and stiffen, so even little things take a lot of time,  not making and doing time but standing-back-and-not-fiddling time - the very worst kind.

 The back story-
 Aim - to make a free standing C18th costume, inspired by Boucher and Gainsborough - using calico and PVA glue. This is a trial piece to assess the creative and practical potential of this method of working.
it's more like this from LACMA

It was meant to be elegant  like this, but....

Process so far -Bundled up a mini papier mache  body on a stick to be the armature.
Added a skirt. Dunked it  in glue, dried then redunked and dried again to make rigid.  Then added a stomacher and  the body of a sack backed jacket based on the pet en l'air made before Christmas. This was without sleeves or collar, to be added later. Dunked, draped and dried.

This was all in the last post - just didn't have the heart to update,  adding that the weight and wetness of the jacket caused a skirt crisis and it started to collapse over night.
 After expressing myself quite fluently, the skirt was resoaked and reset and redried.  The jacket was in decent state so only needed a gentle re-wetting and then resetting onto what is left of the now mutant body form and re-rigid skirt.
 For some reason the glue is struggling to hold the jacket closed onto the stomacher, it keeps gaping, I may have to resort to pins or tacks to close it while trying again. This sounds simple  but the fabric is now rising nobly to the challenge of going rigid - the last stay stitch had to be done using pliers to pull the needle through and the cotton thread wasn't as strong as the cloth!

Patience is not a virtue I possess, there are teeth marks on the furniture. The waiting has led to several ideas/ associations. At present the height of the back neck and the general headless quality remind me 'Sleepy Hollow' - could this be Mrs Headless Horseman, or perhaps he was a cross dresser before Tim Burton came along to do the film?


 Sleeve making has now happened, although not quite as originally planned.  The raw sleeve units were made up with flounces and elbow tucks but not then set.  To lessen the weight and the awkwardness of joining rigid to rigid,  just the top section of the sleeve was glued and then attached to the body, pinned (pliers again), and dried. They have moved as they dried but the glue is determined not to let go so it will have to stay. The rest of the sleeve is being painted with glue  and allowed to dry in sections. I'm just about at the flounces now, without major mishaps so far!

The neck edge has yet to be sorted out- the back lowered and then cased. I am thinking of cutting out  as much of the original body as possible leaving the costume to support itself.  I doubt if this will be easy or neat so extra finishing - maybe a lace edging will have to be done.    Another week of happy glueyness!
She(he?) is in the hall drying - I keep sneaking a peek round the door to check but she is being well mannered at the moment. I hope to have it finished by next week, I'm sure I said that last time.....
Also should have an en ferreau polonaise gown done by then -  I'm part way through fitting it - but key question - can  I be said to ferreauing?


Sunday, 5 January 2014

non-essential learning- life skills

lesson one - when squashed by a sofa Brie remains very Brie-like, satsumas  are less resilient.
lesson two - flat teddy bears are great when removing or replacing doors.
lesson 3 - organised does not mean tidy.
lesson 4 - it doesn't matter how many things you bring downstairs in one go, there is always something you have to go straight back up to fetch.
lesson 5 - the people who  phone when you are busy or the phone is the other end of the house are the least important to you.
lesson 6 - hiding doesn't make the nasty things go away. Nor does shutting cupboards or doors, the mess is always waiting for you.
lesson 7 - always have someone to blame.


Couldn't put it off any longer.  The house was fine when the emphasis was on going out and then being comfortable when home. Now I  needed more work space, floor space for cutting out, and better lighting now the daylight is  thin and feeble. So all the livingroom stuff is now in the little dining room, and worktables etc are now in the front, larger room. My house isn't large so dismantling of furniture, juggling sofas, dining tables etc around and door removals to get it all down a narrow hallway,   had to happen.  Not much energy was left for sewing. (And yes, when stashing a sofa in the kitchen I did land it on a bag of groceries I'd forgotten all about) ( The Brie tasted fine, didn't try the mushed satsumas, probably helped to tenderize the beef)

the pet en l'air costume
The bulk is done, still some things to resolve, like just how comfortable should the spare armchair in the work room be, so in amongst the chaos I began making again.
 Something I have been considering for a long time is treating the costume more as a sculptural exercise than a sewing one. I am reconstructing the pet costume but in calico and glue. Why? Don't really know.


cast of the body - spot the high tech approach
 I had a little body on a stick from which I took a papier mache cast. This was then taped to a stand and a calico skirt  was dunked in a PVA mix and draped onto it. ( recommend not doing in a busy room - the glue gets into some surprising places).   Elastic bands held it up while drying which took 2 days, and then it needed recoating with a stronger glue solution  to increase the rigidity  At this point found the old hairdryer, taped it to a mannequin stand and  blasted the thing... Not very elegant.
Stage 2 was  adding a false stomacher - just a triangle, dunked and glued in place. Breeze.
Stage 3 is where we are now  The start of the pet. Some sewing had to happen -  the Watteau pleats were pinned into the back but the big base pleat needed to be held together underneath to create the back bodice. The underarm seam is over the hip pleats  like the original  but I haven't  made arm holes. This pet is now dunked in the glue and drying on the model. Once dry and set rigid the back neck will need trimming and casing and of course arms are needed. These I am planning to make separately with cuffs and/or flounces, dunk and set them before attaching as a complete prefab unit. Hours of fun!
The finished object should be a self supporting, fairly rigid structure of the jacket, skirt and possibly kerchief.
Really just to see if I can. The fabric is coarse calico so could take spraying or painting ......  umm..... and then what do I do with it? It will probably be 'answers on a postcard' time again.
And as for scissors - haven't seen ANY for days. I think I know where they should be......

Tuesday, 31 December 2013

Completed C18th costume - Gwen does Poldark?


Ta da te da te Dum! (larger fanfare than usual)


Not only are the pet and caraco complete (old news) but I have now made the skirt and a neckerchief to complete the costume. There is no point in making stays – the only way to reduce or alter Gwen's waist is with wood working tools, no point in shoes, etc – there are no legs or feet, and a cap or bonnet looks incomplete without a head to go underneath it.


front showing the inside of the open pet
The skirt is simple, blocks of fabric pleated at the waist, raised slightly in front to compensate for the bum rolls. The hem is taped rather than folded, extra work but a smart, clean finish. The construction is straightforward – the knife pleats face to the back leaving a small flat section at centre front. A length of tape runs along the waist edge, neatening and holding the pleat edges as well as extending to become ties to fasten the skirt. The knife pleats sit really well, opening over the roll and folding shut when not needed.
 This extra layer does not benefit the mission in search of Gwen's corset waist, but with the pet's skirts flaring outward over the hips it is contriving to give an illusion of narrowness ( you have to get the angle just right and squinting might help).


The neckerchief is again very basic. Janet Arnold shows a triangle, Nancy Bradbury, a square to be folded. For this one I used a triangle of muslin – need practice with the flimsy fabrics, though now I never wish to see it again! To finish the edge I turned a hem and then caught across it in the first row of a crocheted edging to keep it secure. The originals seem to have been made in a wide range of sizes, fabric and colours – coarse and dark for workers, finer and more ornate for the ladies, so it seemed quite safe to improvise a little. Having the longest side of the triangle on the cross grain of the fabric did make life a little exciting – the muslin is quite loosely woven so pulled and rolled out of shape. The crochet edging seems to have stabilised this and inspite of the excessive moaning was not difficult nor take long. It is a single crochet into the scarf, chain 4, and repeat every half centimetre. Row 2 is merely single into the chain loop of the row below, chain 5,and repeat. I did try all sorts of designs of various complexity but this gave a neat edge with minimum fuss.


Overall - an enjoyable foray into the 18th Century, frustrating, time consuming, deeply annoying. But enjoyable. There are many errors still to address but I would look forward to tackling them rather than sob into my soup and consider emigration. A full sack back gown perhaps?  It will join the growing list Of Things I want To Make... Seeing the ensemble together is strangely satisfying - something to be learnt there I think - but next task......  is already underway.
 
It is experimental, uses builders' grade and a hair drier - at the same time.
 Should have it done for next week's post, if I manage to recapture the scissors by then.
 

Wednesday, 18 December 2013

watercolour inches and apologies

sorry folks - again no sewing to share this week -
the trouble with making Christmas presents is the time  it all takes - oh, I'll just add this or that little detail, 'just' adds an hour or two each time. Or three. And I can't share the trials, tribulations and triumphs here because I want the pressies to be as much of a surprise as possible!  Definitely not winning this week.

I am stacking up a couple of sewing tasks to do  over the holiday while the rest of the family is snoozing or on mobiles or watching Dr Who, so should have some work done to show soon. Item one  already cut out and ready to sew is a petticoat to go with the 18th Century pet en l'air and caraco. They look MOST odd with the skirts flaring out over the bum rolls on Gwen or even odder when sadly drooping without them (see the caraco post). The  skirt I photographed the pet with was a confection of pins and recreational violence (apologies to Gwen )  so it is time to make one properly. It won't be fancy - not quilted or flounced,  just knife pleats at the waist and fastened with the tapes used to finish the top edge.


I've even taken a bit of a break from the portraits. Shock, horror! Been totally immersed in doing inches - literally. These are tiny paintings measuring about an inch square. It began with wanting to practice different fabric surfaces and sewing details but is threatening to expand drastically, The fabric details are so good to do, lots of texture, delicate tone and colours, and the different shines and patterns are a great challenge. The watercolours are difficult at this scale - I want to let them run and enjoy themselves but it becomes a soggy blob too quickly, so restraint and precision (within reason) is required. Oddly the worst trap is trying to be too precise -  the most controlled ones I don't like at all - they are too hard edged and photographic. The painting techniques are shifting all the time as well, some inches are built up with layer on layer of transparent colour while others are more like gouache, opaque mixed colours, and others are just bullied until they give in and begin to look something like.  Having worked through one scrap fabric bag do I start on the next? should I do inches to chart the journey up the stairs to fetch it? I'm already starting on a journey across the work table- tape measure, binding offcuts, pencil sharpenings, paint box, papers, lunch......  the trouble with this is that nothing stays still long enough.......


Sunday, 8 December 2013

Gwen travels back in time -

Considering that I was interested in Regency costume  pet en l'airs and now a caraco are an aberration. These jackets were common wear in the mid 18th century but were sadly outmoded by the turn of the century when the Neo Classical was all the rage.  Mine was based on the example from Snowshill again used by Janet Arnold and Nancy Bradbury. It is not a complicated design = no shaping to the front, the underarm seam is a dart  and the back  panel is cut in 2 with the pleats in the skirt following down from the seams, a gusset giving extra fullness at the base of the underarm dart. The cuffs are lined and winged. Simple! 
I'm sure it should have been but again the pattern had to be Gwenned. I should be good at this by now! I am beginning to believe more firmly in the need for a basic block pattern for each era rather than scaling up from the original each time. Perhaps by next post I will believe strongly enough to have done something about it.
It was good to be doing a tailored back, even though I had to piece the fabric to make the 2 centre back panels. The extra seams are at the waist so do not look out of place. Understanding the fit was a problem. The National Trust photographs the garment as an artefact rather than a piece of clothing  and each of the other extant examples I found seem to be variations on a theme! Some were very much more intricate, shorter, longer, decorated and plain, some, en ferreau, some sack backed and others tailored! I was as faithful to the original as possible but don't think I got the underarm dart right. This became a seam and is too upright  you can see the pull to the bust, it should be angled  forward from the arm hole which would move the gusset  more to the front.

loved the back details and naturally flirty skirt!
 The flare on the skirt has had tantrums, the top and lining fabrics argued, especially at the gusset ( the triangular insert over the hip). A lot worked out when I gave Gwen real hip rolls. The pleats immediately became flirty rather than droopy!  The real pain has been the front neck line, the angle to the shoulder wasn't quite right  and it has a tendency to gape just a little. Neither the lining nor the top did this but together they made trouble. The sleeves were inspired by this poor behaviour - these are fitting no. 4. They are in and sewn and I don't intend there to be no.5.  
I had thought it would be longer from the illustrations in Patterns of Fashion,  but then I wouldn't have been able to fit it on the remnant of fabric at all. The proportions look awkward - I did have to redraw the waist lower by about an inch, so there is more body than skirt compared to the original. ( don't think anyone will know if I don't tell them)The winged cuffs were also a new thing and quite fun to do. It is a lined tube, pleated on the front and then sewn to the sleeve. The cuff is wider than the sleeve which gives the 'wing'.  I had to do the top fabric in 2 parts so they are a little stiffer and more awkward than they should be.

Not entirely happy with this. I am expecting more now, very little margin of error allowed. The flat lined garments look much smoother at the seams and the fitting is easier. This was started as 2 garments and then joined at the front and neck and then the side dart put in holding the two together.


Snowshill caraco,  National Trust
met museum. Dutch.
The 2 extant garments provided the shapes and form I was aiming for. The Snowshill one was the inspiration right from the word go but the Met museum one showed a similar robe in the round. The neckline is scandalous, obviously (hopefully)  there was an undergarment or a well pinned kerchief to preserve some modestly (and prevent chest colds). The sleeves are a little longer, without cuffs, but  I tried to get them to hang in the same way.  It does have the gusset, similar problems under the arm. The skirt is longer and more shaped, the pleats give the back a bit of a kick but not to same degree as mine. Perhaps I should have pressed the pleats in more aggressively.


Distractions - Gwen2  the clone- resurfacing and tidying, Christmas decorations, drawing and painting. Now reading about the Fairfax family of York. Have also put my drawings and paintings of these costumes onto a page - tab is at the top -


Tuesday, 3 December 2013

new Gwens and painting


Gwen 2- A Clone Drone.


For some brilliant reason I woke one morning, leapt out of bed and encased Gwen in layers of clingfilm, PVA soaked fabric and then paper – all before breakfast.

Shame I can't remember why it was so important to do, I hadn't planned it at all. The process was fun enough and simple enough but had I thought about drying time?

Photo one is Tuesday. Photo 2 is Thursday. Still drying on Saturday. I've taken the body cast off her and resealed it and guess what? - waiting for it to dry. I've also made a paper cast of a dinky body form to experiment with – it is still drying too. I have headless bodies dotted round the house hogging the radiators.... why does this make me want to put Christmas decorations up?


This brought nearly everything to a halt- difficult to drape and fit without a model to drape on and fit to. Never mind. It has been a finishing and resolving week. The velvet purple spencer has been revamped, some hems redone and illustrations, notes and pattern pieces put together. Instead of total chaos taking over the house it is now organised total chaos and coordinated heaps of things. Can't spot the difference. I've roughed out a caraco to use up the scraps from the blue rose fabric and hope to complete that this coming week once a Gwen is free. The illustration below shows what it should be like (hope).


In the meantime it's been research, paint and draw. I now know what Marie Antoinette wore to the Revolution – fascinating book but still feeling rather ambiguous about her ( felt sorrier for the husband!). The ideas of clothing as a visible statement of status, personal attitudes and political allegiance are still commonplace and mainstream, but it was interesting. Still not sure whether it was the choice of clothing or the attitudes leading to the choices that are important. She did seem to give a lot of ammunition to her enemies with many of the things she did.

Compared to the current book this was light entertainment. Having read some of the 'Ackermann's Repository's on Google books (thank you for the free downloads!!) I desperately need more background. I'm on page 12 (again) of a weighty tome– and there may stay – it's discussing the underlying shifts in philosophy and attitudes that led to the Neo Classical revival and Romanticism – apparently it wasn't just finding Pompeii and all those Grand Tours. The posts on Google+ in the Regency and general history communities are excellent at providing snapshots of key people and places but stitching these snippets into a broader understanding of the era is taking time.


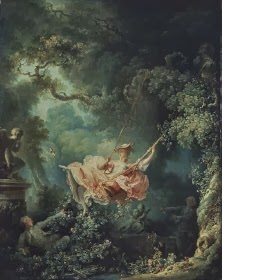
Fragonard the swing
As light relief more illustrations – new artists to trace down and try to remember, and as usual the more I look the less it seems I know. I was brought up with the formal portraits, but there are so many styles, some looking back, some looking forward.
While admiring the skill and drama of the formal, (Gainsborough's country house portraits of tall figures who tower above you in all of their finery, or of starchy court paintings,)
http://www.ibiblio.org/wm/paint/auth/fragonard/reader.jpg I am a creature of the 20th and 21st centuries so find the sketchy, the domestic, the intimate and informal more fascinating. Some the pastel or pencil studies are exquisite – they show more of the artist's thought and working practice in response to the subject before the layers of fashion and style take over. Looking at Fragonard's body of work is an education in itself – the fanciful, mannered and playful Rococo pieces to the more sober, bolder observation of paintings such as “young girl reading”. It is so easy to dismiss artists if the style of work is not fashionable any more but that just means we judge on trends and presentation expected of their time and not on skills and content.

Of course there are problems, dating the painting, attributing work – just take a look at John Copley's listing on BBC paintings - some the handling is so skilful and on others so clumsy. The same face reappears on different bodies. Even within the one painting the quality can be radically different. Some studios did have specialists to do various parts of a painting such as the clothing ( my dream job, if anyone needs one just ask!) or hands, and sometimes students filled in the unimportant bits, but there should be a consistency of standard. Of course I don't know which works were of a commercial standard and which may have been rejected and stayed in the studio or reworked and sold on. Some may have been retouched or repaired and this is not recorded on most sources.
paul SandbyPaul Sandby

Using portraits to help with understanding the clothing isn't helped by the artists having a stock of costumes which appear on a variety of patrons over the years. A serious draw back as I've been using them to match hair and accessories to dress styles as well as dress to artistic style! Oops? But at least it makes it very clear where the traditions for the school photo poses come from!