Tuesday 19 November 2013


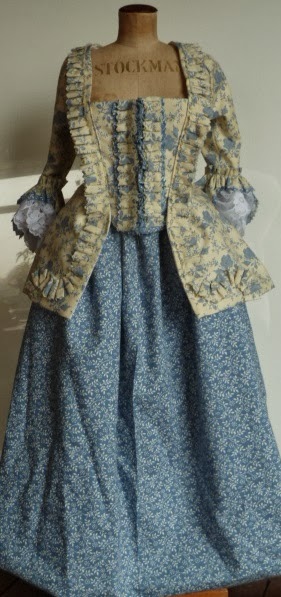
Meet the completed pet en l'air. This has been a week of traumas, obsessive sewing and happy painting.

As usual the simple task list hid hours of work.


Task one – sleeves. Made up sleeve-1 as per pattern – did not fit to the robings as shown on the Arnold drawing and stuck straight out like a penguin.. They would do for fitted sleeves but needed greater length between the bottom of the arm hole and the head plus more width at the head because of the lengthening of the front bodice. There was  sleeve-2, and sleeve-3. I wasn't sure about the fullness at the top of the arm but many portraits show a looseness there, so it will stay. The arm is set back and angles backward rather than hanging straight ( better than the first Pingu attempts). I have been assured that this is right but it still looks strange to me –truly need a real Gwendoline to see how this works.

After sleeve trauma came flounce-gate. Having been out and bought contrast fabric for lining the flounce and then made them and attached them, I decided the bulk of fabric in the fine gathers at the cuff looked clumsy and awkward. Hmm. Then salvation through the post – Fashion History arrived showing details of the Kyoto Institute collection – lots of raw pinked edges! Did get a little carried away, well a lot carried away. It took several days of looking and pondering before giving in (time for the perforated finger ends to heal- sewing the flounces on had been a pig of a job) Off came the flounces, unpicked and pinked and reattached with the lining now dropped slightly and facing outward.

  Much happier with the results and a quick lace ruffle put in to complete the look. In the mean time furbelow fever struck – Not on the original design at all but having seen so many examples it seemed silly not to try. Bye bye to Wednesday. These are 2cm wide strips with 1cm box pleats meeting nearly edge to edge down the length of the strip. Huge lengths had to be pinked, measured and sewn and then attached but it was strangely compelling. I had intended to add just two strips either side of the centre front on the stomacher…... not down the entire front but...
and then just had to try doing curling flourishes at the hem. I still think of these as moustachios.

It has changed the nature of the garment – it was quite plain and clean with a clarity about the construction, but now is fluffy and fussy.  I still quite like it, but that was Thursday gone as well!

Final finishing – the hem and redoing the sleeve flounces and that was Saturday. DONE.


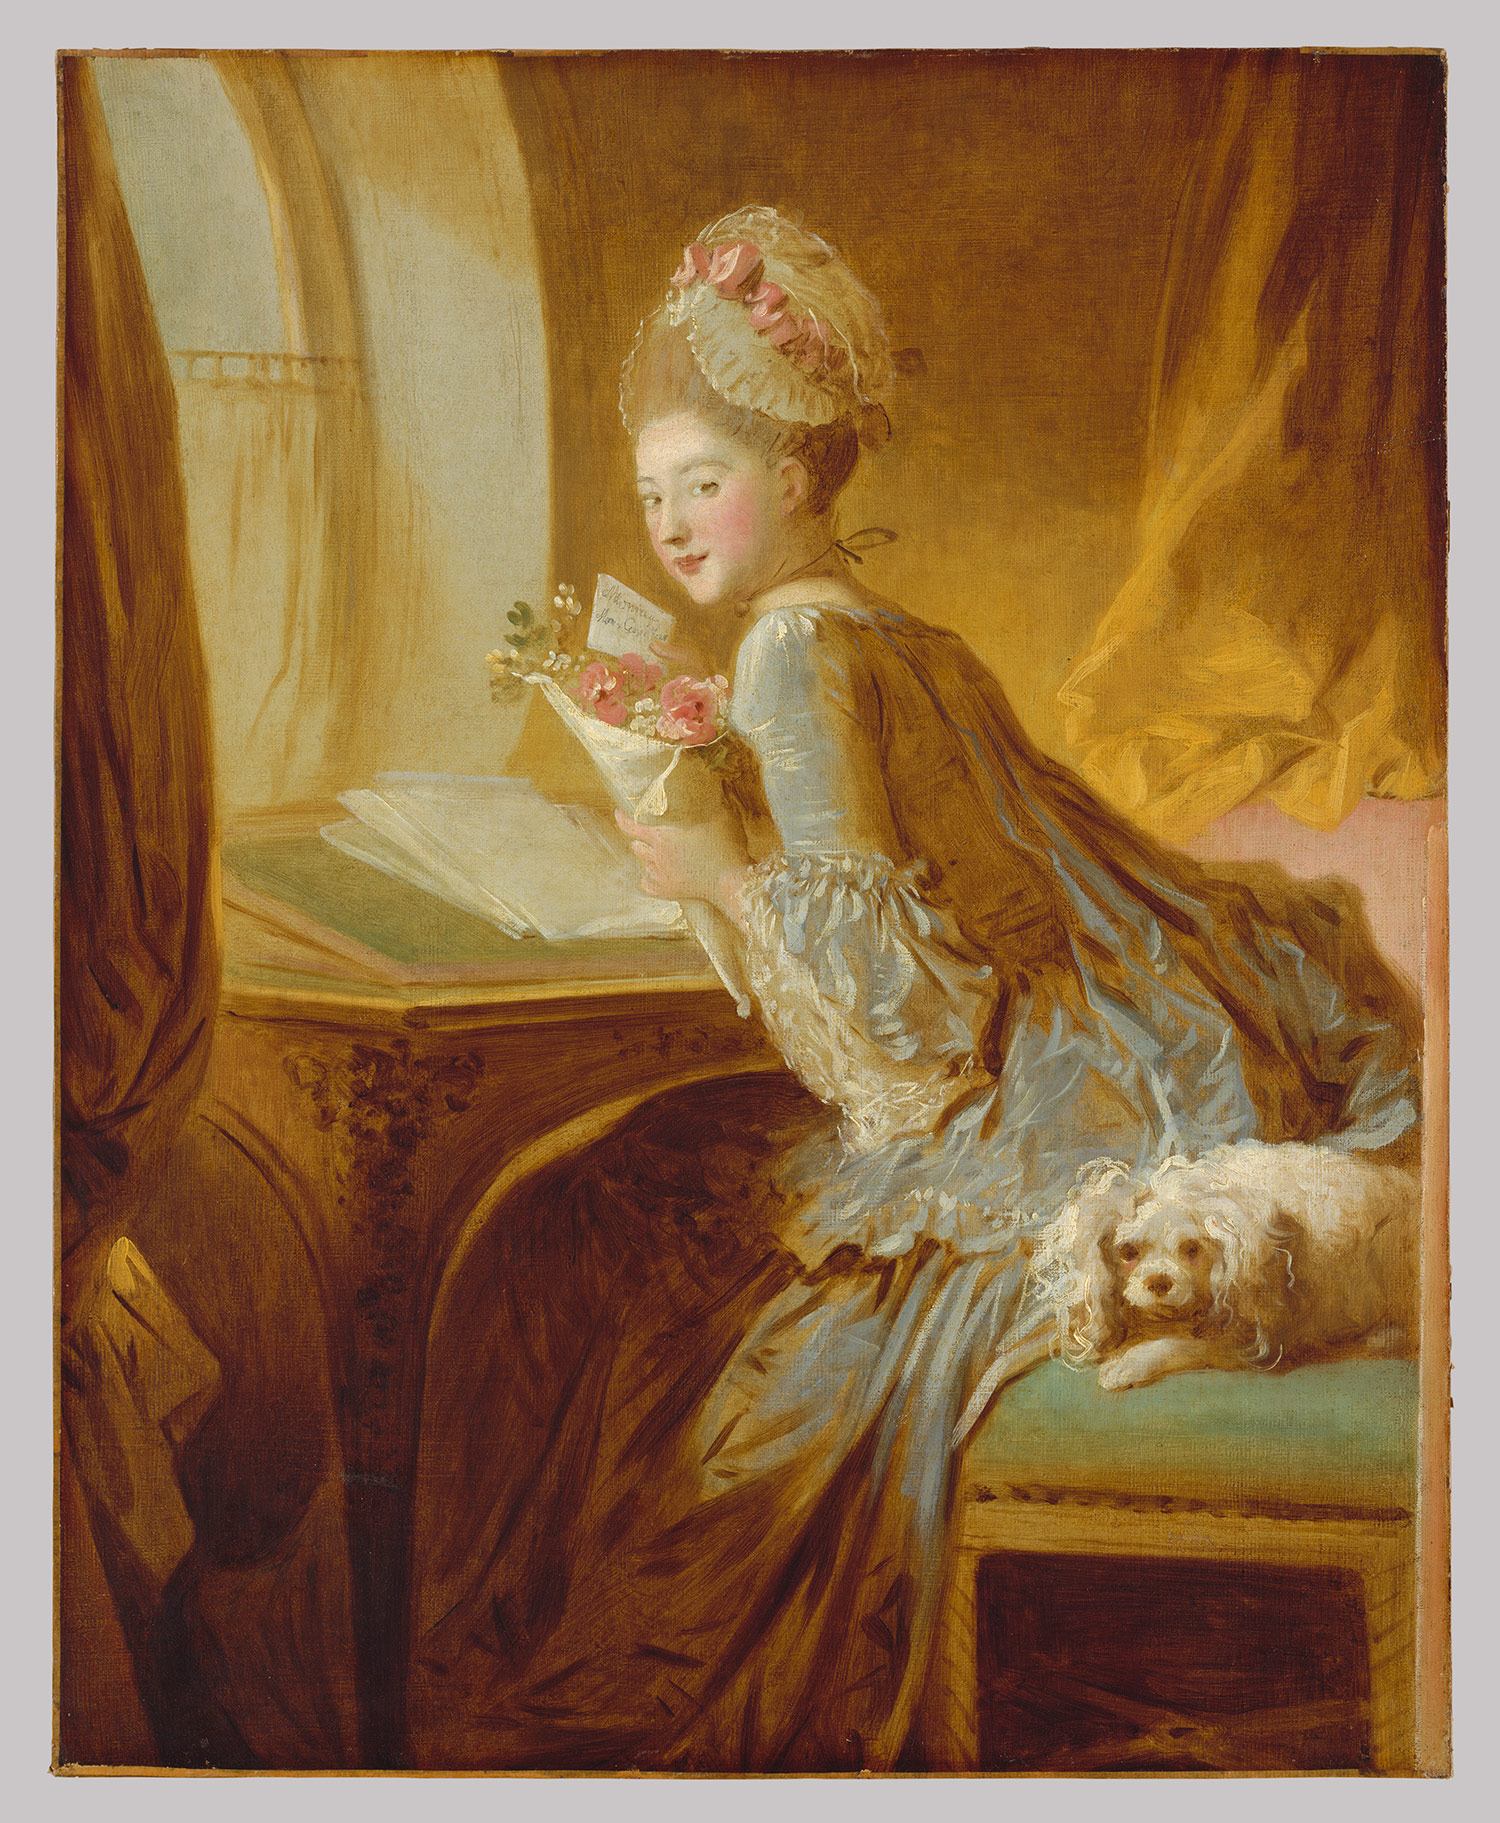
Fragonard - the Love Letter. Met Museum
nattier 1750nattier
This has been a great adventure – painful at times but rewarding. The research has gobbled up hours – trawling for 18thC painters has introduced many new names to explore and reintroduce old favourite pieces. I was expecting rigid, theatrical, formalised portraits with grandiose dresses, silks, flying ribbons and romantic notions of settings and did find lots of them. Considering the highly mannered style of the Rococo some of the portraits are definitely modern in their boldness and direct use of colour and composition. I still have trouble dating  some paintings - the dates of the sitter are given but not that of the artwork, a real menace especially when artists used their own collection of garments over many years to pose their models in. Jacquet !
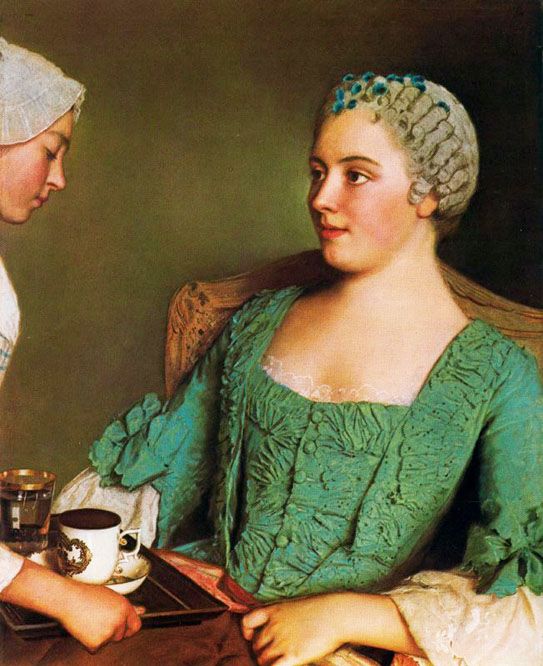
liotard 1754Liotard 1754
I've also been reading “Queen of Fashion – what Marie Antoinette wore to the Revolution” by Caroline Weber. Very different attitudes to the significance of dress. The rigid stratification of society up held by distinctions in dress code, I had known about this but not the extreme importance it seems to be given in the breakdown of the ancien regime. Were the experiments in new dress modes responsible for, or merely a symptom of new ideas? Was it the new that caused the conflict or the determined adherence to the old?


And of course I've been illustrating – an interior, seated pose to reflect the pet's informal nature.
Lacking anyone daft enough to pose for me I have had to borrow bits of myself to help – so no elegant young romantic writing love letters – just me with a drawing board or table. I love artistic license – bye to the wrinkly bits – a very cheap face lift! Promise she does look happier in close ups. It is a love doing the fabric. Does any else want paintings of cloth? Some court portraitists hired specialists to paint in the clothes - does an opening still exist do you think?

Sunday 10 November 2013

18th Century jacket - pet en l'air.


And this week's challenge – a pet en l'air (pet en l'eir?). I think the direct translation is somewhat rude but to me it is a sack back jacket from the 1700s, a kind of short version of an open robe, or robe a la Francaise.  Think Watteau, think Thos. Gainsborough. This was an informal garment, worn at home, so when finding portraits I've looked for full gowns showing the volume of fabric at the back and the fitting at the front.
Watteau studies - just how much fabric! Shall we play guess the weight?
Gainsborough - Viscountess Tracey


Gainsborough, Miss Theodosia Magill
 The one I am making is based on one from the Snowshill Manor collection dated 1745-55,  described and drawn by both Janet Arnold and Nancy Bradbury. It is made in silk with a linen lining and probably worn with a kerchief to fill in the neckline.

Drawing from Janet Arnold, Patterns of Fashion. The painting above is the one cited by Bradbury - Upton House NT.


  Again it is made to fit Gwendoline, the little model, so every inch on the pattern becomes a centimetre- there will have to be other tweaks and adjustments but the Arnold diagrams will provide the basic shapes.
 I am using a printed cotton - quite fine in texture, too much of a coward for silk or satin at this stage of the learning curve.
 There are several extant examples documented and similar jackets seem to have many different names - on some the front closes, others the stomacher is pinned in as a temporary closure, the back pleats can be sewn in or sewn in part rather than hanging from the neck line. This caraco is from the Met. and although the detail may be different it does give an idea of the garment and the size of padding needed to get Gwen up to speed! I do get everso confused by all these names - I think I understand what a caraco is, a casaquin, a pierrot , and then..... Never mind - the embroidery is exquisite and that row of buttons!


met museum. caraco. 
– Even with 2 sources to glean information from I had no idea how this garment worked. Unpicking happened often. And again Gwen's shape has caused some major headaches- she has a wide flat torso, little hips and a long smooth waist, nothing like the kind of corseted shape shown in the contemporary paintings. I have tried to be as faithful as I can to the original – give and take a bit (quite a big bit in places).  The pattern had to be extended  to fit around

her and the upper front elongated.  The fabric is in two halves – joined at the centre back , with a major amount of pleating on the hip and back and the front bodice extends over the shoulder to meet the back.. What did become obvious as I tried to put this together is the importance of the lining in creating the base for the top fabric to hang from. There is a lot of fabric there - Gwen is 16cm across the shoulders - one half of the top fabric is over 50cm.  Janet Arnold described the parts being made up as one as far as the centre back, so that is what I did, but the lining back has to fit snugly to give shape to the bodice front and shoulder as well as to support the pleats. So undo the flat lining and fit the back bodice together – re-attach top fabric so there was something to hang the pleats onto. Working without a centre front was also difficult - trying the garment on Gwen seemed to give a different fit each time, and with the top and lining together of course they behaved differently again. To stabilise it the false front was made up and fitted as shown. Chickened out of doing the tab fronts from the original jacket and treated it as a solid piece with hooks and eyes to fasten at centre front just to make fitting easier. Considering how the parts were made and all that had to be done was to sew it together neatly the length of time taken seems huge- 2 hours! The side seams were extended an inch to fit Gwen more snugly but then there should be hoops or at least a large bum pad to hold the skirts out from the body which will alter the shape completely - can't win!


Next steps – sleeves, ruffles, hem, decoration.

The arm holes seem to have migrated backward  but I left a lot of spare fabric when cutting out so should not be too difficult to re- establish. I am looking forward to the sleeve - it is such a different shape. The pleats at the head should give a little leeway but....
A the real reason for putting myself through this torture ? Want to make the ruffles, I want to flounce. Already thinking through and planning...... are they lined - self or linen? or hemmed ? Do-able at this scale? Hours of fun to moan about next post.

 
 I've put in some of the useful sources/blogs etc. To be honest there is a lot of very good stuff out there- these are only a tiny tip of the proverbial iceberg.
 http://brocadegoddess.wordpress.com/pet-en-lair/   does a much better job of making than I have!
 http://www.marquise.de/en/index.html
http://americanduchess.blogspot.co.uk/2010/10/costume-analytics-1770-80-chintz-caraco.html

and of course - Janet Arnold -Patterns of Fashion 1 p28-30, Nancy Bradbury - Costume in Detail p19 National Trust - Snowshill collection.
BBC paintings, Met Museum, and Museum of London.

Sunday 3 November 2013


Fisherwomen project – just about done


The purpose of the task was to try out working from existing garments, find out what information was needed, what was important, and how this could be translated into a Gwendoline costume.

Stephen's loan of the costume from the “Women's Voices” project was inspired.

Task 1 examine and record garments, drawing, measuring, noting details and guessing at construction methods. Learnt under duress  the need to be very methodical and precise.


Task 2 – look for contemporary images, artefacts, sources – comparing to and looking for contextual background. This was far more time consuming than expected. - internet is great but it still takes time – finding images on google wasn't enough – paintings had to be credited and checked against the photographic records. Both have drawbacks , the “naturalistic” poses, the romantic visions, the selective subjects, but both gave a lot of information about how such garments were worn, by whom and idea of when. It did feel a bit like cheating knowing that the costume was based on Sutcliffe's photographs and having some knowledge of the Staithes group of painters. But I have found new, interesting artists and learnt a lot more about the fishing industry and the communities dependant on it. At times the lack of detailed information on the web is frustrating- pinterest images which have lost their origins, undated paintings, uncredited photographs. A lot is available in blog posts but it is hard to judge the quality of information and whether it is sourced fact or opinion. Part of this task was creating my own images-illustrations really- trying to imagine how the garments I had could have been worn. I am a visual being, so seeing made the necessary connection between what I was touching and the research I was compiling and reading.

Task 3 – Reconstructing the garments.


This was supposed to be the fun bit. Referenced Janet Arnold's books and other records to compare with other contemporary garments and to check my own observations with her far more informed and experienced notes! I redid the measurements and took a whole lot more to create pattern pieces and fitted them to Gwendoline. Oh dear -Gwen is only human-ish so quite a bit of adjustment was required. Marking the seams on her and fitting to them saved my sanity a few times. Following the original as closely as possible Gwen's version was put together, darts, boning casing, flat lining and then seams. The reduction in scale has caused the usual additional problems- and yes, I did end up using some thin but fairly rigid plastic packaging for the boning – and no, still haven't put the roller blind up. Fastenings are becoming a real headache – reducing the scale of buttonholes was unexpectedly problematic– the length shrinks to match the button but the width can not reduce beyond a certain point or it just doesn't hold the fabric edge. This is obvious now, but had to be learnt the hard way. I ended up working them by hand to cover the chewed edges and they look far too clumsy( take glasses off and stand back – they look fine!). I guess doing small scale detail on a fabric that frays at full scale was always a poor idea. The other bright idea – inserting plastic boning of unknown parentage – wonderful until I had to press the jacket! The next not really seen problem was the centre front opening – I was concerned about the buttons being too big visually but the real issue was the amount of allowance needed for the holes. The overlap is giant scale against the rest – it would cover the first dart on the opposite front if I let it. So no resolution yet – still questioning whether to try it, to find a new source for mini buttons, or to cheat and surface mount the row of buttons and have hooks and eyes underneath.

Oh well.


Do you like the background? a bit Wuthering  - an old painting of N Yorks Moors but it seemed appropriate for a Whitby based project. And of course I like the back best.

The project is just about done – some tidying round required. Sorting the button issue is the most obvious thing but I would like to redo and improve some of the paintings – I have to decide exactly what I want from them – they suffer from a lack of clarity of purpose and expectation. When all is complete I will condense all of the Fisherwomen posts into a summary page and attach. It has been an interesting and enlightening process – the amount and level of detailed notes needed was an eye opener – working downstairs and having the costume upstairs became my fitness regime. There is a huge difference between information used for looking and recording and what is needed for making!